new LS-II build
- peuge73
- Approved Member
- Posts: 126
- Joined: Thu Mar 12, 2009 1:22 pm
- Location: bourg de péage, France
- Been thanked: 1 time
Re: new LS-II build
Be sure I will follow this one carefully...a lot of things still to learn on this car.
Just one thing: is it possible that I get a fine scan of your stickers ????? PM me if possible (it would be great).
local club president, but also family team manager - mecanic - official sponsor, and some times cruising my RC cars......YES!!!!!!!!!!
http://www.bmvrc.com/
-
- Approved Member
- Posts: 243
- Joined: Wed Nov 11, 2009 5:41 pm
- Location: NJ
- Been thanked: 3 times
Re: new LS-II build
It would be my pleasure to scan the decals.............If only I knew what that meant and how to do it. I'll have to get the wife involved for that. I'm not the most computer savvy person out there.
- peuge73
- Approved Member
- Posts: 126
- Joined: Thu Mar 12, 2009 1:22 pm
- Location: bourg de péage, France
- Been thanked: 1 time
Re: new LS-II build
OK, I will open my topic next WE! It will be about a kind of Eagle LS OIN... I let you imagine until next week.harry697 wrote:It would be my pleasure to scan the decals.............If only I knew what that meant and how to do it.
A racer car that you surely have seen in some topics all around there.
But please, let's focus on your build now.
local club president, but also family team manager - mecanic - official sponsor, and some times cruising my RC cars......YES!!!!!!!!!!
http://www.bmvrc.com/
-
- Approved Member
- Posts: 243
- Joined: Wed Nov 11, 2009 5:41 pm
- Location: NJ
- Been thanked: 3 times
Re: new LS-II build
On to the build!
This kit is all brand new in sealed packages, but some parts were missing. One of the major things missing was the entire transmission. No worries though as I already had the majority of what was needed to complete the build. All new in packages of course. The manual starts with assembling the differential. Pretty straight forward.
The diff came with quite a few extra parts and the instructions kinda lean towards it being an upgrade part for the Eagle or Bullet. Now that's old school!
Some trusty AE diff lube and black grease and about 30 minutes of my time and the diff is ready to go. For some reason the diff didn't come with any lubes for the balls or thrust bearing.
-
- Approved Member
- Posts: 243
- Joined: Wed Nov 11, 2009 5:41 pm
- Location: NJ
- Been thanked: 3 times
Re: new LS-II build
Time to assemble the trans. Had to purchase a few items here. I had all the hard to find stuff, just needed the top shaft and gear from the LHS.
I forgot that the older style top shaft doesn't come with the roll pin pre-installed. What a fun job that was.
Even had the era-correct header for the washers to shim the trans. Took me several trial assemblies to get the assembly shimmed properly. Trans is very smooth with no slop and no binding.
The only piece on this truck that I can't consider brand new is the motor plate. It really is new but there are two very light marks where a motor had been bolted to it at some point. Aside from that, not a scratch or defet anywhere. Matter of fact, I can safely say the plate has never been used because the motor guard actually had a hole that was drilled but not threaded. It was the hole that attached the motor guard to the motor plate, so there's no way it could have been used. The missing threads stalled the build until I got my hands on a 3mm tap. That was the first of many road blocks I've run into just while assembling the rear end. Hopefully the rest of the build goes a lot smoother than the trans assembly.
I should also mention that this is the first time I've built a Traxxas vehicle by following a manual since back in 1991 when I got my first new Blue Eagle. I've built a ton of these trucks over the years just by memory and I've found some steps in the manual that I decided would be better done in a slightly different order. First thing I did different than the manual suggested was the slipper. In the manual, it tells you to install the slipper and spur assembly, along with the gear cover before mounting the trans to the chassis. I decided to leave the slipper off until the trans was mounted because once you install the spur gear, you can't access the screw that attaches the motor plate to the motor guard. If you tighten this screw first, it makes it harder to line up the two holes that attach the motor guard to the chassis plate. After seeing this in the manual, it kinda made sense to me why those holes in the guard are stripped out so often.
Re: new LS-II build
harry697 wrote:the screw that attaches the motor plate to the motor guard. If you tighten this screw first, it makes it harder to line up the two holes that attach the motor guard to the chassis plate. After seeing this in the manual, it kinda made sense to me why those holes in the guard are stripped out so often.
Cool build Harry, and this is correct^
You going to do a box paint job?
- dave00beer
- Approved Member
- Posts: 169
- Joined: Sat Jan 01, 2011 12:58 am
- Location: Sterling Heights, MI.
- Has thanked: 9 times
- Been thanked: 2 times
-
- Approved Member
- Posts: 243
- Joined: Wed Nov 11, 2009 5:41 pm
- Location: NJ
- Been thanked: 3 times
Re: new LS-II build
BMKTW2 wrote:harry697 wrote:the screw that attaches the motor plate to the motor guard. If you tighten this screw first, it makes it harder to line up the two holes that attach the motor guard to the chassis plate. After seeing this in the manual, it kinda made sense to me why those holes in the guard are stripped out so often.
Cool build Harry, and this is correct^
You going to do a box paint job?
According to the manual, you're supposed to tighten the countersink phillips screw (in the last pic I posted) before installing the spur, motor, and gear cover. This is all done with the trans out of the truck. Problem is, if you tighten that screw, it makes it much harder to align the motor guard to the chassis. Not only does it twist the motor guard a little when tightened, but it also makes it darn near impossible to pivot the motor guard when trying to line it up to the lower chassis plate. I installed the trans to the chassis, then gave a final snug on the screw that joins the plate and guard. Then installed the spur assembly once the trans was mounted. Made it much easier to get the screws started straight into the aluminum.
As for the body, I haven't gave it much thought yet. Probably leave it un-trimmed and un-painted for now. The box art job isn't the most complicated, but does take some patience. I did that on my last LS-II (still regret selling it).
-
- Approved Member
- Posts: 243
- Joined: Wed Nov 11, 2009 5:41 pm
- Location: NJ
- Been thanked: 3 times
Re: new LS-II build
Well, I just remembered that the motor guard not being threaded on the one mount was not the first issue I ran into with this truck. As you can see, I opened a brand new pair of transmission cases. The cases come with the idler gear shaft. Turns out when I tried to install the idler on the shaft, it was a no-go. The idler shaft seemed to be a hair too thick. Probably would have went if I "pressed" the issue but I know it wasn't right. Grabbed another new out-of-package case and it was the same issue. I even tried a bunch of different bearings and none would slide onto either idler shaft. I ended up using an idler shaft from a Rustler/Bandit/Slash trans and it worked perfect. Hard to believe I got two defective idler shafts in a row. Maybe there was a bad run of them BITD???? I have several Blue Eagle transmissions assembled on different trucks and this is the first time I've encountered an issue like this. Oh well, it's all good now.
So, to this point, I ran into a bad idler shaft and a motor guard that wasn't finished. Unfortunately it's not the last issue with this build so far. Too bad it's something like 20 years old cuz I'm sure calling Traxxas and complaining wouldn't help at this point.
-
- Approved Member
- Posts: 243
- Joined: Wed Nov 11, 2009 5:41 pm
- Location: NJ
- Been thanked: 3 times
Re: new LS-II build
A little more progress:
Trans assembly completed and ready to install:
Fresh graphite!!!!!!
Aside from the entire trans and bulkhead missing from the kit, it's also missing the hardware bag. Apparently the hardware bag also contained all the hinge pins, links, and rod ends. Fortunately between my personal inventory, some ebay finds, and LS inventory, I managed to find everything I need (at least I think). I feel like I got a good deal on the kit, but it's really starting to nickel and dime me.
Now for the third issue with this kit. Somebody must have been hitting the bottle or possibly the pipe when packaging this thing. Here's a sealed bag with the rear hubs and arm mounts. See anything wrong with this pic?
That's right. Three arm mounts and one hub carrier. WTF?!?!?!?!
There is no mention of the anti-squat wedges in the manual whatsoever. Yet, there are 1.5 and 3 degree wedges included. Best part is, both sets were packaged with two entirely different bags of parts. Anyway, I went with the 1.5's.
Installed. Which brings me to yet another issue. Strangest one I've seen yet. When I installed the new gear cover, it rubs against the output yoke. Perhaps rub isn't the best description. It is actually so tight against the yoke that the right drive shaft won't spin at all. This one has me baffled. Could it be a defective gear cover? I can't even count how many of these trucks I've owned over the years and have never seen anything like this before. Heck, I even ran Rustler VXL gear covers on my SRT's and didn't have any problems like this. I'll have to mess with it some more later.
Re: new LS-II build
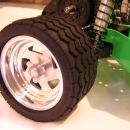
I've always used the medium spacers on those rear turnbuckles. It gives more clearance with the gear cover. Might be causing the cover to egg shape and go into the outdrive iono
Cool build so far!
Re: new LS-II build
harry697 wrote: According to the manual, you're supposed to tighten the countersink phillips screw (in the last pic I posted) before installing the spur, motor, and gear cover. This is all done with the trans out of the truck. Problem is, if you tighten that screw, it makes it much harder to align the motor guard to the chassis. Not only does it twist the motor guard a little when tightened, but it also makes it darn near impossible to pivot the motor guard when trying to line it up to the lower chassis plate. I installed the trans to the chassis, then gave a final snug on the screw that joins the plate and guard. Then installed the spur assembly once the trans was mounted. Made it much easier to get the screws started straight into the aluminum.
I bolt the motor guard on the chassis first thing and never take it off the chassis. The trans bolts down and then you push the ear on the gaurd to meet the mount and it never strips the threads.
- dave00beer
- Approved Member
- Posts: 169
- Joined: Sat Jan 01, 2011 12:58 am
- Location: Sterling Heights, MI.
- Has thanked: 9 times
- Been thanked: 2 times
Re: new LS-II build
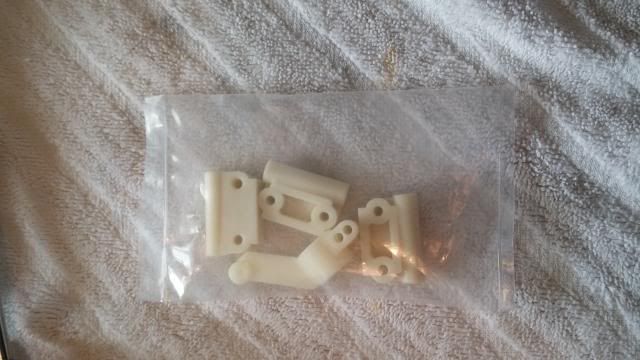
Man thats crazy!harry697 wrote:Three arm mounts and one hub carrier. WTF?!?!?!?!
Yeah let alone, theres probably only a handful of support guys that would actually know of a LS-IIharry697 wrote:Too bad it's something like 20 years old cuz I'm sure calling Traxxas and complaining wouldn't help at this point.
Either way cool build forsure, I'm sure you will work through the small bugs. Can I assume a shelfer, or will this see the ground?
- Lonestar
- Approved Member
- Posts: 4270
- Joined: Wed Dec 12, 2007 5:17 am
- Location: Switzerland, yannow, in Europe (or almost)
- Has thanked: 626 times
- Been thanked: 166 times
Re: new LS-II build
what a cool build!!!
the 3+1 thing is hilarious... as long as it happens to others
Paul
the 3+1 thing is hilarious... as long as it happens to others
Paul
AE RC10 - Made In The Eighties, Loved By The Ladies.
Blue Was Better - now, Blue Is Bankrupt.
Facebook affiliate program manager: "They go out and find the morons for me".
Life is short. Waste it wisely.
Blue Was Better - now, Blue Is Bankrupt.
Facebook affiliate program manager: "They go out and find the morons for me".
Life is short. Waste it wisely.
Create an account or sign in to join the discussion
You need to be a member in order to post a reply
Create an account
Not a member? register to join our community
Members can start their own topics & subscribe to topics
It’s free and only takes a minute
Sign in
-
- Similar Topics
- Replies
- Views
- Last post
-
- 100 Replies
- 15456 Views
-
Last post by DerbyDan
-
- 20 Replies
- 3991 Views
-
Last post by DFaultXEX
-
- 10 Replies
- 1296 Views
-
Last post by Lonestar
-
- 20 Replies
- 2674 Views
-
Last post by treehugger
-
- 9 Replies
- 2212 Views
-
Last post by 59burst
-
- 26 Replies
- 2384 Views
-
Last post by RC10resto
-
- 17 Replies
- 2196 Views
-
Last post by KyoshoScorpionKid
-
- 23 Replies
- 3258 Views
-
Last post by sbednara
Who is online
Users browsing this forum: No registered users and 8 guests