Page 2 of 3
Re: Finman's Losi JRX2
Posted: Sun Mar 23, 2014 1:24 pm
by finman
Received the ceramic balls for the diff, so that's now rebulit using Associated diff lube and black grease. Not super smooth but miles better than it was.
Also decided fit a slipper as per LosiXXkid
http://www.rc10talk.com/viewtopic.php?f=27&t=33592#p364461. Got the parts coming from all over the world, so a bit more waiting!!
While waiting for parts to arrive, I've had a go at the chassis with its extra holes and scratches.
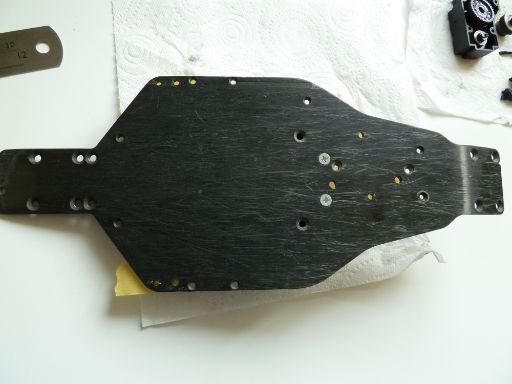
Put some masking tape on the top side of the chassis to contain the epoxy resin.

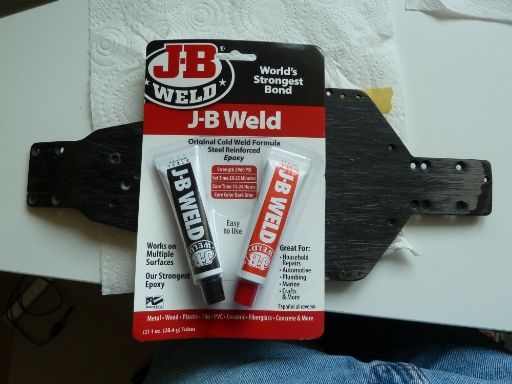
Mixed up and applied liberally!
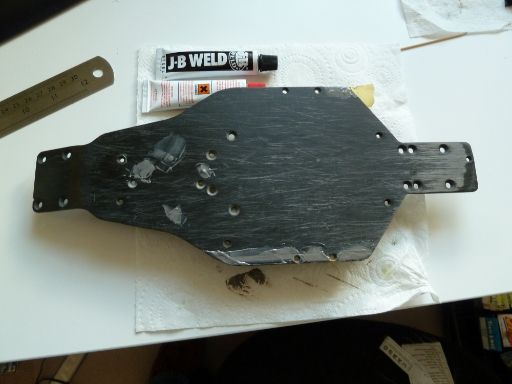
It has now cured, and I've sanded it back, it's got some dips and holes so I've filled them again. Will post up more pictures when its cured.
Re: Finman's Losi JRX2
Posted: Sun Mar 23, 2014 4:10 pm
by finman
Just rebuilding the shocks, they came with purple springs on the front and yellow(? could be a pale green) on the rear.
The purples seem a bit stiff for the front can any body recommend a start point for the springs (don't mind associated one's as I have a couple of spring tuning kits).
Rich
Re: Finman's Losi JRX2
Posted: Mon Mar 24, 2014 10:34 am
by fredswain
I've filled in chassis holes like that but they are visible since the epoxy is gray. I've done a couple of things since the first one. I've mixed in some black RIT dye powder in and I've also added some graphite powder but that still comes out grayish. The RIT black powder works well. It doesn't take much.
Re: Finman's Losi JRX2
Posted: Mon Mar 24, 2014 10:49 am
by Jirka
finman wrote:Just rebuilding the shocks, they came with purple springs on the front and yellow(? could be a pale green) on the rear.
The purples seem a bit stiff for the front can any body recommend a start point for the springs (don't mind associated one's as I have a couple of spring tuning kits).
Rich
This might help and give some advice:

- SpringConversionChart.jpg (67.04 KiB) Viewed 1679 times
- SpringConversionChart.jpg (67.04 KiB) Viewed 1679 times
Purple springs might be the blue ones, my blue ones are also more purple then blue.
My advice is if You want to use Losi springs, do not use stiffer then reds.
Jirka
Re: Finman's Losi JRX2
Posted: Mon Mar 24, 2014 11:32 am
by finman
fredswain wrote:I've filled in chassis holes like that but they are visible since the epoxy is gray. I've done a couple of things since the first one. I've mixed in some black RIT dye powder in and I've also added some graphite powder but that still comes out grayish. The RIT black powder works well. It doesn't take much.
Yes, the epoxy is lighter than I thought - wish I'd thought of the RIT dye before the second application

.
Jirka wrote:My advice is if You want to use Losi springs, do not use stiffer then reds.
I assume this is for the rears, what would you recommend for the front?
Thanks for the advice.
Rich
Re: Finman's Losi JRX2
Posted: Mon Mar 24, 2014 2:15 pm
by Jirka
finman wrote:
Jirka wrote:My advice is if You want to use Losi springs, do not use stiffer then reds.
I assume this is for the rears, what would you recommend for the front?
Thanks for the advice.
Rich
At least in rear, but probably also in front too. Front springs depends on so many factors: track size, traction level, front and rear tires, driving style etc. impossible to give good answer without more knowledge. In my opinion Losi springs are pretty stiff, so softest Jrx2 front spring red should be considered as a medium spring. You can start with stiffness like Losi's red in front and then see how the car feels. In short soft front springs gives more low speed steering and firmer more high speed steering. More basic tuning advices can be found from Losi manuals, see also other then Jrx2 manuals. You can download them here:
http://www.vintagelosi.com/Manuals.html.
Jirka
Re: Finman's Losi JRX2
Posted: Sun Mar 30, 2014 8:27 am
by finman
A few updates. The chassis is now filled and I've put on a matt black vinyl covering which I think looks OK.

Then decided to get on with the build, even though all the parts haven't arrived yet!! Why is it the parts that come the furthest arrive the quickest? Still waiting on parts ordered from UK stockist 2 weeks ago ahh!!
Anyway some more pictures of the build.


With new steering posts, the old ones having had a fight with some pliers at some point!

With the Sabula Tech shock mount bushes

New rear bulk head and new rear shock tower (supplied with the car from Mark) and the Sabula Tech shock mount bushes.

New wing tubes as the old ones had also had a fight with a pair of pliers!

Whilst the vinyl looked good when first applied it has 'twisted' when tightening up the screws may need a re think.
Rich
Re: Finman's Losi JRX2
Posted: Sun Mar 30, 2014 5:08 pm
by LosiXXkid
Oooh! An almost new build.....exciting stuff!

Maybe you could fit the vinyl after all the screws have been fitted......just a thought.
Re: Finman's Losi JRX2
Posted: Sun Apr 20, 2014 10:15 am
by finman
Now received most the bits to carry on the build, although did more building than taking photos!
Did have some problems with the slipper conversion, when I assembled the gearbox it was very notchy. Took it a part and all ran smoothly in one half of the gear case. After a while realised it was the pinion gear that was too wide, I'd used a Throp delrin gear, and the recess in gearbox wasn't as wide as the gear. So a bit of trimming of the gear and all works fine. Just need to order spur gear and slipper pads.
I'm using JC Racing wheels for B2/3 with Schumacher rear tyres and Pro-Line fronts for running and I've got some wild red wheels for the shelf.
In the photo you can see the printed parts from oldrc.com/Sabula Tech steering arm set, antenna mount, shock bushings and out drive spacers all in red.


Cleaned the old body up a bit - should be alright for running. Also got a new body from Penguin on ebay, I think Derby Dan helped with this, nice shell but cut lines are difficult to see.


Still trying to find some rear shock mounts, currently I have bolted the 'normal' mounts to the lower arm, seems to work, no binding just not sure about the angle of the shock, any thoughts?

Rich
Re: Finman's Losi JRX2
Posted: Mon Apr 21, 2014 5:29 am
by aggpm09
Looks good Rich. I am a long way through a similar project and I have experienced the long delivery times to the UK on just about every part needed! I haven't run my JRX yet and have been in debate about the wheels, I also have JCR B2/3 wheels on the car - they look great but they do make the rear very wide. Have you made any modifications to bring the rear width more into line with the original width?
Re: Finman's Losi JRX2
Posted: Mon Apr 21, 2014 11:03 am
by fredswain
I run modern B4 wheels on my 5 link. I used Custom Works spacers on the axles and then spaced the lower trailing link in a bit.
Re: Finman's Losi JRX2
Posted: Tue Apr 22, 2014 6:18 am
by DerbyDan
Looking really good!
Great work on the chassis - I think i'll have to have a play with the JB weld on some of my plates... with the black vinyl it looks like new!
The red/orange 3D printed parts from Sabulatech look great & I think tie in well together with the white wheels.
The 'Penguin' shell was indeed taken from my un-cut original body, which to be honest didn't have many visible cut-lines in either - my advice is to cut out the front & rear of the shell first (the mark lines should be quite clear for around the tower?) & cut your (slot) holes for the body mounts (I use blue-tac thinly spread on the inside of the shell to mark the position ~ I cut the shell after painting) - then trim up the sides to suit the line of the chassis once the shell is sitting in its 'fitted' position.
Spring-wise - i'm guessing your 'purple' springs maybe from the original range of springs, which were mostly silver with some feint colour to indicate the rating? I have some spings like this on the rear of my JRX Pro. Like Jirka says - I would have expected the later Losi Red springs to be about as stiff as you would want to go as these are what I tended to use on my Losi XX Bitd - however I found that with the geometry of the 5-link you need to go stiffer to resist the roll, I ended up with med length blues on the rear - these are front springs for later Losis (XX & XXX etc) but are the correct length for the shorter rear shocks of the original JRX2 - reading the comparison chart above these are 3.8lb?
Re: Finman's Losi JRX2
Posted: Tue Apr 22, 2014 8:27 am
by finman
aggpm09 wrote:Looks good Rich. I am a long way through a similar project and I have experienced the long delivery times to the UK on just about every part needed! I haven't run my JRX yet and have been in debate about the wheels, I also have JCR B2/3 wheels on the car - they look great but they do make the rear very wide. Have you made any modifications to bring the rear width more into line with the original width?
Thanks for the comment.
Haven't made a comparison to be honest, as I'm trying to get it into a running state, but I will measure and see what a difference it makes. I've also got some rulux's for a B4 (to be dyed orange) I was going to try, which should reduce the width as there's no real off set with them, but do need to get the Custom workd spacers as fredswain mentions.
Rich
Re: Finman's Losi JRX2
Posted: Tue Apr 22, 2014 8:52 am
by finman
Dan thanks for the comments.
If you do use the JB weld, I think you should try adding some black Rit dye as mentioned by fredswain. It does work really well just a shame about the colour!
Good tip on the body, I was wondering how to cut the sides. With regard to the cut-lines yes the front is good but the rear is very difficult to see and no marking for the cut out for the turnbuckle, I'll just take it steady and try not to do it in one go. I'm also cutting before painting so should make it easier. Painting shell gunmetal with the 'boxart' decals from mci-racing on ebay.
For the springs I managed to get some progressive front and rear springs from Sabula Tech - rears seem a bit soft on the 'bench' though.
Now need to sort out the electrics, some e clips and paint the shell.
Rich
Re: Finman's Losi JRX2
Posted: Tue Apr 22, 2014 11:39 am
by DerbyDan
finman wrote:
Good tip on the body, I was wondering how to cut the sides. With regard to the cut-lines yes the front is good but the rear is very difficult to see and no marking for the cut out for the turnbuckle, I'll just take it steady and try not to do it in one go. I'm also cutting before painting so should make it easier.
Rich
I don't think the notch cut-out for the turnbuckles was marked on the original body - but its easy to position once the rest of the shell is trimmed & mounted, just push the suspension to full compression until the camber link touches

Its also worth pointing out that the front mounting slot/hole needs to be a touch further forward than where the body touches (when marking out) to take into account the angle of the shock tower an the fact that the body rides down the peg
I have a feeling that there may have been two JRX2 bodies produced during the production run - both the same in terms of shape & style, the Mr Lexan shell I have - I presume was also taken from an original shell & that had all the markings added, albeit that they were a little missleading - especially the holes for the rear body & wing mounts, this shell also has slightly larger windows, which does change the look when you sit the shells side-by-side.


