Page 3 of 5
Re: Project Tomy Intruder Vintage Racer
Posted: Thu Feb 25, 2016 10:22 am
by Coelacanth
JamieB wrote:So last night I spent hours masking up my repro shell to then tear the masking out. How do I go about removing masking residue? Washing up liquid doesn't seem to be working on this stuff? I'm using Tamiya masking tape.
Are you referring to the sticky tape residue? WD-40 works great for removing that adhesive residue.
Re: Project Tomy Intruder Vintage Racer
Posted: Fri Feb 26, 2016 2:52 am
by JamieB
Thanks guys, I actually have some WD40 so will give that a go. Will make sure I wash the stuff off the shell before painting.
I spent another night masking, I tore all the previous nights mask off again as I have a new plan for replicating the lines of the original shell. I'm not expecting a professional finish but hopefully it will look something like the one I am trying to copy. When I have done this one, somewhere down the line I have an RC10t3 shell I want to paint up and copy and original one with checked flag paint. I'm sure I will have lots of fun trying to do that one.
I will try and get some pics up before the weekend is over.
Re: Project Tomy Intruder Vintage Racer
Posted: Fri Feb 26, 2016 11:16 am
by DennisM
Wouldn´t use WD-40 either
I use isopropyl alcohol /isopropanol to remove the masking tape residue.
Haven´t had any whitening of the lexan.
Try it on a piece of scrap lexan first though.
Re: Project Tomy Intruder Vintage Racer
Posted: Fri Feb 26, 2016 11:16 am
by Coelacanth
tamiyadan wrote:there is always liquid mask.
i wouldn't use wd-40.
Why not? I've used WD-40 tons of times to remove tape residue. It won't harm Lexan. It's a degreaser/moisture remover; not brake fluid, ffs. In fact, I just used it 2 nights ago to remove sticker residue from a clear plastic container; clear plastic is decidedly far less durable than Lexan (plexiglass).
Re: Project Tomy Intruder Vintage Racer
Posted: Sun Feb 28, 2016 2:44 pm
by JamieB
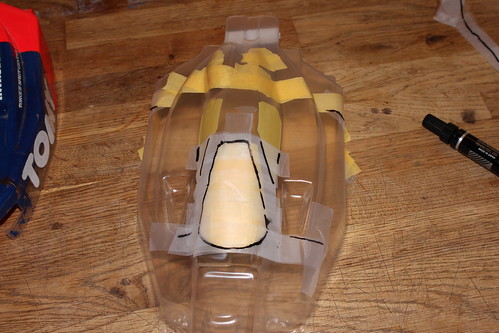
Firstly I cant even draw a smiley face free hand. Basically I suck at art of any kind. It has been many years since I sprayed an RC shell. The last time I did it would have been luminous pink sprayed into black.
I decided to replicate my original Tomy shell as I didn't think the colour scheme was too bad and thought it would be easy enough, even for me. Right away I run into issues with using a duplicate shell. In all honesty if I ever got an original shell to paint I would pay a professional, especially after this weekends results.
Am I happy? Yes and no. Its pretty obvious I am crap at the whole process, I have paint bleed and the spray is pretty poor. Even my trimming of the shell could be improved. Luckily I have another repro shell that I will paint later in the summer. I'm going to use the rest of my paints practicing my new craft.
So here are some pics of me masking and the results. Guys be brutally honest, I know you cant polish a turd but I do feel I can do better so let me know where I have gone wrong and how best to practice. Also where can I get cheap paint to practice with?
Reminds me of those shows where they do breast ops

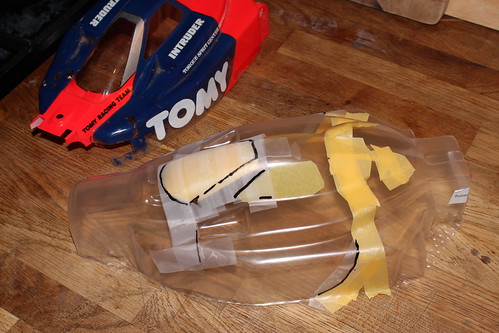
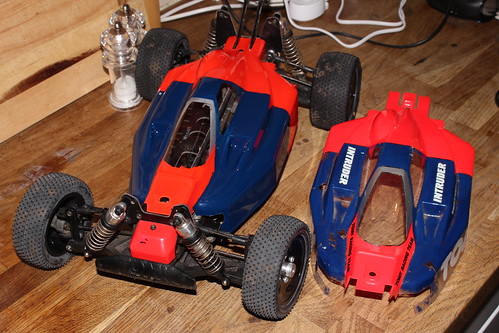
Ready to paint
Dan I know you mentioned to me to trim the shell and make sure if fits before hand but as I had already began and wasn't too sure of the best way to proceed I painted first. Some of the trimming and hole making mistakes were not due to me not trimming before painting but were due to other factors. I may well trim the shell first next time.
Nose cone is the original one, just testing the shell here on the car.

Easy to see the paint bleed and poor masking if you zoom on flickr
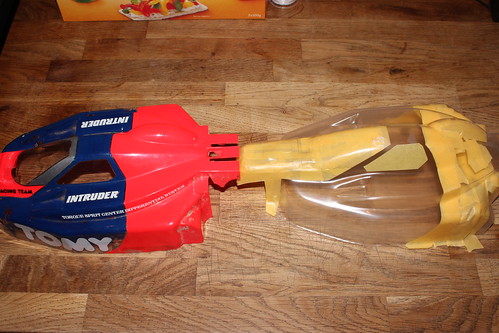
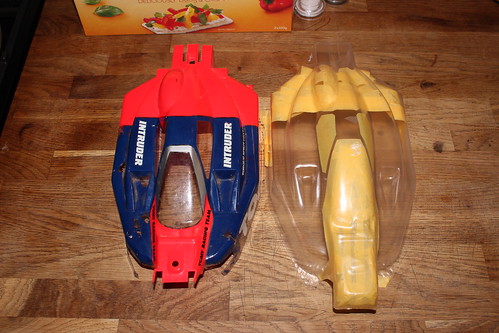
Some repro stickers added
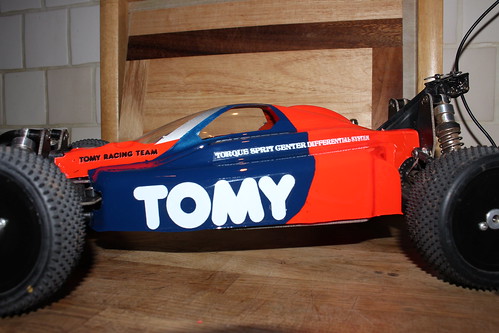
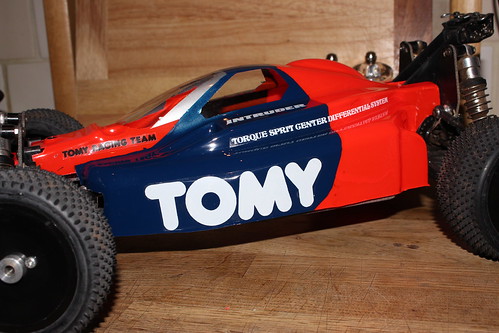
Zooming in on flickr the paint is actually worse than I first suspected. From afar, like if I was racing this car it would probably look OK

Come guys fire me your thoughts, I am almost 40 so should be able to take the honesty.
I found the paint didn't go on light enough, maybe I sprayed too much too close. Maybe it was too cold as well..
Re: Project Tomy Intruder Vintage Racer
Posted: Sun Feb 28, 2016 4:15 pm
by jwscab
looks fine. If you are happy with it, then it's good. Most times you look closely at bodies and they all have overspray or bleed, or not quite perfect lines. from a foot away they look flawless.
Re: Project Tomy Intruder Vintage Racer
Posted: Sun Feb 28, 2016 8:00 pm
by klavy69
a big part of bleeding through at your edges is the masking tape. Invest in some decent fine line tape or a better tape in general than the paper masking tape. You can get it in several different widths at a local auto parts store or on the internet. 3M makes a nice tape in green and blue that won't break the bank and will pay for itself in time and rebuying more bodies

jwscab wrote:looks fine. If you are happy with it, then it's good. Most times you look closely at bodies and they all have overspray or bleed, or not quite perfect lines. from a foot away they look flawless.
That pretty much sums it up for me above

.
I've been to races where there are some awesome show piece/shelfer bodies getting thrashed and when I look closely they have imperfections too.
The prep work I do is wash it with Dawn dish soap and done. I've used wd40 and isopropyl alcohol both without any issues to remove glue residue. I like the alcohol since its cheap and already in the house...yeah, I'm lazy

Keep us updated...for some reason I've liked these Tomy's for a long time.
Todd
Re: Project Tomy Intruder Vintage Racer
Posted: Sun Feb 28, 2016 11:17 pm
by Coelacanth
Every single time I've used masking tape, I've had tape bleed. It didn't matter what tape I used, from the cheap to the expensive 3M vinyl fine line tape. That was always with properly prepped/cleaned/scuffed bodies, and a wipe with mineral spirits prior to painting, so no blame for fingerprints or oils. It's just tape bleed.
What I will say is the tape that had the LEAST bleeding was Tamiya's yellow masking tape. Apply it, and press it down firmly along the edges with the round finger end of a scissors or round butt end of an X-Acto knife.
To get almost zero bleed, you need to use a liquid mask, like FasMask.
Check out the lines on this job I did on my buddy's girlfriend's Buffalo...courtesy of liquid mask:

Re: Project Tomy Intruder Vintage Racer
Posted: Mon Feb 29, 2016 3:42 am
by JamieB
Thanks guys. Some useful tips which I will use to my advantage going forward.
Some of the mask may have lifted a bit because of the time from masking to painting. In an ideal world I would do all the masking and painting in one day. With a three year old and a long term partner (not married) its a bit difficult. At the moment I kinda wanted to get some paint on to give me a bit of encouragement with the builds that I am working on.
Basically this shell will go on the car I decide to race. The original shell will just sit on my original Intruder looking all old and retired. I like the look
I cant remember back to when I use to race the Schumacher Cougar but this shell was a pig to trim and fit. You sort of have to thread/pass the front section under/over the steering arms then slot it around a few bits and pieces. I have seen a really majorly trimmed Intruder shell on the net, I didn't want to have to trim this much more than the original as I believe that is the best look.
Do you guys back you paint with a protector coat of some sort? I have already marked the shell and removed some paint by accident when fitting and removing the shell.
At the moment I have only fitted stickers to one side of the car. Anyone remember the film the Memphis bell? Basically they used a B17G Flying Fortress painted in two halves. So the left was filmed as one aircraft the right was filmed as another. I might sticker the other side a different colour so I can use this she for photos on more than one of my builds. Not sure yet, will have a think.
I almost had another Intruder coming my way but the guy in Australia wouldn't send it abroad and then decided he wouldn't even send it to another forum member here who is based in Australia and had kindly offered to take it and forward to me. Strangely the guy has now decided not to relist the item. Maybe he realized how much he would miss the car.
TamiyaDan, is that wing on the EX an original EX wing? I need a wing for my Intruder, as I cant obtain an original or even a reproduction I have been looking at period wings. I have seen old pics of a couple of Intruders with period wings and need to find something to paint up.
Coelacanth, bear with me here. Before painting my shell I would have looked at your shell and although awesome would have considered the masking as fairly simple. Now, having painted my shell I can fully imagine how difficult it was to get that shell masked and painted to the standard you have. That shell is painted really well. On the front you have a similar issue to what I had at the bottom of my front window which is a curved masked section. I found it difficult to get that right on my sell. Also getting your wing to match up with the shell must have been difficult, well it would have been for me. Nice job and take it from me I can appreciate how difficult that paint job would be.
Back to TamyiaDan, I don't think I would even attempt to mask and paint a EX shell in the box scheme, it really does look a difficult job.
Don't worry guys I am continuing with the build, buying bits up as and when funds allow and parts are available which for these cars is hardly ever! Someone must be sitting on a stock pile of bits.
Re: Project Tomy Intruder Vintage Racer
Posted: Wed Mar 02, 2016 4:04 pm
by JamieB
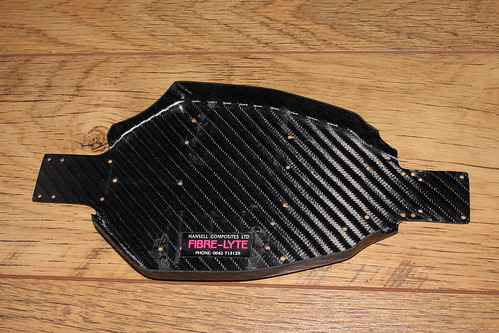
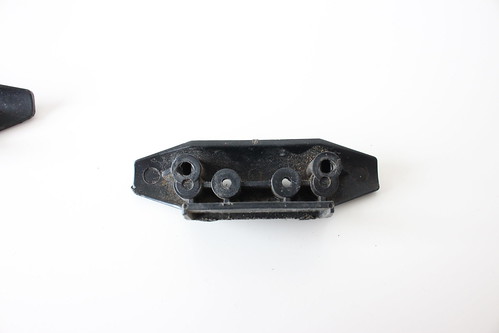
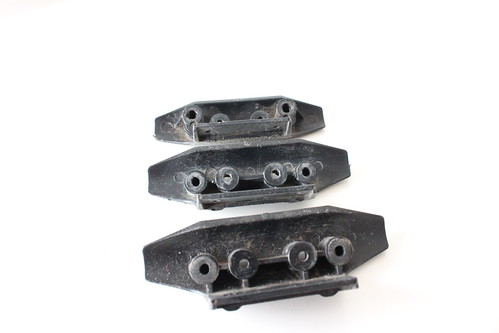
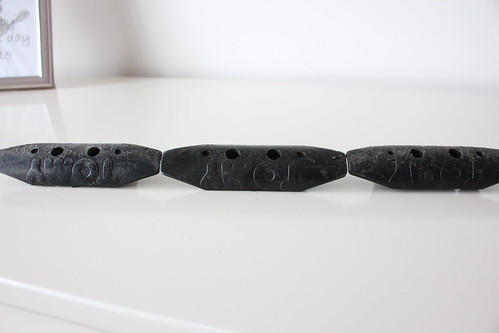
Well I cant seem to get a rear shock mount from GPM for the Intruder bling build. So I decided to contact Fibre-Lyte to see f they still produce Tomy items. You guessed right, they do. Believe it or not I emailed an enquiry late Monday, today Wednesday the items arrived. I'm guessing these were cut to order, I'm impressed with the level of service and product.

I fitted them to the bling build car tonight. You will have to wait for the pics of that though.
I want to get the shocks on as well. Not sure what ones yet.
Re: Project Tomy Intruder Vintage Racer
Posted: Wed Mar 02, 2016 5:02 pm
by JamieB
Same hole as an Intruder, so unless told otherwise I think this is for an Intruder?
When I find that pot of spares at the end of the rainbow I may build it up.
Re: Project Tomy Intruder Vintage Racer
Posted: Wed Mar 02, 2016 6:53 pm
by tiger1
wow!!! great stuff
Re: Project Tomy Intruder Vintage Racer
Posted: Thu Mar 03, 2016 3:51 am
by tiger1
I had gotten fibrelyte items second hand but never got any from fibrelyte directly...
Their quality is usually good.

Re: Project Tomy Intruder Vintage Racer
Posted: Tue Mar 22, 2016 8:17 pm
by Peakey
tamiyadan wrote:Fiber-lyte will actually make any chassis in their catalog into a tub, its a side service they have had the intruder and EX patterns since the 1990s.
Unfortunately they won't make tubs out of any chassis in there catalog trust me I have tried. They will on the other hand make a tub chassis if they still have the mold for it ie the cat 2000 which they still have so will produce one if you ask for it, there not cheap as there very labour intensive as Stephen told me.
The old tubs that they found recently are great I'm working on a RC10 and a Schumacher Cougar one ATM but as they were never finished there taking some time and effort to get right
Re: Project Tomy Intruder Vintage Racer
Posted: Sun Apr 10, 2016 9:51 am
by JamieB
Been having a little mess around with the bling build. I noticed two things..
First the front bumper was bugging me. It just didn't seem right. So I checked it out, removed it and believe it to be an EX front bumper.
Needs a lot more work but here are the latest updates


Yes I need to sort out the alignment of the wheels front and back.
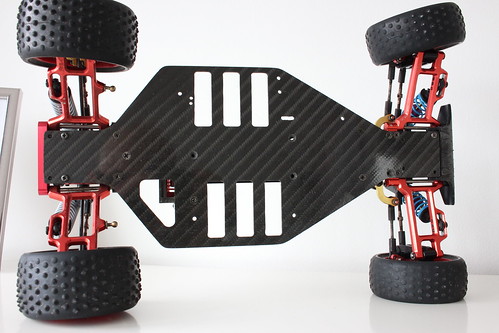
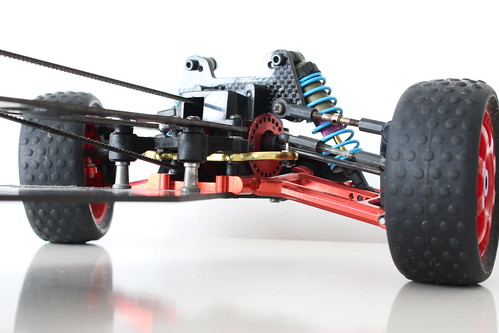
I went to fit the wing mount and hit a problem I had not noticed before.

Spot it?
I will give you a clue
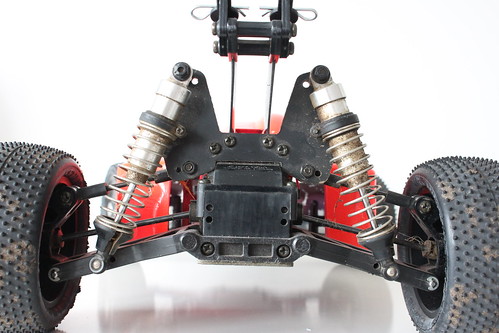
The shock mount has not been trimmed as per the original. I will contact the guy I purchased this from to discuss further.
The rear drive shafts are very close to coming out of the diff drive parts. Hopefully this will be fixed when I adjust the settings of the turnbuckles.
Just as a recap, this project car is the bling build, I am building it from a set of bling part I received a few months back. Most of which I didn't even know existed. So it is kinda like a tribute build to all the bling bits you could have purchased back in the day.
My project racer is coming along at a snails pace. I am buying up knew parts as funds allow, just told the model shop to send me what they have as I gave up waiting on the other bits on order for over six weeks. Most of the screws etc are going to be new. If I can get the carbon shock mounts correctly made I will order another set. I'm also thinking about a carbon chassis but not sure. May just go with one of the spare original used ones I have.
I have some other Tomy things in the pipe line as well. Announcements sooner or later.