Page 5 of 10
Re: Rusty RC12E Resto
Posted: Mon Jul 23, 2012 7:17 pm
by bearrocco
just hoping it would spark someone with one of those jomac with the cox td .049 wow what a neat car.
Re: Rusty RC12E Resto
Posted: Sun Jul 29, 2012 6:58 pm
by PlastiZapCA+
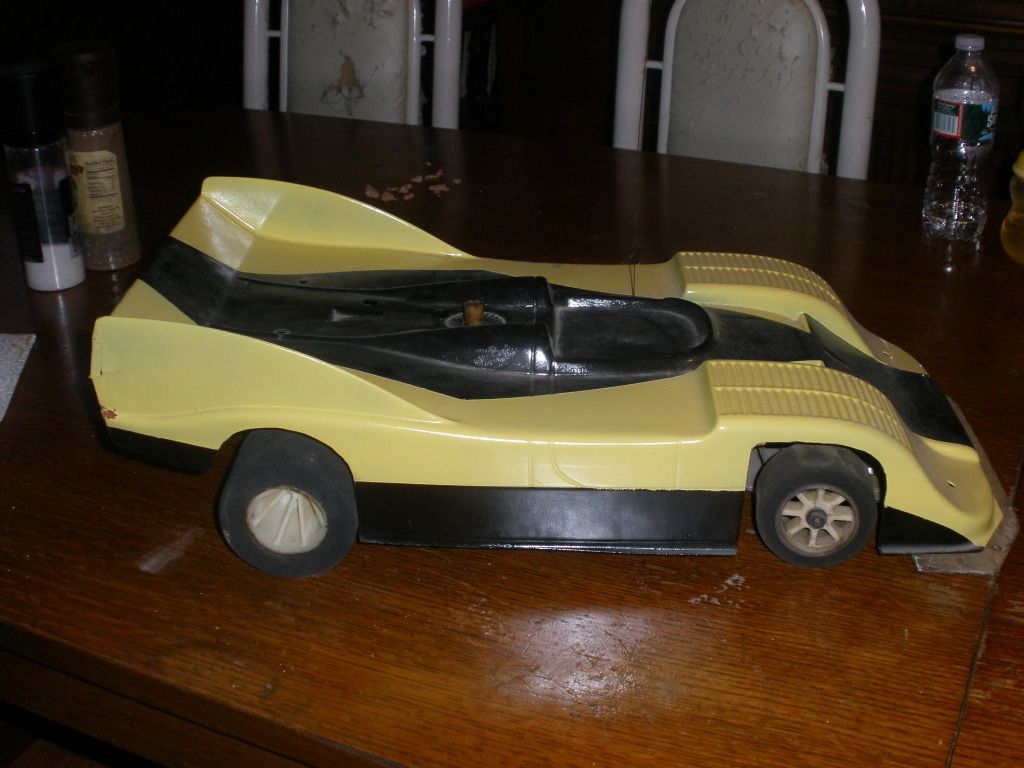
Sorry for the delay on this project but I've been really busy of late. I've got new Jagermester decals now as the old ones were bad. I'll have to sand the wing down and repaint again for the new decals. I've also decided to paint the body from the outside as it has too many dents and dings. I have two TOJ bodies and both have a fair amount of body damage. The body shown in this thread looks good in photos but not in person. The previous owner had also drilled the front body holes a little crooked so I'll be fixing that too. Anyway I'll have some progress pic up soon.
Re: Rusty RC12E Resto
Posted: Mon Aug 06, 2012 12:55 am
by PlastiZapCA+
Started on the body work. This should go fairly smooth though I've created more work for myself by opening up the intakes. I'll be fabricating the duct work from plastic card and molding it in. I hope to have it ready for painting soon.


I'll be making some alterations to this driver figure so he can be used for static display in the car. I have no plans to make an interior for the body.

Re: Rusty RC12E Resto
Posted: Mon Aug 06, 2012 1:08 am
by PlastiZapCA+
I drove the car for the first time Friday night! All I can say is WOW!!! The car is a beast!

Way too much power to run in the tiny room I had. The car is a monster without a diff too and wants to spin during acceleration. I quickly adapted to this by correcting the steering prior to acceleration and found it wickedly fun! I must now find more carpet!

The car could really use some soft compound tires too. I have hard compunds on the front an mediums on rear at the moment. Still it was fun running this machine.

Showing the corrected the wiring for the speed control in this short vid.
[youtube]bx7qokjYYqg[/youtube]
Crappy quick vid of the car running. The car is a blast to drive.
[youtube]PN7lKw42AFE[/youtube]
Re: Rusty RC12E Resto
Posted: Tue Aug 07, 2012 6:43 pm
by bearrocco
Great to see it rolling , body looking good can't wait to see it painted
Re: Rusty RC12E Resto
Posted: Wed Aug 08, 2012 6:40 pm
by slotcarrod
Fantastic, your doing a wonderfull job for an RC rookie! I must ask? You sanded the body in the inside right? I know you are a pro plastic model builder, but for RC, you paint on the inside of the body, just in case you did not know!

Re: Rusty RC12E Resto
Posted: Wed Aug 08, 2012 7:04 pm
by GoMachV
PlastiZapCA+ wrote: I've also decided to paint the body from the outside as it has too many dents and dings.
Re: Rusty RC12E Resto
Posted: Thu Aug 09, 2012 10:54 am
by slotcarrod
gomachv wrote:PlastiZapCA+ wrote: I've also decided to paint the body from the outside as it has too many dents and dings.
Really???? I missed that comment! That's too bad! I would still paint on the inside no matter how many scratches. It's just the correct way for RC. You would have to use 50 layers of clear to get the same result! The scratches on Lexan are easy to hide with Plexus plastic cleaner
http://www.plexusplasticcleaner.com/plexus.html ! However, I know the end result will look perfect anyway, as PlastiZapCA+ seems to be a perfectionist!
PlastiZapCA+, make sure you use paint for Lexan!
I'm sure you know, but just in case, it has a flexing agent in it and it etches to the Lexan!
Re: Rusty RC12E Resto
Posted: Thu Aug 09, 2012 7:19 pm
by bearrocco
Tough to get a finish on the outside , but I was 17 I'm 50 now. New body , new try ? P.s still have it.
Re: Rusty RC12E Resto
Posted: Thu Sep 06, 2012 7:17 am
by PlastiZapCA+
slotcarrod wrote:gomachv wrote:PlastiZapCA+ wrote: I've also decided to paint the body from the outside as it has too many dents and dings.
Really???? I missed that comment! That's too bad! I would still paint on the inside no matter how many scratches. It's just the correct way for RC. You would have to use 50 layers of clear to get the same result! The scratches on Lexan are easy to hide with Plexus plastic cleaner
http://www.plexusplasticcleaner.com/plexus.html ! However, I know the end result will look perfect anyway, as PlastiZapCA+ seems to be a perfectionist!
PlastiZapCA+, make sure you use paint for Lexan!
I'm sure you know, but just in case, it has a flexing agent in it and it etches to the Lexan!
I know that the body should be painted form the inside, but this one has way too much damage for me to be satisifed with it. Besides I have good information that says the TOJ will be re-popped in the not so distant future. I plan on buying several bodies when they come up for sale. For now I will still have a go at painting this body on the outside. It will be for display only.
Re: Rusty RC12E Resto
Posted: Thu Sep 06, 2012 7:19 am
by PlastiZapCA+
bearrocco wrote:
Tough to get a finish on the outside , but I was 17 I'm 50 now. New body , new try ? P.s still have it.
Nice!!!
I hope to get my hands on one of those soon.
I say go for it! You could strip the paint off of that body and have another go for sure. Would love to see the chassis.
Re: Rusty RC12E Resto
Posted: Wed Sep 12, 2012 11:30 pm
by PlastiZapCA+
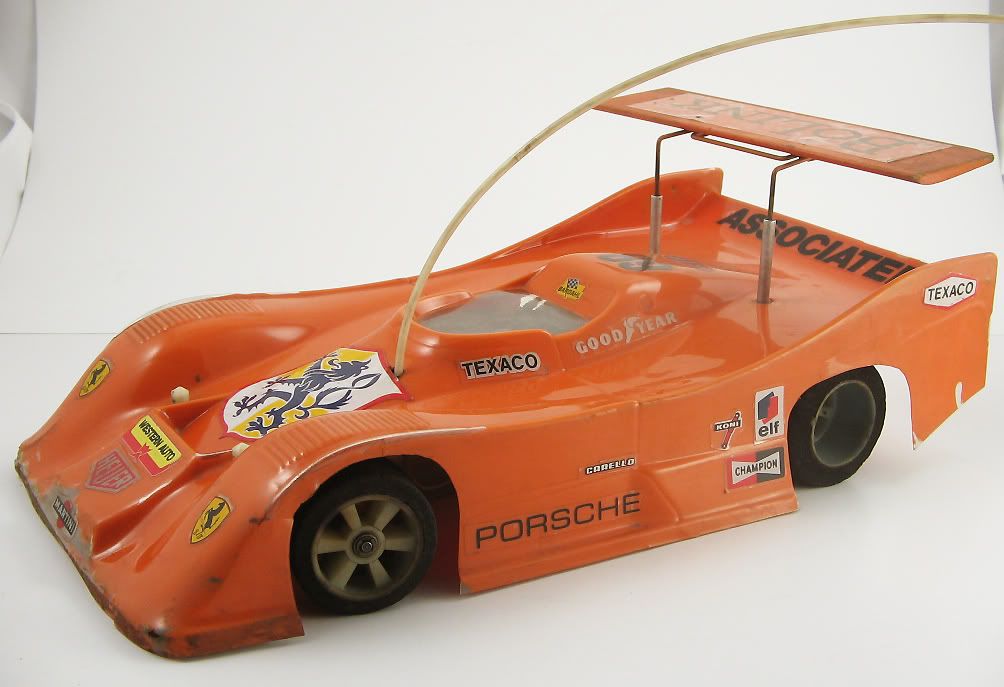
Just scored another TOJ body. Keeping my fingers crossed that it arrives in good shape. If so I will paint and decal ASAP and wrap this one up.
Auction pic.

Re: Rusty RC12E Resto
Posted: Tue Sep 18, 2012 5:04 pm
by PlastiZapCA+
Just received the new body and it's perfect!
I'm talking ten out of ten! The orange machine doth cometh!
I would like your opinion on this. Should I drill a hole in the new body for the antenna like the original had or not?
Re: Rusty RC12E Resto
Posted: Tue Sep 18, 2012 5:19 pm
by GoMachV
I would

Re: Rusty RC12E Resto
Posted: Wed Sep 19, 2012 9:24 am
by PlastiZapCA+
gomachv wrote:I would
It's a done deal then! I'll be starting on the body this weekend. Might have a few side projects to add to it too.
Now to get back to work on the 12i!