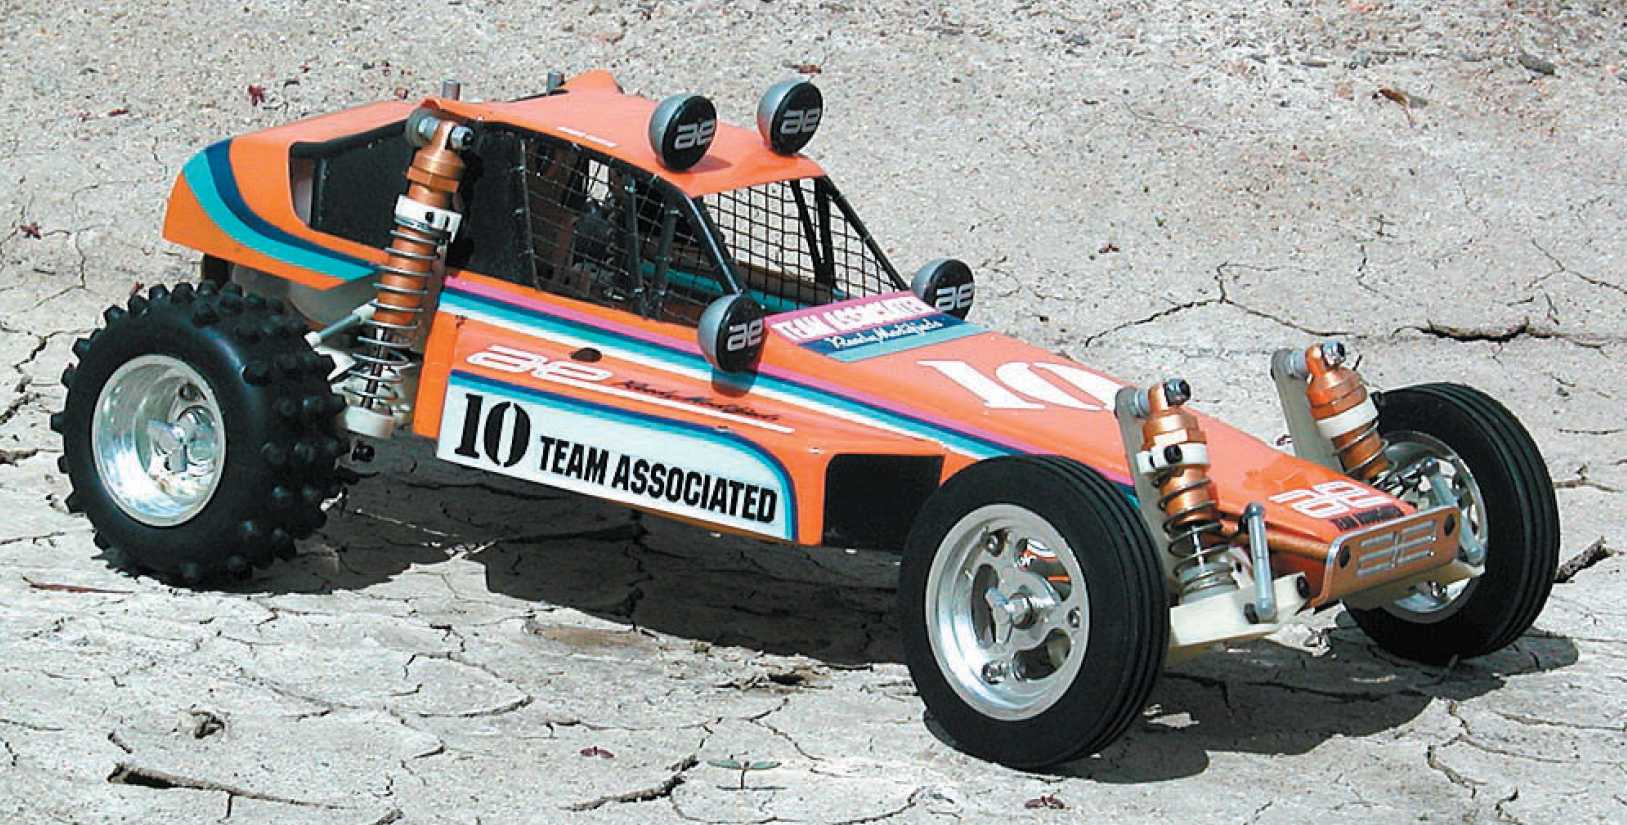
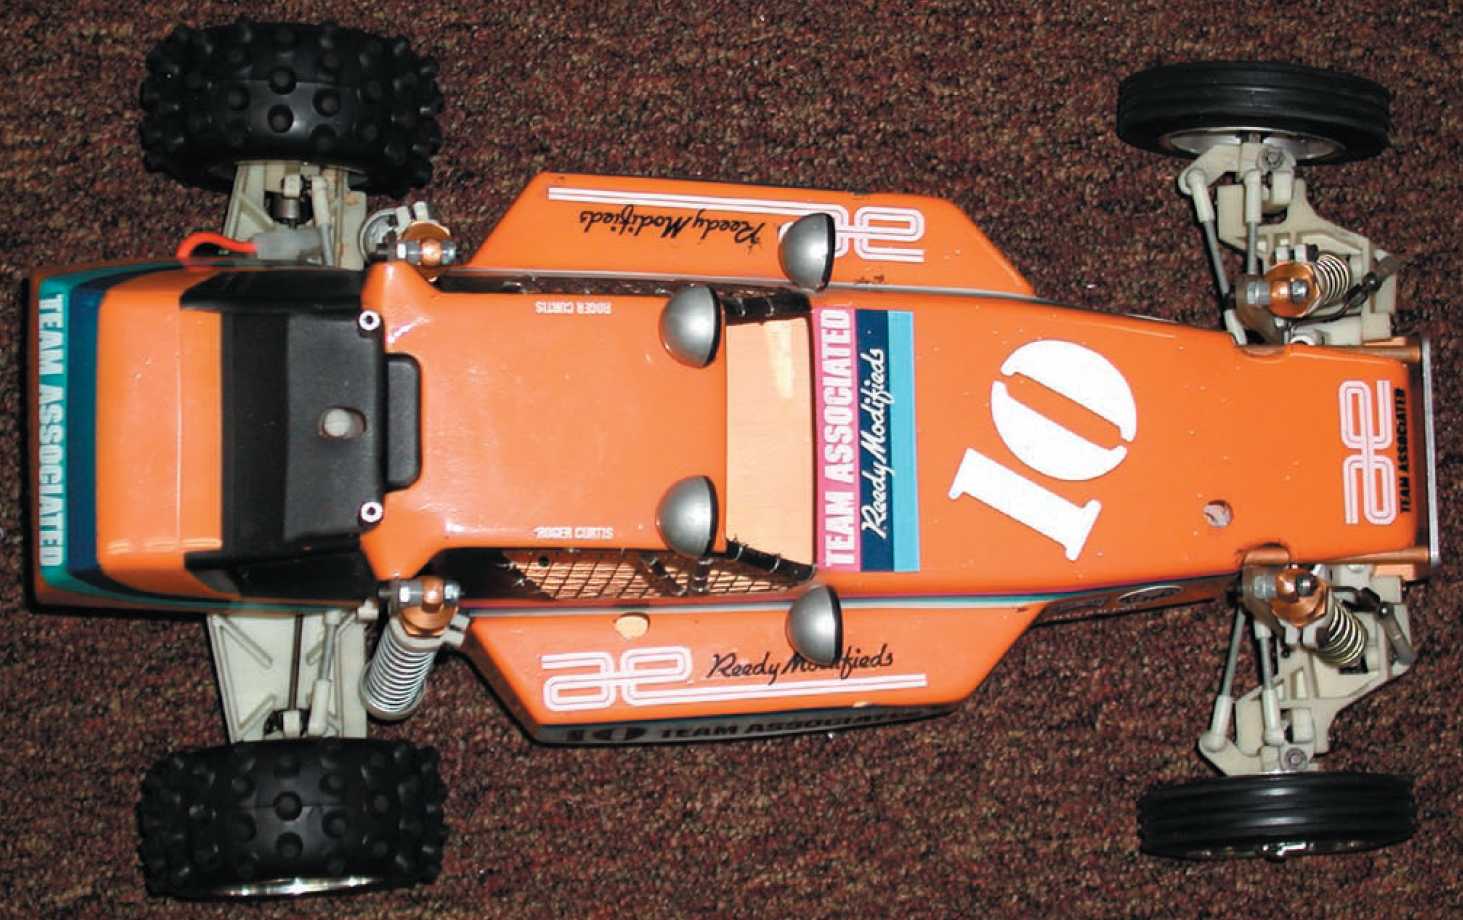
RC10 40th Anniversary boxart - Striped Decals vs Painted Stripes
Posted: Thu May 16, 2024 8:37 pm
by GreenBar0n
Closer look.
The red/white arrow points to the location on the boxart body where the decal is too wide, and it won't stay stuck to the body. The red arrow shows how the decal bunches up in the rear corners.
Andy's painted stripes. Pro.
Bought (2) RC10 Clear Classic Protech replacement bodies, the day they were available, they were $20 each back then.
Have the RC10 40th body now as well, or (3) Protech bodies total. Going to do one body in the decals, and see if I can trim them to fit properly where they are too wide over the chassis.
And going to try to use all spray cans to paint the stripes on another body.
DougH wrote: ↑Thu Jan 05, 2012 5:48 pm
Here is what I used, all rattlle cans. Check the buggy forum under Readers rides or do a search under box art and you will find some photos of my car.
OK here are the spray cans I used on this one:
Tamiya PS-19 Camel Yellow main body
Tamiya PS-33 Cherry Red accent stripe
Pactra RC252 Blue Streak accent stripe
Tamiya PS-3 Light Blue accent stripe
Pactra RC251 Sprint White accent stripe
All colors were backed with silver to prevent bleed thru. Overall I'm very happy with how it came out, only mistake was I messed up on the rear wing and put the pink on the bottom instead of the top. Will eventually correct this when I find a correct wing
DougH wrote: ↑Fri Jan 06, 2012 12:28 am
Here is what I got using all spary cans
Will begin as soon as the weather permits tomorrow.
That's some nice work, Mike. It looks great with the CC decals.
Anyway, you just can't beat painted stripes.
For decals, I just warm the vinyl with a hair dryer, then press and hold them down tightly with my thumb while the vinyl cools and they will stay in place.
Will definitely try the decals on body #1. But I have read more than a few times now, that the stripe decals will come up after time, even on the shelf.
I already have the 1mm Tamiya curved tape, and the other Tamiya masking tapes for painting the stripes the correct widths. Not sure I'll like the results of my attempt at painting the stripes on, but I like to try to level up on my painting and prep skill wherever possible.
Body #1 will have PS-5 Black for the roll bars and window frames, and PS-19 Camel Yellow for the rest. The weather is looking good out there, with low wind, right for painting.
First in line for paint when the sun hits the right spot out back.
Just a little FYI, the two panels before and after the shock tower are black on box art.
I reckon AE has included these masks so customers can personalize their builds -- which is good.
Also, box art has side and front windows removed and I've done that in the past but I probably won't do it the 40th car.
Anyway, just mentioning it FWIW.
The shape of the body doesn't make it easy to cut out.
Used a little box to get behind the cuts.
Decent results for #1, learned what not to do on this one.
Getting the masking above the shock towers is not easy, had to take a break from it, will finish that crucial spot, and then hit it with the PS-5.
@XLR8, thanks for the shock tower tip! Panels opened up, but will leave the windows in and sealed to keep the shelf dust out .
Wishing I had matte/flat black PS paint now, gloss for the rolls bars, and matte black for the panels.
Just remembered I can use PS-55 Flat Clear on the outside of the black panels, to give them the matte/flat finish, and use PS-5 black for everything inside the body.
GreenBar0n wrote: ↑Fri May 17, 2024 5:14 pm
...
Just remembered I can use PS-55 Flat Clear on the outside of the black panels, to give them the matte/flat finish, and use PS-5 black for everything inside the body.
There ya go, that's perfect. Good plan!!
You can use the overspray film as masking. I've done that many times and it works great.
I see what you're saying: cut and remove the outer wrap only on the shock tower window panels, and then paint it PS-55 outside; that saves a lot of time rather than removing the outer mask entirely, and then re-masking it (which is what I've done every time before with PS-55). Thanks!
Yeah the overspray film is the perfect mask - super sharp lines and no bleed-through. And I'll go one step further.
I actually won't mask for the black on the inside of the body. Instead, I'll mask only the windows and paint everything inside PS-19 then, using the overspray film, paint the black on the outside. I'll use black PC paint as a primer then cover that with flat black rattle can paint from the hardware store. I could use PS-55 to bring down the shine but I'm cheap so I try to save money everywhere I can. As great, great, great, great, great, grandpa Ben said "A penny saved is a penny earned."
Anyway, the disadvantage with paint on the outside is that it can scratch and reveal the PS-19 underneath. That's okay for a shelfer that won't ever get scratched but not so good for a runner.
How do you cleanly cut sections of the outer overspray film? Just use a hobby knife and carefully peel? Or am I missing something? I'd like spray the entire interior with Tamiya Camel Yellow (PS-19), then hit the exterior with Tamiya Black (PS-5) for the cockpit area from the outside. Good chance I'm missing something here!
A sharp hobby knife/Xacto is what @XLR8 is talking about using for sectioning the outer wrap, just cut and peel. But If you go too heavy with a blade on the outside of the body, it can leave a cut line, and if the scoring is too deep, crashing the body could make that score line open up.
If all the precautions are taken against cutting too deep, it should work just fine.
This video really got me going in the right direction, when using a blade on lexan (not about painting).
The film is soft and extremely thin so merely the weight of the knife is enough to score through it.
It's a delicate process but the results are worth the effort. You're able to add very fine, high quality painted details to the exterior of the body without the hassles associated with masking tape.
Found out why the RC10 Classic Clear decals are not the same as the 40th decals, or the 1984 boxart.
The large 10 on the hood, and the 10 Team Associated decals on the sides, are hollow, not solid colors.
On the next body, the one with the painted on stripes, PS-62 Pure Orange will be used instead of PS-19 Camel Yellow, along with the solid color 40th decals.
Actual 1984 RC10 boxart body - missing wing, with later issue wheels.
Hey guys. Just joining the conversation here as I'm about to paint the body for my fr-01. I'm wondering what the consensus is regarding cutting out the windshield or any of the windows to promote airflow? I'm old school just getting back into the hobby and back in the day I had my esc mounted on the shock tower and cut about 2/3 of the windshield out to let air pass over the esc heat sinks. Now my hobbywing esc has a fan and I feel like that plus keeping dirt and dust out is good reason to keep the windows in. Any advice would be appreciated.