Recoloring parts
-
DMAT

- Approved Member
- Posts: 885
- Joined: Wed Mar 20, 2013 8:53 am
- Location: Baton Rouge, La
- Been thanked: 4 times
Recoloring parts
Was just curious what you think is the best way to go about it. If there are several different way, which do you use? Im not sure of the material used with these cars and my first recommendation was dying them. Was told to bleach them white first but after a few hours I didnt even see a sign of color change. Right now Ive got a set of Blackish colored parts fading into either a red of purplish hue and another set of parts that are just whitish.
-
marlo

- Approved Member
- Posts: 2071
- Joined: Tue Jan 22, 2013 5:31 pm
- Has thanked: 18 times
- Been thanked: 22 times
Re: Recoloring parts
To dye parts black, I use rit dye. Have a pot of boiling water, with parts suspended on a hanger of some sort. set parts in the water ( with the dye ) wait about 10 min, and they should turn out nice, to whiten them, can be very frustrating. you will need to work with mother nature on that one, hydrogen peroxide and a lot of sun, days will pass to see results. Then there is the water bath periods, I know that there is a section on here that will explain it a little better.
-
tuna.Rc
- Approved Member
- Posts: 312
- Joined: Tue Jan 29, 2013 10:01 pm
- Location: central Illinois
- Has thanked: 11 times
- Been thanked: 6 times
Re: Recoloring parts
DMAT - ive used RIT dye. I dyed some yellowish Rc10 nylon , i used black ,but it came out a reddish or purple color. ive used the powder and liquid dye.
i have only gotten small parts to come out black ( suspension mounts,antenna holder,battery straps,body posts) everything else comes out purple
Ive dyed them up to 3 different times,they get darker but still dont come out black.
I wonder if adding salt to the water to bring the temp up has anything to do with it ?
-
GoMachV

- Super Member
- Posts: 12336
- Joined: Sun Apr 29, 2012 10:31 pm
- Location: Twin Falls, ID
- Has thanked: 1129 times
- Been thanked: 3919 times
Re: Recoloring parts
You need to bring to a slow boil and be patient. I use rit powder dye and because I am not trusted in the kitchen I use a very small fry daddy deep fryer. I use the entire pack of dye and just enough water to cover the parts. The fry daddy has a neat tray that you can put the parts in making it easy to check them along the way. I have had the best coloring since using the fry daddy, but it gets too hot for water so once it is boiling I unplug it and wait a few minutes, then back in. Within 2-3 cycles the parts are jet black

-
RC10th

- Approved Member
- Posts: 4761
- Joined: Sat Feb 16, 2013 9:51 am
- Location: Australia
- Has thanked: 52 times
- Been thanked: 1548 times
Re: Recoloring parts
Letting the parts cool down in the dye allows them to absorb the dye better. The pores of the nylon open up while being boiled and close up when cool. This only works with black however, unless you like really dark colors.
I was old school - when old school wasn't cool !
-
GoMachV
- Super Member
- Posts: 12336
- Joined: Sun Apr 29, 2012 10:31 pm
- Location: Twin Falls, ID
- Has thanked: 1129 times
- Been thanked: 3919 times
Re: Recoloring parts
Yeah I forgot to mention that after boiling and the color is achieved I put my parts in ice water. Don't remember why but that's what I was told to do years ago. Gotta wash em off anyway 

Re: Recoloring parts
I've always used "Dylon" clothing dye as that is what is readily available here in Australia..
Instead of turning the kitchen black (or whatever colour you are using), I bought a $20 gas camping stove, and do my colour changing outside.. Use an old saucepan or coffee tin to boil your water/parts in..
I dont think that it matters when you put the dye in the water (before or after boiling) as I often re-boil my dyed water, and re-use it over and over again..
Mark..
-
marlo
- Approved Member
- Posts: 2071
- Joined: Tue Jan 22, 2013 5:31 pm
- Has thanked: 18 times
- Been thanked: 22 times
Re: Recoloring parts
I do the same, I takes a little time, but It will work!gomachv wrote:Yeah I forgot to mention that after boiling and the color is achieved I put my parts in ice water. Don't remember why but that's what I was told to do years ago. Gotta wash em off anyway
-
K-TOWN-KITT
- Approved Member
- Posts: 199
- Joined: Wed Mar 27, 2013 9:26 pm
- Location: Buffalo, NY
- Been thanked: 2 times
Re: Recoloring parts
I HAVE BEEN USING THE SAME PAN OF BLACK RIT DYE FOR YEARS. IT HAS IT'S OWN BURNER ON THE STOVE,( OH YES THE OLD LADY LOVES IT). THE PAN HAS DRIED UP NUMEROUS TIMES. I JUST ADD SOME WATER AND STIR THE PAN WHILE THE WATER WARMS UP. ONCE IT STARTS TO BOIL, I THROW THE PARTS IN. I SET THE PAN TO A SLOW BOIL AND LET THE PARTS SIMMER FOR AROUND 5 TO 10 MINUTES, (THATS THE TRICK). I PULL THEM OUT AND GO RIGHT TO THE SINK. I RINSE THEM IN WARM TO HOT RUNNING WATER. I ALSO TAP THE PARTS ON THE SINK UNDER THE WATER. THIS HELPS TO GET THE DYE OUT OF THE STUBBURN SCREW HOLES LIKE THE ONES ON THE TOP AND BOTTOM OF THE REAR BULKHEAD.
IF YOUR TRYING TO DYE THE WHITE NYLON PARTS ANOTHER COLOR, MY SUGGESTION IS TO START OUT SMALL. SAY YOU WANT TO DYE YOUR PARTS RED. START OUT BY PUTTING A SMALL AMOUNT OF DYE IN THE PAN. ONCE THE WATER IS BOILING, PUT IN 1 PART AS A CONTROL. TRY USING AN EXTRA WHITE NYLON PART THAT YOU MAY HAVE LYING AROUND. ONCE YOU THINK THE PART IS READY, PULL IT OUT AND RINSE IT. IF IT'S THE COLOR YOU WANT THEN HORRAY. IF NOT AND IT'S TO LIGHT, ADD A LITTLE MORE DYE AND TRY AGAIN. KEEP DOING THIS UNTILL YOU GET THE DESIRED COLOR. REMEMBER YOU CAN ALWAYS GO DARKER BUT NOT THE OTHER WAY AROUND. IT MIGHT BE A LITTLE HASSLE BUT WORTH IT IN THE LONG RUN. IT'S BETTER THAN GETTING AN UNDESIREABLE TO DARK OF COLOR. IF POSSIBLE, DYE ALL YOUR PARTS AT THE SAME TIME. THIS WILL HELP TO KEEP ALL THE PARTS THE SAME SHADE OF COLOR.
IF YOU ARE GOING TO DYE A PART THAT IS GOING TO BE TOUCHING A WHITE NYLON PART BE SURE TO RINSE THOROUGHLY, MAYBE EVEN USE A BRUSH, AND MAKE SURE THE PARTS ARE COMPLETELY DRY. IF NOT, YOU MIGHT GET BLEEDING FROM PART TO PART.
REMEMBER EVERY DAY THAT PASSES THERE ARE LESS AND LESS WHITE PARTS OUT THERE. SO DYE RESPONSIBLY.
-
tuna.Rc
- Approved Member
- Posts: 312
- Joined: Tue Jan 29, 2013 10:01 pm
- Location: central Illinois
- Has thanked: 11 times
- Been thanked: 6 times
Re: Recoloring parts
Ive been dying nasty yellowed parts. Hard to come across nice white parts.
Well, i found out what works best for me. 1/2 a Folgers coffe can of water, 1 whole bag of powder rit dye. Parts came out nice and black. No purple color to them. Saved the dye and re-used later, same results. Starting to get the hang of this dying thing.
Well, i found out what works best for me. 1/2 a Folgers coffe can of water, 1 whole bag of powder rit dye. Parts came out nice and black. No purple color to them. Saved the dye and re-used later, same results. Starting to get the hang of this dying thing.
-
scr8p

- Administrator
- Posts: 16812
- Joined: Tue Feb 07, 2006 9:46 pm
- Location: Northampton, PA
- Has thanked: 36 times
- Been thanked: 1318 times
Re: Recoloring parts
soak them in peroxide outside in the sunlight.tuna.Rc wrote:Ive been dying nasty yellowed parts. Hard to come across nice white parts
-
RC10th
- Approved Member
- Posts: 4761
- Joined: Sat Feb 16, 2013 9:51 am
- Location: Australia
- Has thanked: 52 times
- Been thanked: 1548 times
Re: Recoloring parts
It's surprising how well the peroxide works. I couldn't bring myself to dye any white part black, only dye previously and poorly dyed parts.tuna.Rc wrote:Ive been dying nasty yellowed parts. Hard to come across nice white partsscr8p wrote:soak them in peroxide outside in the sunlight.
Who's going to invent white dye
I was old school - when old school wasn't cool !

Re: Recoloring parts
I thought I'd put my .02 cents here. I have dyed numerous batches of parts over the last 20 years so I feel I have something to contribute.
I think black has been the easiest color for me to work with. I have always used the full box of RIT dye in approx one gallon of water in an old aluminum sauce pan (not sure if aluminum makes any difference?). I find that if I throw the parts in the water, bring them to a boil, add the dye and boil for 10-15 minutes more, I get very dark black parts. I typically let them boil loose and then strain them through an old collender once the bath is cool. I have done this with blue, green, burgundy etc. Colors come out vibrant and have deep color penetration. This works well on fiberglass as well.
A key to keeping things clean is using a tall pot and a slow boil, resist temptation to check on progress. Parts will always jump off the spoon and cannonball into the dye bath splashing it on every houshold surface within a 10 foot radius!!
I have another batch of blue to do soon and maybe a yellow or orange for my worlds build in the next month. I will try and document my process if it will help anybody.
Now for whitening... Here is my secret.... I use Mr Clean in my ultrasonic tank with the heating on. I used to add oxy clean but that chalked up the parts!! I leave them in there for at least an hour and start with hot tap water in a ratio of approx 75% (25% Mr Clean). The heat is key, also any longer than an hour at temp and I fear the parts may chalk so I stop while I am ahead. I use a toothbrush to clean the stubborn stuff and an ordinary pipe cleaner to clean the pin holes. BTW this removes paint and chrome so beware, however I usually find this to be a good thing. Then let the parts dry and transfer them to a tub of hydrogen peroxide.
I use a clear glass cassarole pan, load it up with parts and pour in enough HP to cover them all, poke at them until all the trapped air bubbles holding them up are released. Set this in the sun for a few days and you have white parts!!
A UV lamp would work great but I find the sun to be much cheaper
Any questions lemme know, oh and BTW this is top secret confidential info, any use outside this forum is strictly prohibited 8-!
Have fun
Re: Recoloring parts
OK I thought I'd expand on my process with a little procedure on my process. First I disassemble the parts so that I have nothing but the nylon parts. BTW, the steering parts are Nylon, just not glass filled. Do not try this on ABS or other plastics, they will probably melt/deform. I had this happen to one of those Losi battery cups.
Note - I have been known to not seperate tie rods, the ball cups clean and the threaded rod is usually ok. The rods will however take on a bit of the dye, especially black. It has been an effect I can appreciate.
I will start by laying down an old towel on my work area which happens to be the washing machine. It's convenient and located next to our wash tub.
I load up my cleaner with the dirty parts, be sure to clean parts by color, just like laundry:
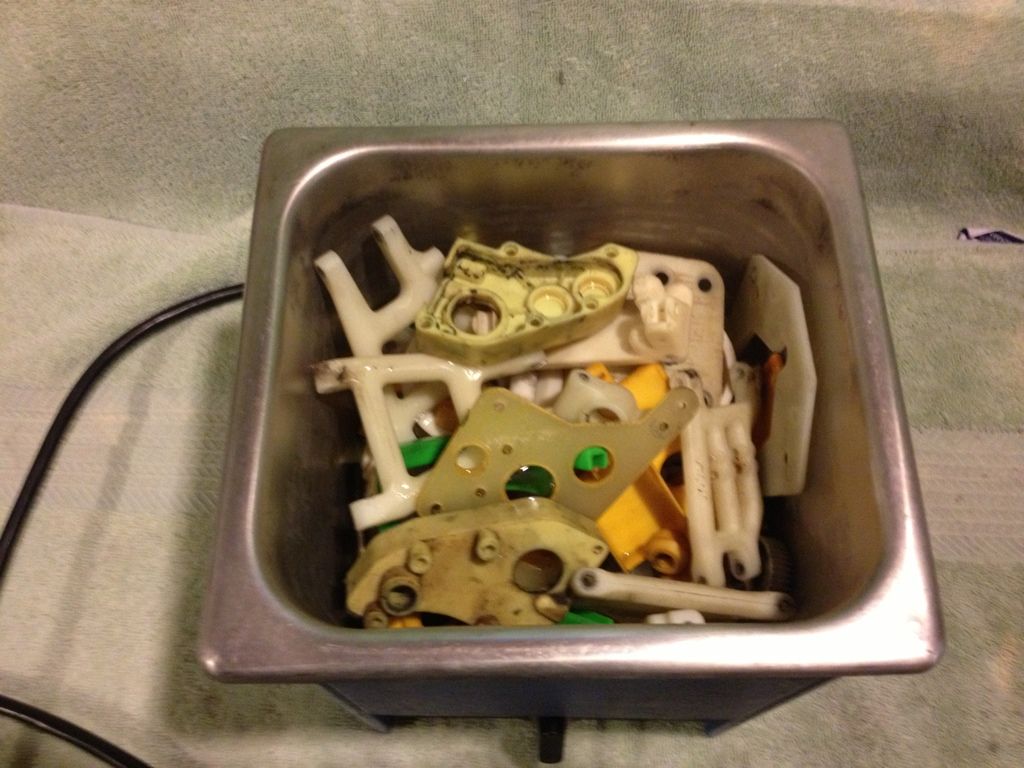
I had cleaned white parts and red parts at one time, this solution will remove some dye and it tinted the white parts pink. Luckily, I was able to clean the white parts in fresh solution and whiten them with peroxide as described later.
I clean everything in an ultrasonic cleaner with Mr Clean and warm water in a 10-20% solution.

I let them cook with the heat on for an hour, I just keep reseting my timer.
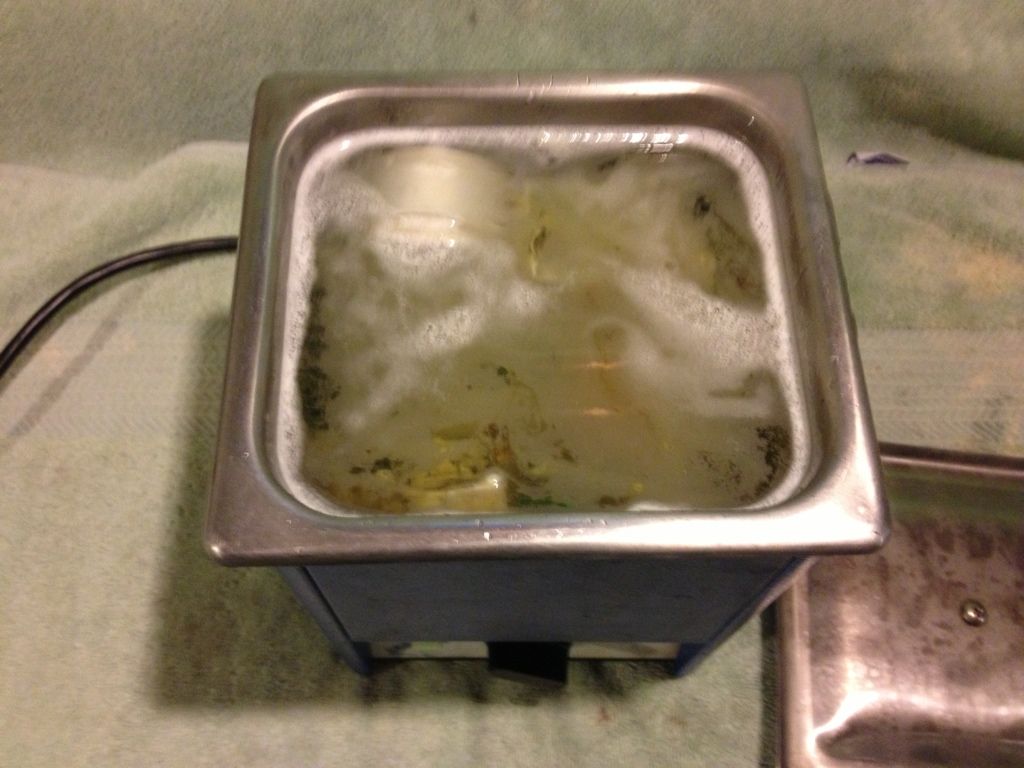
DO NOT let them in there for longer than one hour, you will risk chalking and drying out the parts
I rinse them well in a collender and let them dry:
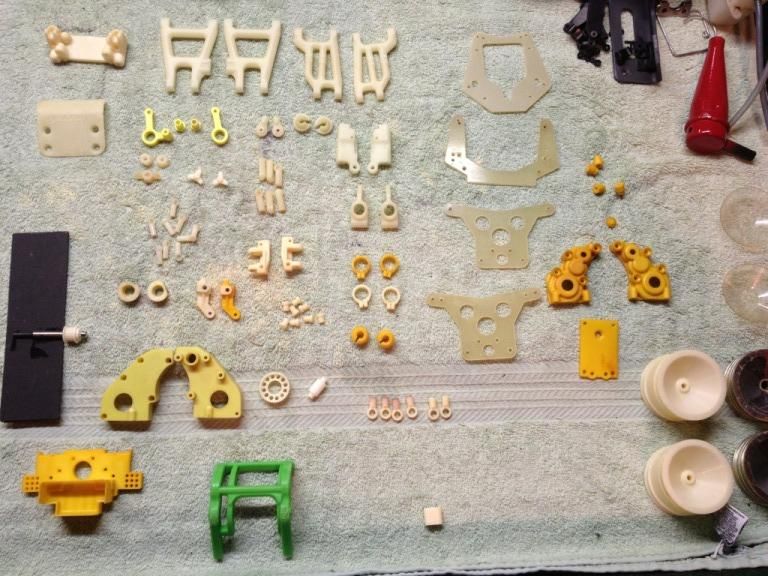
Inspect the parts for any missed dirt or super glue. Super glue must be removed prior to whitening or coloring. It is a huge problem when trying to dye parts.
At this point you can decide if you want to whiten or color the parts.
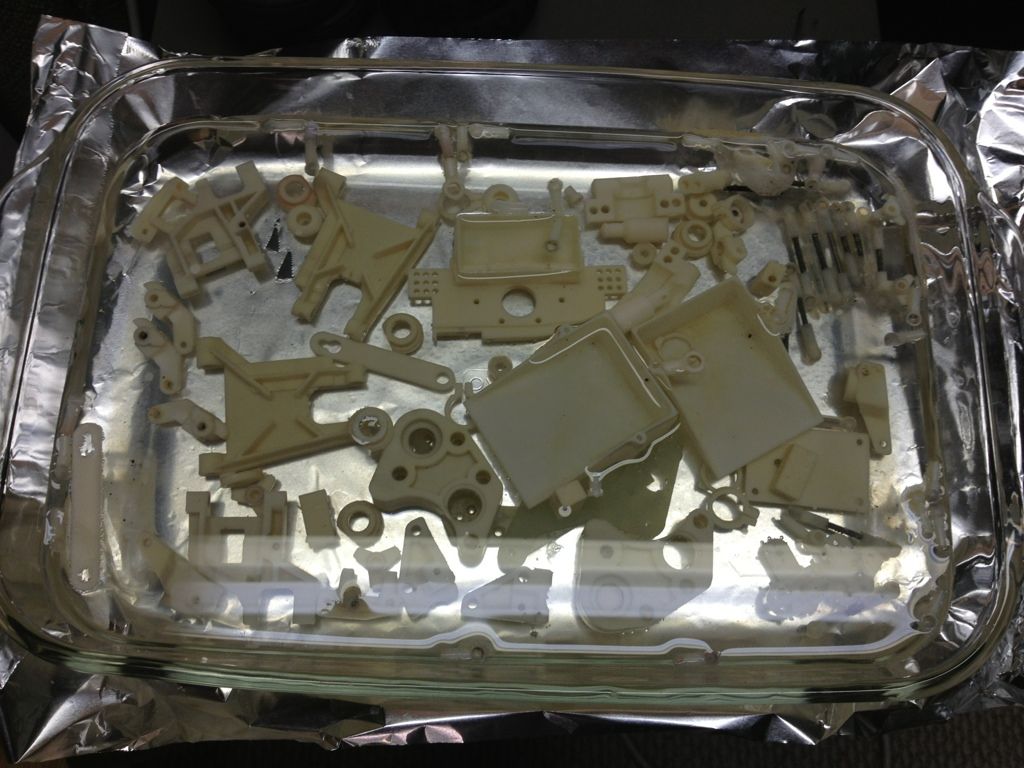
To whiten, let the white parts sit in hydrogen peroxide for a few days in the sun. This will not remove dye and may or may not make much difference on dyed parts. It definitly will not do anything for parts molded in a color
I set them in a pyrex cassarol dish with aluminum foil underneith to reflect the sunlight.
To color the parts, I will put them in a large stainless sauce pan and fill it with a gallon of water.
I bring that to a boil with the parts in it. Once to a boil, I add the dye and boil for an additional 10-15 minutes. I use powdered dye, although I will be experimenting with liquid dyes soon
In the cooler months I just put the pot outside after the boiling process is over and let it cool. Other wise I slowly fill it will cool water as to not splash and cool the mixture. I then drain it through the collander so no parts are lost. Rinse the parts carefully with cool water until the water runs clear.
Let the parts dry and then install.
I will be dying some parts soon so pics and other editing will follow
Note - I have been known to not seperate tie rods, the ball cups clean and the threaded rod is usually ok. The rods will however take on a bit of the dye, especially black. It has been an effect I can appreciate.
I will start by laying down an old towel on my work area which happens to be the washing machine. It's convenient and located next to our wash tub.
I load up my cleaner with the dirty parts, be sure to clean parts by color, just like laundry:
I had cleaned white parts and red parts at one time, this solution will remove some dye and it tinted the white parts pink. Luckily, I was able to clean the white parts in fresh solution and whiten them with peroxide as described later.
I clean everything in an ultrasonic cleaner with Mr Clean and warm water in a 10-20% solution.
I let them cook with the heat on for an hour, I just keep reseting my timer.
DO NOT let them in there for longer than one hour, you will risk chalking and drying out the parts
I rinse them well in a collender and let them dry:
Inspect the parts for any missed dirt or super glue. Super glue must be removed prior to whitening or coloring. It is a huge problem when trying to dye parts.
At this point you can decide if you want to whiten or color the parts.
To whiten, let the white parts sit in hydrogen peroxide for a few days in the sun. This will not remove dye and may or may not make much difference on dyed parts. It definitly will not do anything for parts molded in a color
I set them in a pyrex cassarol dish with aluminum foil underneith to reflect the sunlight.
To color the parts, I will put them in a large stainless sauce pan and fill it with a gallon of water.
I bring that to a boil with the parts in it. Once to a boil, I add the dye and boil for an additional 10-15 minutes. I use powdered dye, although I will be experimenting with liquid dyes soon
In the cooler months I just put the pot outside after the boiling process is over and let it cool. Other wise I slowly fill it will cool water as to not splash and cool the mixture. I then drain it through the collander so no parts are lost. Rinse the parts carefully with cool water until the water runs clear.
Let the parts dry and then install.
I will be dying some parts soon so pics and other editing will follow
Create an account or sign in to join the discussion
You need to be a member in order to post a reply
Create an account
Not a member? register to join our community
Members can start their own topics & subscribe to topics
It’s free and only takes a minute
Sign in
-
- Similar Topics
- Replies
- Views
- Last post
-
- 13 Replies
- 1518 Views
-
Last post by vsefiream
-
- 7 Replies
- 1986 Views
-
Last post by alcyon
-
- 13 Replies
- 1371 Views
-
Last post by Lavigna
-
- 1 Replies
- 1432 Views
-
Last post by a01butal
-
- 4 Replies
- 1067 Views
-
Last post by discgolfer72
-
- 1 Replies
- 4934 Views
-
Last post by mytimac
-
- 5 Replies
- 674 Views
-
Last post by highwayracer
-
- 5 Replies
- 1395 Views
-
Last post by rccars4sal
Who is online
Users browsing this forum: ![]() Bing [Bot],
Bing [Bot],  juicedcoupe,
 ![]() Tbot [Bot],
Tbot [Bot],  XLR8 and 4 guests