Restoring a Hornet
- SMOKE-DOG
- Approved Member
- Posts: 723
- Joined: Wed Jul 23, 2008 1:03 pm
- Location: Columbus, Ohio
- Been thanked: 1 time
Restoring a Hornet
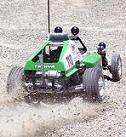
I picked this vintage Tamiya Hornet out of a classifieds ad. It came with the original box, manual, MRC catalog, spares, Parma Cyclone II, charger, and a Futaba Magnum Jr. The buggy wasn't in bad shape, but was a lil dusty and rusty sitting around over the last 20+ years. It had Wild One tires but the original tires/wheels were in the box. I also found a full set of bearings in the box, not in the buggy for some odd reason.
No that's not a glare. That's white spray paint on the tire.
I started with a complete teardown to clean and rebuild everything. I had enough new spare screws in the box to replace almost all of them which was a plus since most of the screws on the Hornet were corroded.
Dirt was falling out with every screw removed.
TC showroom: http://tamiyaclub.com/showroom.asp?id=18447
- SMOKE-DOG
- Approved Member
- Posts: 723
- Joined: Wed Jul 23, 2008 1:03 pm
- Location: Columbus, Ohio
- Been thanked: 1 time
Re: Restoring a Hornet
All the metal parts needed some love so I gave em a little.
A quick cleanup, some sanding with 800 grit paper and a lil Mother's polish.
The ad showed a pic of this Parma Cyclone II in the box. When I got it home, to my disappointment, I saw that it wasn't new in box. It was in decent shape though, just a little dirty. I'll clean it and throw it up on the lathe later.
TC showroom: http://tamiyaclub.com/showroom.asp?id=18447
- SMOKE-DOG
- Approved Member
- Posts: 723
- Joined: Wed Jul 23, 2008 1:03 pm
- Location: Columbus, Ohio
- Been thanked: 1 time
Re: Restoring a Hornet
I sprayed the faces of the original 3 piece wheels pure white and the centers black. Helps them look less plasticy and a little more realistic.
The rear shocks were rough and the springs were rusty.
They cleaned up well enough.
The rear shocks were rough and the springs were rusty.
They cleaned up well enough.
TC showroom: http://tamiyaclub.com/showroom.asp?id=18447
- SMOKE-DOG
- Approved Member
- Posts: 723
- Joined: Wed Jul 23, 2008 1:03 pm
- Location: Columbus, Ohio
- Been thanked: 1 time
Re: Restoring a Hornet
@tamiyadan
I will be using a re-re body but will do a different livery. Never been a big fan of boxart. You're right about the transistor opening, didn't notice that. I won't be using the MSC though...
I lettered the tires as usual with a Sharpie paint pen. Quick and easy and makes a model stand out.
Front end is nice and clean now. Using the old logo Futaba S148 servo that came with the car, still working well.
Chassis complete. Body next.
TC showroom: http://tamiyaclub.com/showroom.asp?id=18447
- SMOKE-DOG
- Approved Member
- Posts: 723
- Joined: Wed Jul 23, 2008 1:03 pm
- Location: Columbus, Ohio
- Been thanked: 1 time
Re: Restoring a Hornet
Done. All vintage and original except for re-re body. I used the remainder of a can of Tamiya yellow and period correct decals from my collection to finish off this budget resto.
TC showroom: http://tamiyaclub.com/showroom.asp?id=18447
- 1300GT
- Super Member
- Posts: 694
- Joined: Fri Feb 01, 2013 6:58 pm
- Location: Clare, Australia
- Has thanked: 331 times
- Been thanked: 275 times
Re: Restoring a Hornet
Looks good SD. Have a look at this link about halfway down. Pretty cool motor for your Hornet.
http://www.rc10talk.com/viewtopic.php?f=37&t=3023&hilit=igarashi
Chris.
Toys.............they are!
- SMOKE-DOG
- Approved Member
- Posts: 723
- Joined: Wed Jul 23, 2008 1:03 pm
- Location: Columbus, Ohio
- Been thanked: 1 time
Re: Restoring a Hornet
Man, you're right. Would go perfectly.1300GT wrote:Looks good SD. Have a look at this link about halfway down. Pretty cool motor for your Hornet.
http://www.rc10talk.com/viewtopic.php?f=37&t=3023&hilit=igarashi
TC showroom: http://tamiyaclub.com/showroom.asp?id=18447
- DerbyDan
- Approved Member
- Posts: 1836
- Joined: Tue Sep 08, 2009 8:04 am
- Location: Northampton UK
- Has thanked: 2 times
- Been thanked: 17 times
Re: Restoring a Hornet
Man! This is great.... these sort of projects are often the most satisfying - a real budget build but with everything just 'happening' to be available or to hand to turn this old Hornet into a real looker & performer
My T.C Showroom; http://www.tamiyaclub.com/member.asp?id=28990
-
- Approved Member
- Posts: 239
- Joined: Wed May 15, 2013 12:14 am
- Location: NJ, USA
- Has thanked: 1 time
Re: Restoring a Hornet
DerbyDan wrote:Man! This is great.... these sort of projects are often the most satisfying - a real budget build but with everything just 'happening' to be available or to hand to turn this old Hornet into a real looker & performer
Agreed! Great project and result. After building a re-re that ended up being too nice to run, I took on a similar project with an early original broken beater that needed some love. I went ultra-low budget build only replacing broken parts with some re-re replacements, a quick clean/rebuild followed by the addition of period-correct radio, motor and MSC that I had laying around since the 80's. Its a blast to drive just like the one I had back then.
Re: Restoring a Hornet
Man, I love this! I have much love for the Grasshopper/Hornet series. You've inspired me to do my own budget restoration of a Grasshopper chassis I've had sitting in a box. Question for you, what did you use to clean up the plastic?
RC10 Short Arm | Novak Tempest ESC | Tamiya Torque Tuned 25T | Savox 1258 | Stealth Trans w/ Exotek Slipper Eliminator (geared 24/81)
RC10B3 | HW Just Stock Club Spec | Reedy 13.5 | Savox 1258
Re: Restoring a Hornet
This is a spectacular restoration! My first car was a Hornet... You are inspiring me to get another one!
Create an account or sign in to join the discussion
You need to be a member in order to post a reply
Create an account
Not a member? register to join our community
Members can start their own topics & subscribe to topics
It’s free and only takes a minute
Sign in
-
- Similar Topics
- Replies
- Views
- Last post
-
- 16 Replies
- 2236 Views
-
Last post by vintage88
-
- 14 Replies
- 1349 Views
-
Last post by slick2500
-
- 1 Replies
- 484 Views
-
Last post by THE H.P FREAK
-
- 2 Replies
- 1085 Views
-
Last post by chrome
-
- 17 Replies
- 2092 Views
-
Last post by radioactivity
-
- 13 Replies
- 1281 Views
-
Last post by mtbkym01
-
- 2 Replies
- 1133 Views
-
Last post by EOL
-
- 8 Replies
- 1361 Views
-
Last post by Klocwork
Who is online
Users browsing this forum: Frankentruck and 4 guests