RC10 Team car restoration
-
MarkyDents

- Approved Member
- Posts: 1021
- Joined: Sun Jan 10, 2021 11:52 am
- Location: Staten Island, N.Y.
- Has thanked: 1347 times
- Been thanked: 509 times
Re: RC10 Team car restoraion
It’s looking and coming together very nice, well worth the effort.
Who do you race for ?
Me……. I race for me.
That’s impossible, I was told you need a sponsor to race.
Hey Cru ! Go balls out
Me……. I race for me.
That’s impossible, I was told you need a sponsor to race.
Hey Cru ! Go balls out
-
JohnE
- Approved Member
- Posts: 75
- Joined: Tue Mar 16, 2021 5:35 pm
- Has thanked: 17 times
- Been thanked: 67 times
Re: RC10 Team car restoraion
Rebuilt the rear hub carriers, the bearings were pretty shot so I put new ones in. The dogbones were ok, a little bent and rusty so I straightened them out and painted them semi-gloss black.
One of the shock collars was missing, looked around for some original ones but ended up getting some 3D printed ones. When I say white they are white, I did the hydrogen peroxide trick on the rest of the hardware but the colors still don't match but it's close enough. Put new seals in the shock bodies and new oil and they were good to go.
One of the shock collars was missing, looked around for some original ones but ended up getting some 3D printed ones. When I say white they are white, I did the hydrogen peroxide trick on the rest of the hardware but the colors still don't match but it's close enough. Put new seals in the shock bodies and new oil and they were good to go.
- Attachments
-
-
-
-
JosephS
- Super Member
- Posts: 1530
- Joined: Thu Mar 23, 2017 5:31 pm
- Has thanked: 1003 times
- Been thanked: 467 times
Re: RC10 Team car restoraion
What kit did you buy that didn't sit flush?JohnE wrote: ↑Tue May 11, 2021 9:18 pm Skipped this picture of the nose plate after it was painted.
I decided to put stainless steel screws in this car since most of the ones on it were pretty rusty, plus I always thought they look really cool. The screw kit I bought came with stainless steel versions of the bigger screws that hold the suspension mounts on but they did sit total flush like the aluminum ones do so I left them in.
-
JosephS
- Super Member
- Posts: 1530
- Joined: Thu Mar 23, 2017 5:31 pm
- Has thanked: 1003 times
- Been thanked: 467 times
Re: RC10 Team car restoraion
How do you straighten the universal joint axles ? I have a set of bent ones and couldn't figure that out.JohnE wrote: ↑Fri May 21, 2021 5:23 pm Rebuilt the rear hub carriers, the bearings were pretty shot so I put new ones in. The dogbones were ok, a little bent and rusty so I straightened them out and painted them semi-gloss black.
One of the shock collars was missing, looked around for some original ones but ended up getting some 3D printed ones. When I say white they are white, I did the hydrogen peroxide trick on the rest of the hardware but the colors still don't match but it's close enough. Put new seals in the shock bodies and new oil and they were good to go.
-
JohnE
- Approved Member
- Posts: 75
- Joined: Tue Mar 16, 2021 5:35 pm
- Has thanked: 17 times
- Been thanked: 67 times
Re: RC10 Team car restoraion
The screws? I bought an RC Screwz set for the 'RC10'. The big ones stuck out the bottom of the chassis but the small 4-40 ones were all fine.JosephS wrote: ↑Sun May 23, 2021 9:51 pmWhat kit did you buy that didn't sit flush?JohnE wrote: ↑Tue May 11, 2021 9:18 pm Skipped this picture of the nose plate after it was painted.
I decided to put stainless steel screws in this car since most of the ones on it were pretty rusty, plus I always thought they look really cool. The screw kit I bought came with stainless steel versions of the bigger screws that hold the suspension mounts on but they did sit total flush like the aluminum ones do so I left them in.
-
JohnE
- Approved Member
- Posts: 75
- Joined: Tue Mar 16, 2021 5:35 pm
- Has thanked: 17 times
- Been thanked: 67 times
Re: RC10 Team car restoraion
It's not that hard, I just put them in a big bench vise and taped them with a medium sized adjustable wrench. You will be surprised how easy they bend, if you hit with a hammer it would make it an L shape.JosephS wrote: ↑Sun May 23, 2021 9:53 pmHow do you straighten the universal joint axles ? I have a set of bent ones and couldn't figure that out.JohnE wrote: ↑Fri May 21, 2021 5:23 pm Rebuilt the rear hub carriers, the bearings were pretty shot so I put new ones in. The dogbones were ok, a little bent and rusty so I straightened them out and painted them semi-gloss black.
One of the shock collars was missing, looked around for some original ones but ended up getting some 3D printed ones. When I say white they are white, I did the hydrogen peroxide trick on the rest of the hardware but the colors still don't match but it's close enough. Put new seals in the shock bodies and new oil and they were good to go.
GIve it a few taps, take it out of the vice and spin it while looking down the driveshaft. You can see the bends.
-
JohnE
- Approved Member
- Posts: 75
- Joined: Tue Mar 16, 2021 5:35 pm
- Has thanked: 17 times
- Been thanked: 67 times
Re: RC10 Team car restoraion
Put the rest of the rear end together, I ended up using some 3D printed rear arms which are copies of the Andy's arms which were out when I had my car. My plan all along was to make this car as much like the car I wanted back when i was racing, since I couldn't find original Andy's arms these went on. They look pretty good shape wise but the white was way too bright to match the rest of the car.
I ended up priming them with Tamiya white primer and spraying them a DuPont off white color I found a Home Depot that was made for patio furniture.
The rear tie-rods were a bit short so I used a white RPM one I had laying around, it looks pretty close but I put it on the inside so it's not so noticeable.
- Attachments
-
-
-
juicedcoupe

- Super Member
- Posts: 2976
- Joined: Sun Aug 16, 2020 4:05 pm
- Location: Pascagoula, MS
- Has thanked: 229 times
- Been thanked: 1742 times
Re: RC10 Team car restoraion
If you read around some, it is known that kit doesn't have the correct 8-32 screws. They include the common 82° screws instead of the correct 100° screws. An RC10 pan isn't thick enough for an 82°, 8-32 screw.JohnE wrote: ↑Thu May 27, 2021 2:11 pmThe screws? I bought and RC Screwz set for the 'RC10'. The big ones stuck out the bottom of the chassis but the small 4-40 ones were all fine.JosephS wrote: ↑Sun May 23, 2021 9:51 pmWhat kit did you buy that didn't sit flush?JohnE wrote: ↑Tue May 11, 2021 9:18 pm Skipped this picture of the nose plate after it was painted.
I decided to put stainless steel screws in this car since most of the ones on it were pretty rusty, plus I always thought they look really cool. The screw kit I bought came with stainless steel versions of the bigger screws that hold the suspension mounts on but they did sit total flush like the aluminum ones do so I left them in.
Team KnK has the correct ones. They have kits and packets of individual sizes.
If you don't care about color, the Custom Works 8-32 X 1/2 (blue aluminum) have the correct angle.
Always looking for new and interesting ways to waste money.
-
JohnE
- Approved Member
- Posts: 75
- Joined: Tue Mar 16, 2021 5:35 pm
- Has thanked: 17 times
- Been thanked: 67 times
Re: RC10 Team car restoraion
Finished the front end
I ended up going with 3d printed front arms, the car came with black arms and black caster blocks. I wanted to go for the whole white look and couldn't find any original white arms so I went with 3d Printed ones, I painted them like the rears and the color is pretty close. I found some 25 degree caster blocks so those went on. The ball studs were ok, they just needed some cleaning up with wd-40. The ball cups were mostly in good shape so they went back on.
I ended up going with 3d printed front arms, the car came with black arms and black caster blocks. I wanted to go for the whole white look and couldn't find any original white arms so I went with 3d Printed ones, I painted them like the rears and the color is pretty close. I found some 25 degree caster blocks so those went on. The ball studs were ok, they just needed some cleaning up with wd-40. The ball cups were mostly in good shape so they went back on.
- Attachments
-
-
-
-
JohnE
- Approved Member
- Posts: 75
- Joined: Tue Mar 16, 2021 5:35 pm
- Has thanked: 17 times
- Been thanked: 67 times
Re: RC10 Team car restoraion
Thanks for the info, I'll look into some of these optionsjuicedcoupe wrote: ↑Thu May 27, 2021 4:43 pmIf you read around some, it is known that kit doesn't have the correct 8-32 screws. They include the common 82° screws instead of the correct 100° screws. An RC10 pan isn't thick enough for an 82°, 8-32 screw.JohnE wrote: ↑Thu May 27, 2021 2:11 pmThe screws? I bought and RC Screwz set for the 'RC10'. The big ones stuck out the bottom of the chassis but the small 4-40 ones were all fine.JosephS wrote: ↑Sun May 23, 2021 9:51 pmWhat kit did you buy that didn't sit flush?JohnE wrote: ↑Tue May 11, 2021 9:18 pm Skipped this picture of the nose plate after it was painted.
I decided to put stainless steel screws in this car since most of the ones on it were pretty rusty, plus I always thought they look really cool. The screw kit I bought came with stainless steel versions of the bigger screws that hold the suspension mounts on but they did sit total flush like the aluminum ones do so I left them in.
Team KnK has the correct ones. They have kits and packets of individual sizes.
If you don't care about color, the Custom Works 8-32 X 1/2 (blue aluminum) have the correct angle.
-
JohnE
- Approved Member
- Posts: 75
- Joined: Tue Mar 16, 2021 5:35 pm
- Has thanked: 17 times
- Been thanked: 67 times
Re: RC10 Team car restoraion
Thank you, I am pretty happy with how it is coming alongMarkyDents wrote: ↑Wed May 19, 2021 7:53 am It’s looking and coming together very nice, well worth the effort.
-
JohnE
- Approved Member
- Posts: 75
- Joined: Tue Mar 16, 2021 5:35 pm
- Has thanked: 17 times
- Been thanked: 67 times
Re: RC10 Team car restoraion
The car is mostly done so on to the electrics
I had a Novak T4 back in the day so I had to find one for this car, it didn't take too long to find a good working one on Ebay. I put a Race Prep connector for the battery on it and direct soldered the motor wires. For a receiver I found a Novak XXL that looks pretty cool and works fine with my Airtronics M8 radio that I still use. The Servo is a JR metal gear with a Kimbrough servo saver, I had an old titanium turnbuckle laying around and some black ball cups that were a perfect fit
I had a Novak T4 back in the day so I had to find one for this car, it didn't take too long to find a good working one on Ebay. I put a Race Prep connector for the battery on it and direct soldered the motor wires. For a receiver I found a Novak XXL that looks pretty cool and works fine with my Airtronics M8 radio that I still use. The Servo is a JR metal gear with a Kimbrough servo saver, I had an old titanium turnbuckle laying around and some black ball cups that were a perfect fit
- Attachments
-
-
-
JohnE
- Approved Member
- Posts: 75
- Joined: Tue Mar 16, 2021 5:35 pm
- Has thanked: 17 times
- Been thanked: 67 times
Re: RC10 Team car restoraion
I was trying to find a Reedy motor from around that time and wasn't having much luck so I ended up cheating a little here. I found a knock off 17T double (I think) that had bearings and a black motor can. I found some replacement Reedy decals on MCI racing's website and decided to give them a try. I think the Reedy motors from back then that were 17T had a red label, plus I like red so I put one of those one, I doesn't look too bad. I put one some capacitor and it was good to go.
The stock gearcover was there but pretty shot so I put a new one on from BOKI, they make replacement bodies for a bunch of cars. This one is has a bit of grey tint like the stock one so I am pretty happy with it.stock
The stock gearcover was there but pretty shot so I put a new one on from BOKI, they make replacement bodies for a bunch of cars. This one is has a bit of grey tint like the stock one so I am pretty happy with it.stock
- Attachments
-
-
-
-
JohnE
- Approved Member
- Posts: 75
- Joined: Tue Mar 16, 2021 5:35 pm
- Has thanked: 17 times
- Been thanked: 67 times
Re: RC10 Team car restoraion
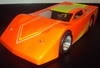
Quick story with the tires, this came with the original white wheels, not sure of the exact size but the rears were a little smaller diameter than the fronts. I am pretty sure the fronts are 1.9". The wheels were a bit scratched up and had some paint on them so I wet sanded them down at bit and ended up spraying them with Tamiya white primer.
I wanted to keep the rims but put modern tires on them so I bought a set of Proline ribbed fronts and Schumacher carpet rears. To get them to fit on the rim I just a section out of the tire and glued them back together with tire glue.
I wanted to keep the rims but put modern tires on them so I bought a set of Proline ribbed fronts and Schumacher carpet rears. To get them to fit on the rim I just a section out of the tire and glued them back together with tire glue.
- Attachments
-
Create an account or sign in to join the discussion
You need to be a member in order to post a reply
Create an account
Not a member? register to join our community
Members can start their own topics & subscribe to topics
It’s free and only takes a minute
Sign in
-
- Similar Topics
- Replies
- Views
- Last post
-
- 12 Replies
- 369 Views
-
Last post by uscm1488
-
- 5 Replies
- 1026 Views
-
Last post by vanpeebles
-
- 6 Replies
- 863 Views
-
Last post by jeepnut24
-
- 5 Replies
- 590 Views
-
Last post by joe sumasky
-
- 10 Replies
- 1461 Views
-
Last post by THEYTOOKMYTHUMB
-
- 9 Replies
- 1594 Views
-
Last post by THEYTOOKMYTHUMB
-
- 9 Replies
- 1517 Views
-
Last post by klavy69
-
- 2 Replies
- 991 Views
-
Last post by pj_elia


Who is online
Users browsing this forum: ![]() Bing [Bot] and 47 guests
Bing [Bot] and 47 guests