I get a ton of questions about my cars, both in person and online through this and other forums. It got me thinking that the best way to answer the questions would be to do a complete build and post it, along with pictures so anyone could see exactly what I do, how my cars are set up and easily duplicate it. There are a ton of other ways to build a modern runner, but this is how I prefer to do it. I'm not suggesting the other ways are wrong and my way is right, it's just how I do it.
The starting point is to find a donor car. Ideally a cheap beater with a stealth transmission will be the foundation. This particular chassis is one I already had, but it is an "A" stamp. Although it was slated to be used to rebuild my 1987 ROAR nationals car, I will postpone that build for this one.
The chassis was drilled to accomodate a stealth transmission. For a modern racer, the 6 gear just won't work as well. After the holes are drilled for the stealth tranny, I used a countersink bit to make sure the tranny screws, and any other screw on the bottom sit flush so they don't drag. I then take an angle grinder with a cut off wheel and cut the nose piece in the shape of a triangle so the servo can sit flush. Otherwise the front servo mount will be sitting on top of the nose plate and the rear mount will be flush on the chassis. Then I take an air grinder with an abrasive wheel and scuff the color off the top edges of the chassis, nose plate and motor plate. The aluminum is a nice contrast to the blue anodize.
RC10 modern racer build
-
JHarris
- Approved Member
- Posts: 526
- Joined: Sat Jan 16, 2010 11:17 am
- Location: Orlando, Florida
- Been thanked: 1 time
Re: RC10 modern racer build
From there I will install the rear arm mounts and rear bulkhead. I use a blue 8/32" nut on the rear screw of the arm mounts. This must be installed before the transmission.
Then I will attach the front shock tower to the front arm mounts. I like to use long steel flat head screws with countersink washers with a nut on the front side just to be sure it doesn't come loose. You will notice through my build that I use the countersink washers in several places. This is to allow a larger area to spread the contact surface of the fastener as well as improve appearance. Anytime you can combine fashion and function it's a good thing. Installing the arm mounts first makes it more difficult to align the shock tower mounting holes with the holes on the arm mounts. I also install the front shock mounting screws prior to installing the assembly on the car. Once it's on the car it's difficult to get to the screws.
Then I will attach the front shock tower to the front arm mounts. I like to use long steel flat head screws with countersink washers with a nut on the front side just to be sure it doesn't come loose. You will notice through my build that I use the countersink washers in several places. This is to allow a larger area to spread the contact surface of the fastener as well as improve appearance. Anytime you can combine fashion and function it's a good thing. Installing the arm mounts first makes it more difficult to align the shock tower mounting holes with the holes on the arm mounts. I also install the front shock mounting screws prior to installing the assembly on the car. Once it's on the car it's difficult to get to the screws.
- Attachments
-
-
-
-
-
JHarris
- Approved Member
- Posts: 526
- Joined: Sat Jan 16, 2010 11:17 am
- Location: Orlando, Florida
- Been thanked: 1 time
Re: RC10 modern racer build
I then attach the nose plate to the chassis using 8/32"x1/2" screws. Then I install the Houge steering system (courtesy of Ruffy) and secure using the supplied nylon nuts. Note that I do not install the nuts first, but install them upside down. This allows me to use a shorter screw to secure the steering and lowers the bellcranks to prevent the ball cups from hitting the camber link ballcups.
Then I install the battery posts. I use B44 posts with spacers underneath them and a countersink washer between the post and the spacer. The spacers are from the 25 degree caster block set. This raises the posts enough to use a 5000-5400mah LiPo. I also use the AE thumbscrews and a B4 carbon fiber hold down.
Before installing the transmission I make sure the bearings are either really clean or new. I use a B4 topshaft, slipper hubs, slipper pads, slipper spring and nut along with an 81 tooth B4 spur gear. The standard stealth slipper works just fine, but using the B4 parts here saves me from having to carry different spares. I also like the design of the B4 slipper a little better. The tranny is bolted in and the carbon fiber brace is screwed in place. It is important to mount the tranny brace prior to the wing mounts since they block access to the front two screws.
Prior to mounting the rear shock tower I drill it to accept B4 wing mounts. Anyone who has run an RC10 knows the joy of yelling, "hey, can you fix my wing". The B4 wing mounts are durable and allow mounting the wing so that it is secure during the race. I drill the shock tower to accept a single 4/40" screw for each mount. The holes are in the middle of the downward portion of the tower material and aligned with the top of the cut out section. This allows me to mount them the same on each car without having to get them drawn in a CAD file. I then install the right mount and take a .050" allen tip wrench and stick it through the rear mounting hole, scratching the motor plate. I then remove the wing mount and center punch the motor plate where I scratched it. This is then drilled and tapped using a 4/40" tap. The wing mounts are then both attached to the shock tower using 4/40" screws and countersink washers.
- Attachments
-
-
-
-
-
-
JHarris
- Approved Member
- Posts: 526
- Joined: Sat Jan 16, 2010 11:17 am
- Location: Orlando, Florida
- Been thanked: 1 time
Re: RC10 modern racer build
From there it's on the the suspension arms. I use the AE wide front arms and RPM rear arms. I prefer to use the AE parts wherever possible, but the design of the RPM arm lets the dirt fall through the holes rather than ride next to the dogbone and be directed towards the bearings. I polish all the hinge pins using Mother's polish applied to a wad of Nevr Dull. I then test fit the arms and remove any material necessary to make the arms fit correctly over the arm mounts. I test fit the hinge pins and use a rat tail file to remove and material necessary to allow the pins to fit properly. Once the arms are on I install the front B4 25 degree caster blocks. The pin hole must be enlarged to accept the 1/8" hinge pin on the RC10. Then I install the steering knuckle, placing it in the middle position and the center drilled front axle. I install the ball studs in the outer hole in the caster block and I use one shim under the ball stud on the steering knuckle.
I then install the rear camber link ball stud in the inner most hole with one spacer beneath the ball stud.
The rear carriers are a little more involved. I use the Racer's Edge .5 degree B4 carriers. I like these because the modifications remove material in stress areas. I am not comfortable doing this with a molded or composite part. I also like that they can be anodized to match the color of the car.
I start by using a 3/8" drill bit to reduce the thickness of the inner wall where the bearings sit. This is done by drilling from the inside of the hub towards the outside. This will move the CV out of the outdrive to prevent binding during full suspension compression. Once I achieve the inner wall thickness I desire, I use a 1/2" drill bit to enlarge the area where the bell portion of the B44 rear CV rides next to the carrier. This allows moving the axle outward without binding against the carrier. I then install the inner bearing and shim to my liking. I will then use individual axle shims between the inner and outer bearings since the standard axle spacers would now be too wide. The outer bearing is then installed and then shims are used between the outer bearing and the B4 wheel spacer.
- Attachments
-
-
-
-
-
-
-
-
JHarris
- Approved Member
- Posts: 526
- Joined: Sat Jan 16, 2010 11:17 am
- Location: Orlando, Florida
- Been thanked: 1 time
Re: RC10 modern racer build
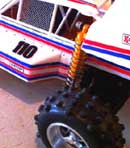
Next is the shocks. Since I use the Atlas shock towers I use the B4 threaded shocks. Aside from the ease of adjustability and the fact that they are sexier, there's no performance advantage to using the threaded shock bodies over the standard smooth bodies.
The fronts use the standard .89 bodies and .71 shafts with no spacers, #1 pistons and 40wt oil. If it sounds thick that's because it is. In the heat here in Florida and with the tracks we run on, it just works. I use the black front springs fully compressed. I also suggest the B44 offset spring cups.
The rears I used in this build are B4, but I would suggest using the Factory Team 1.32" body with 1.02" shafts. Using the B4 rears will work, but you really need to use external limiters with this set up. The rears use 1 internal shim with #1 pistons and 40wt oil. I run green springs in the rear.
My shocks are chromed. This isn't a necessary step, but much like the chromed front nose tubes and the scuffed tops of the chassis it just adds a nice touch. I also had the spring adjusters anodized blue to match the car.
Lastly I installed the rear screw in the wing mounts. This requires a long 4/40" screw that will be trimmed to the exact length needed. I have used spacers between the wing mounts on other builds so the mounts are held securely to the motor plate, but I opted for the plastic shock mounting nuts in this build.
I use a B4 motor cover with the lower hole drilled and tapped in the motor plate. I have also run them with only the top hole holding the cover with no issues.
The turnbuckles used in this build were Technacraft. I prefer the Lunsford but I had these NIP on hand so I opted for them. If the Lunsford are to be used, the rear uses 1 5/8" and the fronts are all 1 3/4". I also used the JConcepts ball cups.
- Attachments
-
-
-
-
-
-
-
JHarris
- Approved Member
- Posts: 526
- Joined: Sat Jan 16, 2010 11:17 am
- Location: Orlando, Florida
- Been thanked: 1 time
Re: RC10 modern racer build
Here's a complete list of the parts needed to duplicate this build. Each part also includes the manufacturer part number. All prices listed are from Towerhobbies.com, except the rear carriers, titanium turnbuckles and items from forum member Atlas.
UNAVAILABLE PARTS
RC10 chassis, nose plate and transmission plate
RC10 stealth transmission
RC10 rear arm mounts
RC10 bulkhead
Limited Availability Parts
Carbon fiber front shock tower “ATLAS” $17.50
Carbon fiber rear shock tower “ATLAS” $17.50
Carbon fiber transmission brace “ATLAS” $8.50
Steering system “ATLAS” $30.00
Readily Available Parts
B4 top shaft ASC9601 $9.39
B4 slipper hub (2) ASC9604 $7.69
B4 slipper pads ASC9603 $6.69
B4 81 tooth spur gear ASC9651 $3.89
B4 slipper spring ASC9605 $1.50
B4 slipper nut ASC6629 $1.00
B4 gear cover ASC7461 $3.79
RPM rear arms RC10 RPM70542 $9.49
Racer’s Edge carriers (.5 degree) RCE9436 $25-local hobby shop
B44 rear CVA’s ASC9756 $26.99
.187x.500 bearing ASC7935 $5.79
3/16x3/8 bearing ASC3977 $5.79
B4 wheel spacer ASC9608B$3.89
B4 wing mounts ASC9587 $3.39
1.32 shock bodies (threaded) ASC7415 $17.99
1.02 shock shaft (2) ASC6417 $5.79/ea
Bleeder caps (6443) ASC6443 $6.69
Shock rebuild kit ASC6440 $3.89
Spring cups ASC6475 $4.79
Shock rod ends ASC6471 $2.89
Green Springs ASC6480 $2.39
Shock pistons ASC6465 $2.89
B44 battery posts ASC9706 $4.79
B4/B44 thumbscrews ASC1787 $6.69
B4 battery hold down ASC9594 $12.99
B4 servo mounts ASC1779 $14.99
3/8x1/4 flanged bearings (4) ASC897 $11.99/ea (2 per pack, need 2 packs)
RC10 front arm mounts ASC6207 $2.00
RC10 wide front arms ASC6206 $5.79
B4 25 degree caster blocks ASC9580 $2.89
B4 steering knuckles ASC9581 $2.89
B4 front axles ASC1585 $13.99
B4 outer hinge pins ASC9622 $3.89
2/56” short screws ASC9645 $2.00
B4 upper shock mounts ASC1780 $5.69
.89 threaded shock bodies (2) ASC9312 $17.99
.71 shock shaft (2) ASC6418 $5.79/ea
B44 spring cups ASC9724 $1.99
Shock rod ends ASC6471 $2.89
Black Springs ASC8232 $2.39
Or .89 shock kit ASC9606 $42.99
Lunsford titanium turnbuckles 1-5/8 (3) 1-3/4 (4) +1 for steering bell cranks $4.50/ea (Superior Hobbies)
JConcepts ball cups $8.00-JC direct
Associated short black ball studs ASC3858 $11.99 (2)
Misc. Hardware – Fastener Express
JConcepts 6” wing 0114 $5.19
-
Seabass

- Business Member
- Posts: 1402
- Joined: Mon Jul 27, 2009 8:34 pm
- Location: Mississippi
- Been thanked: 12 times
Re: RC10 modern racer build
Cool overview of what you are doing to the cars. Apparently you have the right stuff because it shows in the videos you have posted. Nice work, I am impressed with what you are doing.
Jake
Jake
-
vintage AE
- Approved Member
- Posts: 3012
- Joined: Fri Nov 14, 2008 1:47 pm
- Location: Sunken Lake, Nova Scotia
- Has thanked: 29 times
- Been thanked: 35 times
Re: RC10 modern racer build
Great work Jeff! That buggy would look awesome with some aluminum wheels. Cant wait to see how you are going to paint it to match.
-
Toasted Coastie
- Approved Member
- Posts: 662
- Joined: Sun Apr 11, 2010 9:22 pm
- Location: Nashua, NH
- Been thanked: 1 time
-
shodog
- Approved Member
- Posts: 3816
- Joined: Thu Oct 05, 2006 3:09 pm
- Location: Washington
- Has thanked: 3 times
- Been thanked: 86 times
Re: RC10 modern racer build
Great write up, thanks for showing us the modern stuff that works on the vintage
-
JHarris
- Approved Member
- Posts: 526
- Joined: Sat Jan 16, 2010 11:17 am
- Location: Orlando, Florida
- Been thanked: 1 time
Re: RC10 modern racer build
Although Jake does some amazing work, this thread was started by JEFF, not Jake.vintage AE wrote:Great work Jake! That buggy would look awesome with some aluminum wheels. Cant wait to see how you are going to paint it to match.
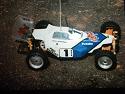
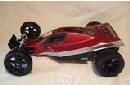
As for the paint; this car was only built for this thread. I have no other plans for this car and it will probably never see use. It is an exact copy of my own race car, which already has paint.
- Attachments
-
-
-
vintage AE
- Approved Member
- Posts: 3012
- Joined: Fri Nov 14, 2008 1:47 pm
- Location: Sunken Lake, Nova Scotia
- Has thanked: 29 times
- Been thanked: 35 times
Re: RC10 modern racer build
oops, sorry, I read Jake somewhere and typed it by mistake. That's a sweet racer!
-
nsr250_repsol
- Approved Member
- Posts: 101
- Joined: Sat Jun 19, 2010 5:28 am
- Location: McChord AFB, WA
Re: RC10 modern racer build
Very nice build!!! I have a lot of spares laying arround... I think I need to do something similar for a vintage racer. Too bad I can't make it to the vintage nats 
eBay ID: Nsr250_sp_repsol
Location: McChord AFB, WA
Location: McChord AFB, WA
-
Ruffy
- Approved Member
- Posts: 875
- Joined: Mon Jan 11, 2010 6:49 pm
- Location: Orlando, Florida
- Been thanked: 45 times
-
RedScampi It’s my birthday!

- Approved Member
- Posts: 2157
- Joined: Sat Aug 30, 2008 7:35 am
- Location: Bonney Lake, WA
Re: RC10 modern racer build
Nice walkthrough, thanks very much! Now to find my blue anodized pan...oh crap! That's right, I don't have one! Have to apply this to a black one I have waiting. 
Gary
Create an account or sign in to join the discussion
You need to be a member in order to post a reply
Create an account
Not a member? register to join our community
Members can start their own topics & subscribe to topics
It’s free and only takes a minute
Sign in
-
- Similar Topics
- Replies
- Views
- Last post
-
- 37 Replies
- 8859 Views
-
Last post by JK Racing
-
- 13 Replies
- 3509 Views
-
Last post by alcyon
-
- 29 Replies
- 3859 Views
-
Last post by Cplus
-
- 43 Replies
- 5203 Views
-
Last post by Lavigna
-
- 35 Replies
- 3743 Views
-
Last post by moto-steve
-
- 1 Replies
- 509 Views
-
Last post by bscotti
-
- 9 Replies
- 2091 Views
-
Last post by zleader
-
- 32 Replies
- 4540 Views
-
Last post by vintagercaddict


Who is online
Users browsing this forum: No registered users and 4 guests