Egress Jamie Booth replica vintage build + race thread

The place for all things Tamiya.

Moderators: scr8p, klavy69

Post Reply
pUs
Regular Member
Posts: 25
Joined: Fri Apr 04, 2014 3:03 am

Egress Jamie Booth replica vintage build + race thread

Post by pUs »

I was one of the select few who signed up on buying a conversion kit from Full Option (UK) which is run by the very talented David Beeby. The kit was supposed to be a pretty accurate copy of the Egress that Jamie Booth ran in part of the 1990 BRCA 4WD Champhionship. David had access to the actual car which Jamie used, so in theory it had all the ingridients to turn out nicely. For you guys out there who are not familiar with Jamies car, it had lots of hand made parts, particularly in the front and rear suspension. The original car had basically no front caster compared to its opposition, which was rectified in the 1990 Egress team car through use of hand made aluminium suspension arm holders and machined nylon suspension arms. It also had a similar setup in the rear with custom inner suspension arm mounts out of machined aluminium with custoim machined nylon arms.

In total I think we were something like 16 people pre-booking the kit and waiting for a year or so. When the kit eventually showed up in a nice box I had sort of lost a bit of my enthusiasm - partly because I had already built a TRF411X and a TRF211X quite recently after another, but also since I had became a father at that same time and didn't have much time left for RC cars (or anything else for that matter..). Because of that, the first month resulted in a few building attempts which didn't take me much further than this;

Image

.. after which the whole build was just put on hold for a couple of years. :(

pUs
Regular Member
Posts: 25
Joined: Fri Apr 04, 2014 3:03 am

Re: Egress Jamie Booth replica vintage build + race thread

Post by pUs »

Basically nothing happened until I visited the Nordic Vintage Challenge #9 race (after years of nagging from the organizer). I had paused all RC for more than 10 years and sort of knew that I would feel the itch to get going again, should I visit that race which is why I avoided it for quite a while... Anyway I went there and had a great time, and actually won a decent lipo charger in the lottery :-) after the race, the rules were also changed to allow a JB replica Egress to enther the 4WD Classic event. I had always dreamt of running that car, and now I had the chance to do so on a pretty vintage-friendly indoor carpet track with jumps. So the build started out again..

Image

The base for this build was supposed to be an old Avante/Egress mix of a wreck that I bought on Ebay more than 10 years ago. Unfortunately, the hoarder in me had different ideas and I guess that was just as well - I think the kit deserves good parts and when I actually got going basically 95% of the parts were replaced with new old stock Egress parts. The idea was to use vintage parts only, as long as it was realistically possible. I wanted the car to look and feel just like Jamies car did and like the Tamiya / TRF team ran it themselves 28 years ago. Vintage titan screws, aluminium nuts, vintage hi-cap dampers, generic hardware such as ball ends, threaded shafts etc. I did one major deviation though - diffs and drive shafts. It's simply not sustainable to try and get enough parts + spares to run those completely vintage. Had to resort to the improved re-re parts here.. :-/

Image

The front end is completely different and - supposedly - the biggest improvement over the original Egress. However, things were not that straightforward, at least not in my case. Initially I had to invest lots of time to make the suspension arm mounts fit tightly and straight against the gear box halves and I was still never really completely satisfied with the results. I didn't like the feeling of the whole assembly; to me it didn't feel solid enough. But more about that later on..

pUs
Regular Member
Posts: 25
Joined: Fri Apr 04, 2014 3:03 am

Re: Egress Jamie Booth replica vintage build + race thread

Post by pUs »

Except for the above mentioned front suspension mounts, the build as a whole went of pretty smoothly, nothing more complicated than any production car. It also happened to coincide with me being on paternity leave, which gave me plenty of time to think a bit. Analyzing different solutions on issues and problems, etc.. a bit of a luxury :-) After a while, the car looked like this:

Image

Since I had done almost no running with anything since 2007 I had a bit of catching up to do and was missing almost all sorts of electronics. I eventually chose the Orion HMX brushless ESX, servo/receiver/transmitter from Sanwa and a 13.5 Much More motor (NVC 4WD limit) to start with.

I chose to raise up the steering servo on the chassis to obtain an almost straight steering arms, since I never liked the feeling of the original Egress steering. Since I actually did race one back in the days, I had this vague memory that it didn't always feel the same left to right. Regardless if that was down to the angled steering arm (which I honestly doubt) it still felt like a pretty nice solution. Symmetry is never wrong :-)

Since I had noted that Jamies old factory car had aluminium steering arms with an extra steering arm hole drilled further inwards (giving a larger steering throw) I mounted a set of Pargu aluminium steering arms and drilled a hole like Jamies car had. Got to say I was extremely disappointed in those Pargu pieces - simply incredible how much I had to shim them in order to use them at all. In any case, the car started to come together nicely now and I was really eager to try it out for the first test session on our local indoor track (which would later host the NVC #10 race).

pUs
Regular Member
Posts: 25
Joined: Fri Apr 04, 2014 3:03 am

Re: Egress Jamie Booth replica vintage build + race thread

Post by pUs »

Just in time before the first test run I assembled a full set of new vintage Hicap dampers. Really nice feeling to open up those nicely packaged shocks in bags labelled 1988, 30 years ago, and experience the same ease of assembly and precision as I did back then.

Image

To be honest though, one also has to admit that there's been some advances since then :-) I wasn't overly impressed by all aspects of the dampers, for instance the o-rings which were just too tight and in my opinion gave them a bit too much friction, even though I did exchange the rings for new ones straight away. But, vintage it should be..

Ready for the first test run! As you can see, my son picks the Egress straight away before the TRF211X / Dyna Storm hybrid ;)

Image

pUs
Regular Member
Posts: 25
Joined: Fri Apr 04, 2014 3:03 am

Re: Egress Jamie Booth replica vintage build + race thread

Post by pUs »

Initially, I had spent quite some time on making sure the car had enough steering throw - particularly since I knew I'd be running it on a tight indoor track where you simply need to be able to throw it around a bit. I also realized early on that the standard steering throw wouldn't be enough. But anything can be solved with a Dremel and lots of time, so I took away quite a lot of material in the caster blocks to enable a bigger steering throw (curiously, the drive shafts were causing trouble binding against the caster block and quite severly so).

Since I built the car with re-re diffs I realized that the design was quite similar to the original but differing quite a lot when it comes to the outdrives; the original has a pin passing through the diff from one outdrive to the other one, which prohibits the use of a central screw. The re-re diffs have a more modern/common centred screw which means the outdrives also has to be designed differently;

Image

At this stage, I thought before building the diffs and just looking at the manual that it would require some pressure to actually mount the end-out drives, and that Tamiya had some sort of smart system to hold them in place. Turned out there wasn't, on the contrary the fall out very easily. Instead you're completely dependent on the small rubber bushings (BB37 on the illustration) are present between the drive shaft end and the outdrive.

Image

Without knowing it at the time, it was somewhere around here that the misery began. I started out by trying to assemble the front end with full size rubber bushings, resulting in severly limited suspension throw, both up and down - and I mean really limited. I then assumed that perhaps it would be as easy as just cutting down them limiters a bit, which I did. Felt pretty good on the table, so off I went to try out the car on the track!

pUs
Regular Member
Posts: 25
Joined: Fri Apr 04, 2014 3:03 am

Re: Egress Jamie Booth replica vintage build + race thread

Post by pUs »

Much to my joy, the car came out flying. Felt great and agile straight out of the box, but unfortunately the joy only lasted for a few laps. Soon after that, one of the out drives popped out. Put it back together, just to repeat the process again. Sometimes the right, sometimes the left, but almost always when steering at the same time as going through a bump or jump. It was obvious that my solution with cut-down rubber bushings wasn't cutting it. So I put the Egress aside, did some 2WD running and continued to wrenching at home later on. I then assumed that I had ran with a bit too much tolerances and wiggle in the actual universal wheel out drive part - it was possible to take it a few millimetres left and right. So I shimmed it tightly enough, kept my cut-down rubber bushings and was hoping for better luck next time.

Image

pUs
Regular Member
Posts: 25
Joined: Fri Apr 04, 2014 3:03 am

Re: Egress Jamie Booth replica vintage build + race thread

Post by pUs »

The changes weren't too successful, as can be seen above. By now I was starting to lose my patience a bit. The front end felt rather hopeless - trying to solve one problem just seemed to expose a new one, and it didn't take much force at all to bend one of those precious front arm mounts. I decided that before even bothering putting any more time or effort into the drive shaft/out drive problem, I had to put a stop on that. The Ti screw holding the plastic pin connecting the gearbox halves had obviously been bent and ripped out of its thread, resulting in the whole mount (and the suspension pin) bending. Incredibly, the suspension arm itself wasn't damaged...

I was in a bad mood for a few days but sat down again, straightened up the suspension mount as well as I could and pondered on what could be done to sort out this issue. Eventually, I did settle on a few key areas to improve upon;

1) The plastic pin holding together the gearbox halves is too weak. Need something more rigid.
2) Something additional has to hold together the suspension arm pairs - screw in front and axle in the rear is too weak - the pin can actually move at the rear..
3) The suspension mount is too weak and excessively lightened - faithfully modelled after the original, but still too weak if taking a hit in an unfortunate angle
4) No more vintage Ti-screws in the most critical places. Not impressed by their flexibility..

1st and 4th areas were solved by finding a suitable 3mm-threaded aluminium pole which replaced the plastic piece, together with some old trusty Corally Torx steel screws.

Image

The 2nd area was solved (or at least bettered) by digging out a pair of longer hinge pins and cutting out a provisional fibreglass hinge-pin brace;

Image

3rd area was difficult though since I couldn't really do anything about it myself. David at Full Option had previously declared that he would only supply extra plastic parts should it be needed. However, after seeing my 'after crash' pic he did agree to try and help me out by machining a custom set of non-lightened front suspension mounts which was much appreciated - the mounts are not easy to produce and quite complicated and time consuming to machine. Many thanks again David!

Image

pUs
Regular Member
Posts: 25
Joined: Fri Apr 04, 2014 3:03 am

Re: Egress Jamie Booth replica vintage build + race thread

Post by pUs »

At this point, I felt like the front end should be able to withstand a few hits slightly better. But I still hadn't solved the neverending issues with the outdrives and drive shafts popping out..

After much thought and a bit of trial and error I realized that the only way to avoid extreme "push" by the whole universal shaft inwards (which was what made it impossible to use uncut foam bushings) was to set up the front end with more camber change under compression, i.e shorter top arms. Initially I had done the opposite and mounted longer top arms a bit like on the Avante 2001, since that's what was on Jamies car when he received it from Tamiya on those famous RCMC pictures. I abandoned this idea and instead put on much shorter top arms mounted on the damper mount 'ears'. All in all it made the top arms more than 10 millimetres shorter. Incidentally, that's also the same setup that Jamie had on his car on its last known run. Perhaps a coincidence, but perhaps not..

Image

It almost looks a bit ridiculous and something that would've been more suited on a modern touring car. But since the lower arms are pretty short (even shorter than on the Manta Ray / Top Force) they're actually pretty much proportional. As soon as I had assembled this setup for the first time, I realized that the driveshaft inner ball was now hardly moving inwards at all. All of a sudden, I could use non-cut down foam bushings without the slightest risk of binding. Full travel both up- and downwards! :-)

The concept as such was confirmed a week or so afterwards, when I managed to do run through a few packs without a single stop. If this wouldn't have happened at this stage, I probably would've put the car on the shelf..

Image

At the same time I thought it was time for a bit more horsepower, so the Muchmore was switched to an Orion 13.5 motor;

Image

The earlier struggles with the front end had meant that I was running with a setup which only goal was to stop the drive shafts from falling out. In other words, as little suspension action as possible in all directions - dampers as far out on the arms as possible, limiting both up- and downtravel and generally sitting at too much angle. This wasn't ideal and was starting to show - the car wasn't even close to how I remembered it from its first run. I had been looking at old pics of how Jamie ran his car and in general he had a very different set up. Shocks stood up more straight and was mounted further in on the arms. On some ocassions he also used a front anti roll bar mounted outside of the front shocks, a bit like the common Cat XLS / Procat setup. I was inspired by this so started to work on setting up one myself. Dug through some old parts boxes and found an anti roll bar of unknown brand (probably Tamiya) which was a perfect fit after a few modifications;

Image

At first i didn't like the feeling on this with the car on the table, but sticking to short dampers, the damper mount and the suspension arms from the conversion kit didn't really leave me with much of a choice. However, I did persist and tried it out on track and to my surprise it felt pretty good. Almost as good as it had been previously and actually better over the jumps and bumps - particularly the corner 'dots' which felt like they sometimes weren't there. Great when you're a bit rusty behind the wheel and generally want to run tighter than you can really master.. :-)

pUs
Regular Member
Posts: 25
Joined: Fri Apr 04, 2014 3:03 am

Re: Egress Jamie Booth replica vintage build + race thread

Post by pUs »

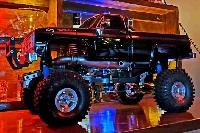
By now I was a bit eager to go racing for real. It seemed like there actually was a decent chance of putting together a real racing car out of what seemed destined for the shelf. So I decided it was time to retire the old, worn Egress body shell which had served so far and sort out a nice spray can job on a new body shell. Didn't have time to find somebody with better skills and tools who could do it for me, and I had thought I'd never spray paint any body shell again. Always hated it. However I did decide to try out Liquid Mask this time, it seemed like a pretty nice solution on those youtube videos. The thought was to try and re-use my old 1:12 color scheme in a simplified way.

It turned out way worse than I had hoped, mainly because of the mask sticking and 'reacting' with the paint in a weird way. Didn't seem to matter if I did the layers with less or more time in between them, and if they were thinner or thicker - I basically had to cut most stuff twice. But I covered the worst hiccups with decals..

Image

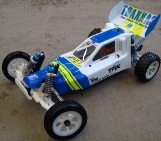
We were now in the middle of the summer and a very hot July. My local club Mk Eskil arranged an open practice day during a weekend and this was probably the first ocassion on which I dared running the car pretty hard. There were still small niggles with one way bearing / main shaft outdrive in need of shimming, rear hubs (Madcap) and front steering knuckles (Hotshot / Manta Ray) which sometimes seemed like they were made out of fine cheese, but in general the car was in much better shape right now.

Lots of setup headache came from the fact that it's extremely difficult to find decent tuning springs for the hicaps - the hopup-tuning springs are slightly weird, the harder the springs are the longer they also are which makes it hard to set your ride height properly when going for harder springs. God knows how many times I changed pistons and oil and/or internal limiters instead..

Image

It was probably here somehwere that I started getting lost setup-wise. From the car having been decent it just got slightly worse over time. I later realized that it was partly down to it wearing down the front tires quite heavily and making the low speed understeer more and more excessive, but it was also partly down to trying out things which didn't work well. Over the month I tried running with less rear toe in (standard Egress chassis), more rear toe in (replica chassis + SA hubs), longer wheelbase replica chassis (copy of what was on Jamies original car) with both more and less rear toe in, re-release hicap dampers etc...

When the Nordic Vintage Challenge was finally coming closer in September, I had pretty much rolled back most changes and was back where I started after putting on the front anti roll bar. It's good knowing what doesn't work but it didn't really get me anywhere :-) I had changed some minor things though;

* Schumacher ball ends in the front - I was so sick and tired of popping the small black Tamiya ball ends even in the slightest of hits. Simply not worth it
* Different steering. Not a fan of blue bling-bling stuff on a vintage car, but I did get more steering throw with the M01 (? I think) alu steering kit. Much needed
* Turnbuckles in the front end. The vintage purist in me simply had to give up, it's not practical to pop off the ball ends consistently for the smallest adjustment
* Trinity motor instead of the Orion (better punch, less boost-dependent)
* Wider front end - 2mm extra on each side
* Dremelled down the rear gearbox to allow for a 24T pinion (25T might be possible if you take away a bit more)

For a while I did consider putting on medium front shocks and using the outer suspension arm holes instead, but in the end I decided against it. The dampers are such an important part of the soul of the car to me - others might disagree, but I want to preserve the old feeling of the car.

Image

Took a quick shot of the cars before going out to the track last Friday to start the free practice. All in all I have to say it ran pretty smoothly. Took TQ and won all three A-finals in the 4WD classic class. It wasn't a big field and there were some others running older cars than this, but still I was pretty quick in pace compared to the more modern cars. I know it would probably had been easier to "just" build myself a rere-Cat XLS or perhaps a standard re-re Egress, but it was still worth the extra effort. I loved driving it and just the feeling of finally running my own Works Egress was great. Above all, I was happy that it didn't break down one single heat all day.

I don't know If I'll ever going to drive it again, but if so it will probably be in the 'newer' 4WD category. It's slightly too good to be fighting old Cats only.. :-)

pUs
Regular Member
Posts: 25
Joined: Fri Apr 04, 2014 3:03 am

Re: Egress Jamie Booth replica vintage build + race thread

Post by pUs »


A few videos from the racing weekend. Car & driving is by no means perfect but it was still really fun to drive. Curious to see how it would handle a bigger and faster track.

tamiyadan
Approved Member
Posts: 1683
Joined: Wed Apr 07, 2010 4:45 pm
Been thanked: 6 times

Re: Egress Jamie Booth replica vintage build + race thread

Post by tamiyadan »

.

User avatar
TokyoProf
Approved Member
Posts: 290
Joined: Wed Oct 16, 2019 6:13 pm
Location: Tokyo, Japan
Has thanked: 473 times
Been thanked: 343 times

Re: Egress Jamie Booth replica vintage build + race thread

Post by TokyoProf »

Would love to have the replica modifications available again. Any chance (with all the re-re's) that I (and others) can purchase the items?
That would be awesome...
"Everyone is capable of so much more than they think they are." - Johnny Kim - Navy Seal, Doctor, Astronaut

User avatar
coxbros1
Super Member
Posts: 2187
Joined: Mon Dec 24, 2018 8:50 am
Location: Energy, Illinois
Has thanked: 1971 times
Been thanked: 1756 times

Re: Egress Jamie Booth replica vintage build + race thread

Post by coxbros1 »

nice refresh on this old thread! very classic stuff....as far as outdrives the simple fix is running Avante gear diffs which are much better anway.

...but this made me see TamiyaDan's name and his deleted post...there has to be a reason he jumped ship and someone out there has to know why! the people deserve the Truth!
Tap pic for clarity: Derek

User avatar
TRX-1-3
Super Member
Posts: 1724
Joined: Sat Mar 29, 2014 12:13 pm
Location: USAG Humphreys, South Korea
Has thanked: 1366 times
Been thanked: 746 times

Re: Egress Jamie Booth replica vintage build + race thread

Post by TRX-1-3 »

Maybe he got punctuated?
Hope you're doin' something fun.

Post Reply

Create an account or sign in to join the discussion

You need to be a member in order to post a reply

Create an account

Not a member? register to join our community
Members can start their own topics & subscribe to topics
It’s free and only takes a minute

Register

Sign in

  • Similar Topics
    Replies
    Views
    Last post

Return to “Tamiya Forum”

Who is online

Users browsing this forum: No User AvatarAhrefs [Bot] and 2 guests