One of the carbon fiber lipo straps had a little bit of de-lamination on the end, which I've repaired with some medium CA glue. This time, I have some blue (sky blue) machined hex stand offs from Tuning Haus. They are available in different colors and lengths from https://www.tqrcracing.com/ or you could buy direct? Yes, they have purple ones too.
Factory Works 180* Steering Bellcrank Build
-
NomadRacer

- Approved Member
- Posts: 1467
- Joined: Sun Apr 16, 2017 7:29 am
- Location: Eastern Shore of Virginia
- Has thanked: 83 times
- Been thanked: 77 times
Re: Factory Works 180* Steering Bellcrank Build
While I'm waiting on some more TLR parts for the battery bulkhead option I started looking at the Exotek parts like I used on the C2 "Tuber" build.
One of the carbon fiber lipo straps had a little bit of de-lamination on the end, which I've repaired with some medium CA glue. This time, I have some blue (sky blue) machined hex stand offs from Tuning Haus. They are available in different colors and lengths from https://www.tqrcracing.com/ or you could buy direct? Yes, they have purple ones too.
One of the carbon fiber lipo straps had a little bit of de-lamination on the end, which I've repaired with some medium CA glue. This time, I have some blue (sky blue) machined hex stand offs from Tuning Haus. They are available in different colors and lengths from https://www.tqrcracing.com/ or you could buy direct? Yes, they have purple ones too.
Bum on Direct Deposit
-
NomadRacer
- Approved Member
- Posts: 1467
- Joined: Sun Apr 16, 2017 7:29 am
- Location: Eastern Shore of Virginia
- Has thanked: 83 times
- Been thanked: 77 times
Re: Factory Works 180* Steering Bellcrank Build
When I disassembled to figure out the battery placement I noticed that the trailing arm pivot was leaving a mark on the ESC stand offs. Not bad, but it was marring the surface. I pulled them off and made a 0.020" reduction of the diameter. Now I'm happy. 
Bum on Direct Deposit
-
XLR8

- Approved Member
- Posts: 3018
- Joined: Sun Feb 19, 2017 3:46 am
- Location: north/central Alabama
- Has thanked: 1272 times
- Been thanked: 913 times
Re: Factory Works 180* Steering Bellcrank Build
A simple problem requires a simple solution. Very nice.
There's so many benefits to owning a lathe.
There's so many benefits to owning a lathe.
Doug
-
NomadRacer
- Approved Member
- Posts: 1467
- Joined: Sun Apr 16, 2017 7:29 am
- Location: Eastern Shore of Virginia
- Has thanked: 83 times
- Been thanked: 77 times
Re: Factory Works 180* Steering Bellcrank Build
Earlier, I had made some wing hardware but was not real happy with them. They could have used a couple of more cuts,45 degrees here and there. So... I drilled some more rod (1/16" for the wire) in prep for a couple of more. Seeing as I'm waiting on some parts and a new Reedy Wolf Pack lipo shorty. I have something to get into. 
Bum on Direct Deposit
-
NomadRacer
- Approved Member
- Posts: 1467
- Joined: Sun Apr 16, 2017 7:29 am
- Location: Eastern Shore of Virginia
- Has thanked: 83 times
- Been thanked: 77 times
Re: Factory Works 180* Steering Bellcrank Build
Mail was running a little late today, dense fog this morning. Packages arrived for the battery hold down, a couple of options to work with.
Bum on Direct Deposit
-
NomadRacer
- Approved Member
- Posts: 1467
- Joined: Sun Apr 16, 2017 7:29 am
- Location: Eastern Shore of Virginia
- Has thanked: 83 times
- Been thanked: 77 times
Re: Factory Works 180* Steering Bellcrank Build
Motor plate heat sinks from 3/8" rod. They might not do much, but look cool.
Bum on Direct Deposit
-
NomadRacer
- Approved Member
- Posts: 1467
- Joined: Sun Apr 16, 2017 7:29 am
- Location: Eastern Shore of Virginia
- Has thanked: 83 times
- Been thanked: 77 times
Re: Factory Works 180* Steering Bellcrank Build
I've got the wing mount hardware finished now, whether I use the wing or not, it's still done.
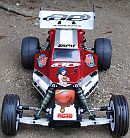
Working on getting the Andy's Renegade body to fit now. I'm close, not perfect though.
Bum on Direct Deposit
-
XLR8
- Approved Member
- Posts: 3018
- Joined: Sun Feb 19, 2017 3:46 am
- Location: north/central Alabama
- Has thanked: 1272 times
- Been thanked: 913 times
Re: Factory Works 180* Steering Bellcrank Build
Sweet!
Andy's Renegade body is timeless and it looks like it'l fit the trailing arm chassis well. I reckon it's really tricky to trim around those canted rear shocks (probably require a little extra clearance so they'll swing freely). Looking good!!
Do you have a paint scheme in mind?
Andy's Renegade body is timeless and it looks like it'l fit the trailing arm chassis well. I reckon it's really tricky to trim around those canted rear shocks (probably require a little extra clearance so they'll swing freely). Looking good!!
Do you have a paint scheme in mind?
Doug
-
NomadRacer
- Approved Member
- Posts: 1467
- Joined: Sun Apr 16, 2017 7:29 am
- Location: Eastern Shore of Virginia
- Has thanked: 83 times
- Been thanked: 77 times
Re: Factory Works 180* Steering Bellcrank Build
Yes, rather tricky. I found a way though...
Eyeball the shock mount hole and drill/ream the screw hole position. Use a long 3mm screw and mount the shock, use a sharpie pen to draw the outline of the shock body/spring.
I've not figured out a paint scheme yet but would like to use gunmetal,chrome,blue and white.
Eyeball the shock mount hole and drill/ream the screw hole position. Use a long 3mm screw and mount the shock, use a sharpie pen to draw the outline of the shock body/spring.
I've not figured out a paint scheme yet but would like to use gunmetal,chrome,blue and white.
Bum on Direct Deposit
-
XLR8
- Approved Member
- Posts: 3018
- Joined: Sun Feb 19, 2017 3:46 am
- Location: north/central Alabama
- Has thanked: 1272 times
- Been thanked: 913 times
Re: Factory Works 180* Steering Bellcrank Build
That seems like a good method. Your eyeball must be calibrated 'cause you appear to have nailed the shock cutout perfectly. Well done Nomad!!
Doug
Create an account or sign in to join the discussion
You need to be a member in order to post a reply
Create an account
Not a member? register to join our community
Members can start their own topics & subscribe to topics
It’s free and only takes a minute
Sign in
-
- Similar Topics
- Replies
- Views
- Last post
-
- 2 Replies
- 115 Views
-
Last post by ZED32
-
- 94 Replies
- 9747 Views
-
Last post by NomadRacer
-
- 22 Replies
- 3455 Views
-
Last post by XLR8
-
- 15 Replies
- 4087 Views
-
Last post by scr8p
-
- 5 Replies
- 1285 Views
-
Last post by scr8p
-
- 13 Replies
- 4562 Views
-
Last post by jwscab
-
- 1 Replies
- 654 Views
-
Last post by jwscab
-
- 15 Replies
- 2775 Views
-
Last post by aip47-2008


Who is online
Users browsing this forum: ![]() Bing [Bot] and 41 guests
Bing [Bot] and 41 guests