Are you really running the purty mk1 motor plate!? Do you know how rare they are????
Losi XXT CR Graphite Plus - Runner build
-
jamin

- Approved Member
- Posts: 1157
- Joined: Thu Dec 16, 2010 5:58 am
- Location: Suffolk, UK
- Has thanked: 3 times
- Been thanked: 28 times
Re: Losi XXT CR Graphite Plus - Runner Build
Wow, you have been busy!
Are you really running the purty mk1 motor plate!? Do you know how rare they are????

Are you really running the purty mk1 motor plate!? Do you know how rare they are????
Team Losi: XX-CR | XXT | XXT-CR Graphite+ | XX4 | Street Weapon IWC Edition
-
Lavigna

- Approved Member
- Posts: 1462
- Joined: Wed Aug 05, 2015 4:24 am
- Location: Petaluma, CA
- Has thanked: 1103 times
- Been thanked: 1419 times
Re: Losi XXT CR Graphite Plus - Runner Build
LOL I am well aware. It took me a couple years to find my first one. I now have 3 new ones. However, this one is actually used. The underside is scraped. That is the only reason I am running it.
Good to hear from you Jamin. It's been very quiet around here without you.
- Attachments
-
-
My Gallery ---> https://www.rc10talk.com/viewtopic.php?f=77&t=38934
-
jamin
- Approved Member
- Posts: 1157
- Joined: Thu Dec 16, 2010 5:58 am
- Location: Suffolk, UK
- Has thanked: 3 times
- Been thanked: 28 times
Re: Losi XXT CR Graphite Plus - Runner Build
Pretty cool that you can use one in your runner, nice touch!lavigna wrote: ↑Wed Jun 28, 2017 4:43 pmLOL I am well aware. It took me a couple years to find my first one. I now have 3 new ones. However, this one is actually used. The underside is scraped. That is the only reason I am running it.
Good to hear from you Jamin. It's been very quiet around here without you.
It took me a long time also to find one - I ended up finding two and got one anodised in the Trinity blue - took some guts to send that of I can tell you!
I'm done with my builds (except for my NIB Kinwald) and so haven't been on here much. Glad to see you putting some time in though
Team Losi: XX-CR | XXT | XXT-CR Graphite+ | XX4 | Street Weapon IWC Edition
-
jcwrks
- Approved Member
- Posts: 674
- Joined: Wed Jun 21, 2017 3:40 pm
- Location: San Angelo, TX
- Has thanked: 171 times
- Been thanked: 393 times
Re: Losi XXT CR Graphite Plus - Runner Build
lavigna, you really do have an attention to detail. Thanks for sharing your build threads. You give us all some great ideas to incorporate into our own builds.
The TX SKUNK
-
mytimac

- Business Member
- Posts: 945
- Joined: Mon Apr 28, 2008 8:42 pm
- Location: Rochester MN
- Has thanked: 7 times
- Been thanked: 59 times
Re: Losi XXT CR Graphite Plus - Runner Build
Jammin you need to stalk the site more.
http://oldrc.com - Find parts for older Losi, Associated, Tamiya and others.
http://vintagelosi.com - Manuals and information on older Team Losi models
http://vintagelosi.com - Manuals and information on older Team Losi models
-
jamin
- Approved Member
- Posts: 1157
- Joined: Thu Dec 16, 2010 5:58 am
- Location: Suffolk, UK
- Has thanked: 3 times
- Been thanked: 28 times
Re: Losi XXT CR Graphite Plus - Runner Build
My builds are done so i don't visit as frequently as i should do. Would love to find a Trinity circuit killer kit for my Street Weapon though!
Team Losi: XX-CR | XXT | XXT-CR Graphite+ | XX4 | Street Weapon IWC Edition
-
mytimac
- Business Member
- Posts: 945
- Joined: Mon Apr 28, 2008 8:42 pm
- Location: Rochester MN
- Has thanked: 7 times
- Been thanked: 59 times
Re: Losi XXT CR Graphite Plus - Runner Build
Those are a more rare than the motor plates. Last one I had actually went to France I think. That was a few years ago.jamin wrote: ↑Tue Aug 15, 2017 4:51 pmMy builds are done so i don't visit as frequently as i should do. Would love to find a Trinity circuit killer kit for my Street Weapon though!
http://oldrc.com - Find parts for older Losi, Associated, Tamiya and others.
http://vintagelosi.com - Manuals and information on older Team Losi models
http://vintagelosi.com - Manuals and information on older Team Losi models
-
Lavigna
- Approved Member
- Posts: 1462
- Joined: Wed Aug 05, 2015 4:24 am
- Location: Petaluma, CA
- Has thanked: 1103 times
- Been thanked: 1419 times
Re: Losi XXT CR Graphite Plus - Runner Build
I have made a few changes to this truck, and still have plans for a couple more upgrades. Unfortunately I have not driven it. There are no tracks near me.
- Attachments
-
-
-
-
-
-
-
My Gallery ---> https://www.rc10talk.com/viewtopic.php?f=77&t=38934
-
matt1ptkn

- Approved Member
- Posts: 910
- Joined: Wed Dec 12, 2012 8:27 am
- Location: Moundsville, WV
- Has thanked: 80 times
- Been thanked: 133 times
Re: Losi XXT CR Graphite Plus - Runner Build
That is a beautiful truck! 
Matt
Just a part of my RC collection: Matt1ptkn's Toys
"I wish there was a way to tell you're in the good old days, before you've actually left them."
Just a part of my RC collection: Matt1ptkn's Toys
"I wish there was a way to tell you're in the good old days, before you've actually left them."
-
Lavigna
- Approved Member
- Posts: 1462
- Joined: Wed Aug 05, 2015 4:24 am
- Location: Petaluma, CA
- Has thanked: 1103 times
- Been thanked: 1419 times
Re: Losi XXT CR Graphite Plus - Runner Build
I am in the middle of a full rebuild on this truck. I'm not entirely sure why I am redoing it, but I just thought it would be fun to take this build to the next level.
The Lunsford tie rods are being swapped for these lovely Tecnacraft units. The MIP steering is replacing the stock setup. The MIP bearings are more than twice the size of stock. It also gets rid of the servo saver. This is better suited to modern servos.
I modified the rear tower similar to what I did on my XX Kinwald build. This one was much more difficult though. The reason for this modification will be clear soon. I also removed the outermost holes on both towers.
- Attachments
-
-
-
-
My Gallery ---> https://www.rc10talk.com/viewtopic.php?f=77&t=38934
-
DerbyDan

- Approved Member
- Posts: 1837
- Joined: Tue Sep 08, 2009 8:04 am
- Location: Northampton UK
- Has thanked: 2 times
- Been thanked: 19 times
Re: Losi XXT CR Graphite Plus - Runner Build
Love this truck.... kinda reminds me of my runner XXTG+ - except you've got a lot more nice hop-up parts & an altogether more modern (& suitable) brushless set-up - I too am a little wary of running it too hard!
I'm on the lookout for that MIP ballraced set-up - looks so much better that the stock steering system-especially if using the Losi ballrace upgrade - they are so small! I've seen somewhere that has the RPM set listed (cheap too) - but I can't say that I trust the website - seems a bit weird! Since these are presumably discontinued, I'd like to copy the MIP parts & 3D print them in graphite impregnated nylon & see how they go - perhaps offer sets for sale?
I'm on the lookout for that MIP ballraced set-up - looks so much better that the stock steering system-especially if using the Losi ballrace upgrade - they are so small! I've seen somewhere that has the RPM set listed (cheap too) - but I can't say that I trust the website - seems a bit weird! Since these are presumably discontinued, I'd like to copy the MIP parts & 3D print them in graphite impregnated nylon & see how they go - perhaps offer sets for sale?
My T.C Showroom; http://www.tamiyaclub.com/member.asp?id=28990
-
Lavigna
- Approved Member
- Posts: 1462
- Joined: Wed Aug 05, 2015 4:24 am
- Location: Petaluma, CA
- Has thanked: 1103 times
- Been thanked: 1419 times
Re: Losi XXT CR Graphite Plus - Runner Build
^ DerbyDan - Thanks. Yes the MIP steering is a nice upgrade for these. Sorry I don't have a spare for you.
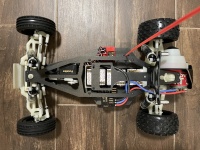
I want this truck to have a very clean and minimal electronics layout as well as being very functional. I carefully cut the sides of the battery tray on the chassis so that a modem lipo battery sits flat. I don't have a lathe so I had to do this by hand. It was hard to do without messing up. I also wanted it to look as factory as I could. It took very careful hand dremeling but the result came out well. Now the battery sits as low as possible. I also cut the rails to the length of a shorty battery, so that the battery is prevented from sliding fore or aft.
I am mounting the esc at the lowest point in the chassis. I drilled to allow the motor leads to come directly up and then pass through the cut out rear tower. This esc placement should look very clean, and also allow for the lowest center of gravity, shortest leads, and let's me hide the capacitor out of sight.
I was originally going to use my Tekin RSX controller, but this new R1 Wurks Digital 3 unit fits better. If I had known I was using it prior to cutting the 3 motor lead holes, I would have done them differently. Oh well!
The receiver will be hidden from sight once mounted. The motor sensor wire is run out of sight and enters from the back under side. I am very happy with how it turned out.
All the hardware is being upgraded to titanium. This should be a very capable truck once completed.
- Attachments
-
-
-
-
My Gallery ---> https://www.rc10talk.com/viewtopic.php?f=77&t=38934
-
DerbyDan
- Approved Member
- Posts: 1837
- Joined: Tue Sep 08, 2009 8:04 am
- Location: Northampton UK
- Has thanked: 2 times
- Been thanked: 19 times
Re: Losi XXT CR Graphite Plus - Runner Build
Wow very neat indeed! I like the hole for the servo lead too!
I'd thought about doing this (trimming the chassis to get the battery to sit flush) But was always a bit worried about the thickness of material & whether I'd break through! The idea of setting a dermal onto an original Graphite STD length chassis in good condition somewhat scared me lol!
I'd thought about doing this (trimming the chassis to get the battery to sit flush) But was always a bit worried about the thickness of material & whether I'd break through! The idea of setting a dermal onto an original Graphite STD length chassis in good condition somewhat scared me lol!
My T.C Showroom; http://www.tamiyaclub.com/member.asp?id=28990
-
Lavigna
- Approved Member
- Posts: 1462
- Joined: Wed Aug 05, 2015 4:24 am
- Location: Petaluma, CA
- Has thanked: 1103 times
- Been thanked: 1419 times
Re: Losi XXT CR Graphite Plus - Runner Build
^ Thanks! You don't need to remove any material going down to the bottom of the chassis, just remove the little lip that runs the length of the tunnel on both sides. This is a XL Graphite chassis and it was hard to make myself cut it. However it's not brand new. I did make a small gouge when drilling the hole for the servo lead, but it's completely covered once assembled.
This thing is close to done. I spent a lot of time to make sure all parts fit and interacted just right. This is truly built to be a runner. The battery is very secure. I ended up using a CF brace I had laying around. It has blue inserted in the carbon strands and it matches the Trinity blue very well. Happy accident.
I put on black springs for now, but may change back to blue /pink later. I upgraded the servo while I was at it. All suspension movements are free but without slop. I spent long time getting all these little details just right.
I'm excited to paint a body and run it!
- Attachments
-
-
-
-
-
-
-
My Gallery ---> https://www.rc10talk.com/viewtopic.php?f=77&t=38934
Create an account or sign in to join the discussion
You need to be a member in order to post a reply
Create an account
Not a member? register to join our community
Members can start their own topics & subscribe to topics
It’s free and only takes a minute
Sign in
-
- Similar Topics
- Replies
- Views
- Last post
-
- 90 Replies
- 20742 Views
-
Last post by Lavigna
-
- 10 Replies
- 799 Views
-
Last post by RogueIV
-
- 7 Replies
- 2114 Views
-
Last post by urpaldan
-
- 10 Replies
- 2238 Views
-
Last post by Diamond Dave
-
- 8 Replies
- 2310 Views
-
Last post by FasterLouder
-
- 5 Replies
- 2029 Views
-
Last post by Lavigna
-
- 26 Replies
- 4446 Views
-
Last post by bird
-
- 120 Replies
- 21598 Views
-
Last post by Lavigna
Who is online
Users browsing this forum: No registered users and 2 guests