Love the LXT! That body seems in good shape considering the age. I assume it's from your racing days based on the decals.
I know what you mean with the vintage electronics vs. new. It looks way better when it's era correct, but the driving experience is much better with modern electronics. I've been building some of each. One to display, one to run sort of.
Rebuilding my JRX Pro-SE
-
mikesofunny
- Approved Member
- Posts: 74
- Joined: Sun Feb 07, 2021 2:14 pm
- Location: Indiana
- Has thanked: 182 times
- Been thanked: 41 times
-
HS-YZ250
- Super Member
- Posts: 263
- Joined: Sun Mar 24, 2013 1:14 pm
- Location: Georgia, USA
- Has thanked: 79 times
- Been thanked: 77 times
Re: Rebuilding my JRX Pro-SE
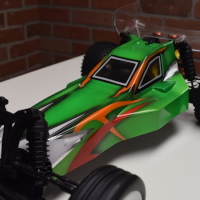
That image is from that body's good side. It's cracked at the front wheel well and bent up at the back quarter. The only reason I have it on is because the Jammin' Lamborghini body I had later was lost years ago. I really miss that one because it was rare and you can't find any reproductions. It'll be getting a new body, eventually.mikesofunny wrote: ↑Sat Jan 08, 2022 9:38 am Love the LXT! That body seems in good shape considering the age. I assume it's from your racing days based on the decals.
I know what you mean with the vintage electronics vs. new. It looks way better when it's era correct, but the driving experience is much better with modern electronics. I've been building some of each. One to display, one to run sort of.
For a while I was buying vintage esc's and motors for nostalgia's sake, but quickly realized that brushless stuff was going to be less maintenance and a better fit for my once-in-a-while bashing. Kyosho's retro Le Mans motors started me on that kick with one of my Rocky's.
Losi LXT (JRX-T Conversion)
Losi JRX Pro SE
Kyosho Rocky
Parts-Car-to-Runner Kyosho Rocky
Yokomo YZ10 WCS '95 Pavidis
RJ Speed Spec10 "Chew Toy Mk1"
Redcat Lightning STK "Chew Toy Mk 2"
Kyosho Lazer ZX, ZX-R, ZX-RR
Losi JRX Pro SE
Kyosho Rocky
Parts-Car-to-Runner Kyosho Rocky
Yokomo YZ10 WCS '95 Pavidis
RJ Speed Spec10 "Chew Toy Mk1"
Redcat Lightning STK "Chew Toy Mk 2"
Kyosho Lazer ZX, ZX-R, ZX-RR
-
HS-YZ250
- Super Member
- Posts: 263
- Joined: Sun Mar 24, 2013 1:14 pm
- Location: Georgia, USA
- Has thanked: 79 times
- Been thanked: 77 times
Re: Rebuilding my JRX Pro-SE
Haven't made a lot of progress, lately for a couple of reasons. One is I've been messing around with this ESC to try and tame the motor. When I got it the throttle would hit so hard it would spin the differential. After playing around with the diff and clutch tensions and getting nowhere, I did a factory reset on the ESC and that seemed to make things more manageable, though I probably need to get the Tekin interface module so I can adjust the current profile. Still overly "punchy".
The other reason is there's been a bit of scope creep when I got it in my head I'd like to have bump stops in the rear shocks to help protect the chassis in the future. Printed in TPU and test fitting the Second iteration in this image. First iteration is the upper-left most piece. It was way too stiff. Going to look into the chemical compatibility of TPU with the shock fluid, because I might make the internal down travel limiters out of TPU also, though they won't be a bellows design like the external ones.
The other reason is there's been a bit of scope creep when I got it in my head I'd like to have bump stops in the rear shocks to help protect the chassis in the future. Printed in TPU and test fitting the Second iteration in this image. First iteration is the upper-left most piece. It was way too stiff. Going to look into the chemical compatibility of TPU with the shock fluid, because I might make the internal down travel limiters out of TPU also, though they won't be a bellows design like the external ones.
Losi LXT (JRX-T Conversion)
Losi JRX Pro SE
Kyosho Rocky
Parts-Car-to-Runner Kyosho Rocky
Yokomo YZ10 WCS '95 Pavidis
RJ Speed Spec10 "Chew Toy Mk1"
Redcat Lightning STK "Chew Toy Mk 2"
Kyosho Lazer ZX, ZX-R, ZX-RR
Losi JRX Pro SE
Kyosho Rocky
Parts-Car-to-Runner Kyosho Rocky
Yokomo YZ10 WCS '95 Pavidis
RJ Speed Spec10 "Chew Toy Mk1"
Redcat Lightning STK "Chew Toy Mk 2"
Kyosho Lazer ZX, ZX-R, ZX-RR
-
HS-YZ250
- Super Member
- Posts: 263
- Joined: Sun Mar 24, 2013 1:14 pm
- Location: Georgia, USA
- Has thanked: 79 times
- Been thanked: 77 times
Re: Rebuilding my JRX Pro-SE
Been out of this for a bit. But, with the receipt of a couple of new project cars I decided I needed to, at least, get this one together and run-able, even if it's not pretty.
So I assembled the threaded shocks with the tpu bump stops I made, using the Jack Johnson setup sheet piston/fluid combination. The bump stops really limit the compression stroke, but they stop the chassis from bottoming out with these tires, which is probably best. I trimmed a layer off the front shock bumps, but that might have been too much: they'll only really work in a nose-dive situation. Probably still better than nothing. Currently I have Kyosho 4wd front wheels because they are the widest I have, for running on hard surfaces. I also paid $36 for a pair of lost blue front springs even though I found that a pair of Schumacher Cat ReRelease front springs (also blue) would probably work just as well. Oh well. Brain has been a bit zapped over the past couple of months!
So, earlier I notched my motor plate to clear the ball stud for the factory Pro SE camber link location (3/3 in the image, below). But then I looked at the Jack Johnson setup sheet and realized they relocated it out a bit (5/4). Has anyone used the 5/4 setup and have any opinions 'about how this link location works compared to factory 3/3? I have the Jammin Jay Steering enhancement kit and, just looking at it, it looks a bit more like modern link setups, and I feel like the 5/4 setup follows that modern trend more than the 3/3.
Losi LXT (JRX-T Conversion)
Losi JRX Pro SE
Kyosho Rocky
Parts-Car-to-Runner Kyosho Rocky
Yokomo YZ10 WCS '95 Pavidis
RJ Speed Spec10 "Chew Toy Mk1"
Redcat Lightning STK "Chew Toy Mk 2"
Kyosho Lazer ZX, ZX-R, ZX-RR
Losi JRX Pro SE
Kyosho Rocky
Parts-Car-to-Runner Kyosho Rocky
Yokomo YZ10 WCS '95 Pavidis
RJ Speed Spec10 "Chew Toy Mk1"
Redcat Lightning STK "Chew Toy Mk 2"
Kyosho Lazer ZX, ZX-R, ZX-RR
-
HS-YZ250
- Super Member
- Posts: 263
- Joined: Sun Mar 24, 2013 1:14 pm
- Location: Georgia, USA
- Has thanked: 79 times
- Been thanked: 77 times
Re: Rebuilding my JRX Pro-SE
Just a quick update: I had set this project aside because I ran into an issue where I couldn't set my differential or slipper right. Seemed no matter what I did either one slipped excessively or it was locked up. I chalked it up to the losi 13.5 Brushless motor being too hot and me needing to figure out how to limit the current in the ESC somehow. After waiting on a Hotwire from Tekin I realized I had an RS, and it didn't have the interface the RS 2 and 3 have.
I was ready to shelve it again until someone posted in a local burn group that they were going to bring some RC cars to next week's burn and was looking for others to do so as well. Suddenly got really motivated to get some cars running and went back to work on the Pro SE since it already had full electronics. I decided to try a ball diff break-in procedure on YouTube and that's when I noticed my rear wheels seemed to be binding up when I torqued the wheel nut. After investigating a bit, I found that a bearing in one of the rear hubs felt gritty, and putting torque on the wheel nut would almost lock it completely. Fortunately, my pit box had a few bearings in it and now it seems to run how I would expect.
The diff and slipper could probably use a good bit more tuning, but I've got a LOT of burn prep to do between now and Thursday when I head out and the RC activities are going to be tertiary, so I might have to go with a wonky driving car, or just show-and-tell vintage examples (I think my cars will be as old as some of the people I'm meeting). But I'm happy to have found that problem.
An aside: I was set to move the rear camber links to the Jack Johnson setup sheet when I realized the bulkhead location was already occupied by a screw that ties the chassis to the bulkhead on the other side, so I'll have to take some time to come up with a solution that allows both the ball stud and chassis/bulkhead coupling to exist there. Maybe the stud and ball cup will be replaced with a tie rod end. Those 3.5mm tie rods might limit me, though.
Losi LXT (JRX-T Conversion)
Losi JRX Pro SE
Kyosho Rocky
Parts-Car-to-Runner Kyosho Rocky
Yokomo YZ10 WCS '95 Pavidis
RJ Speed Spec10 "Chew Toy Mk1"
Redcat Lightning STK "Chew Toy Mk 2"
Kyosho Lazer ZX, ZX-R, ZX-RR
Losi JRX Pro SE
Kyosho Rocky
Parts-Car-to-Runner Kyosho Rocky
Yokomo YZ10 WCS '95 Pavidis
RJ Speed Spec10 "Chew Toy Mk1"
Redcat Lightning STK "Chew Toy Mk 2"
Kyosho Lazer ZX, ZX-R, ZX-RR
-
RogueIV
- Super Member
- Posts: 505
- Joined: Sat Aug 27, 2022 10:04 pm
- Location: W. Mass
- Has thanked: 1080 times
- Been thanked: 428 times
Re: Rebuilding my JRX Pro-SE
I think you should be fine with a swivel ball in the inner position. its mostly a position that rotates and doesnt move much fore and aft.
Consistency is the key I keep misplacing.
-
Chewbacca
- Approved Member
- Posts: 532
- Joined: Sat Jun 24, 2006 6:41 am
- Location: Herrenberg, Germany
- Has thanked: 29 times
- Been thanked: 65 times
Re: Rebuilding my JRX Pro-SE
Agreed. Yo can either get a LONG screw on the bulkhead side and add a pivot ball and a nut on the rear, or you find a ball stud with a long enough thraded shaft and mount that from the rear and add a nut from the front.
Was that understandable?
Good luck, Tony.
*** POWDER - KING ***
-
HS-YZ250
- Super Member
- Posts: 263
- Joined: Sun Mar 24, 2013 1:14 pm
- Location: Georgia, USA
- Has thanked: 79 times
- Been thanked: 77 times
Re: Rebuilding my JRX Pro-SE
The "trick" will be fitting the tie rods. I upgraded to TLR22 ball studs and cups and those take 3.5mm tie rods. Apparently Losi went with that some time around the XXX as I found early TLR22's still used XXX ball studs up around the steering for some reason. But all the rod ends I've found in a couple of searches are 3mmxM3. I'll have to try and drill or ream one out.Chewbacca wrote: ↑Wed Oct 12, 2022 7:23 amAgreed. Yo can either get a LONG screw on the bulkhead side and add a pivot ball and a nut on the rear, or you find a ball stud with a long enough thraded shaft and mount that from the rear and add a nut from the front.
Was that understandable?
Good luck, Tony.
Losi LXT (JRX-T Conversion)
Losi JRX Pro SE
Kyosho Rocky
Parts-Car-to-Runner Kyosho Rocky
Yokomo YZ10 WCS '95 Pavidis
RJ Speed Spec10 "Chew Toy Mk1"
Redcat Lightning STK "Chew Toy Mk 2"
Kyosho Lazer ZX, ZX-R, ZX-RR
Losi JRX Pro SE
Kyosho Rocky
Parts-Car-to-Runner Kyosho Rocky
Yokomo YZ10 WCS '95 Pavidis
RJ Speed Spec10 "Chew Toy Mk1"
Redcat Lightning STK "Chew Toy Mk 2"
Kyosho Lazer ZX, ZX-R, ZX-RR
-
Chewbacca
- Approved Member
- Posts: 532
- Joined: Sat Jun 24, 2006 6:41 am
- Location: Herrenberg, Germany
- Has thanked: 29 times
- Been thanked: 65 times
Re: Rebuilding my JRX Pro-SE
I think you can force the 3.5mm rod into the 3mm rod ends. You migh have to countersing the start. otherwise you can drill the hole just slightly bigger as you already stated.
*** POWDER - KING ***
-
HS-YZ250
- Super Member
- Posts: 263
- Joined: Sun Mar 24, 2013 1:14 pm
- Location: Georgia, USA
- Has thanked: 79 times
- Been thanked: 77 times
Re: Rebuilding my JRX Pro-SE
I started messing around with trying to implement the 5-4 rear camber link setup. Mentioned before, the challenge is the #5 hole location in the bulkhead is normally occupied by a 4-40 screw that vertically ties the chassis to the bulkhead.
I first went looking for a long enough 4.8mmxM3 ball stud to try and thread through from the back that was long enough to use a spacer to let the camber link clear the shock spring and get a locking nut on the other end, but the threaded length would need to be about 20mm (estimated), but I think the longest I could find was about 14mm.
Browsing Google I was reminded that Losi offered a XXX-SCT and Buggy. Being based off the XXX, I figured they might have used the same larger sized tie rods but stuck with #4-40 hardware, which they did. But they also used rod ends instead of ball cups and studs.
Unfortunately, I ran into another dilemma. If I used a longer screw from the front, I would need a hex nut to retain the spacer and rod end, but then would have to trim the slipper cover to get it to go on. If put the screw in from the back, I was back to needing a nut to fit at the front, which would be too big to fit. Here, if I were to go with a 3mm screw, the lock nuts are a little smaller than for the 4-40's and might go on, but then I would have to oversize the hole (like I was doing for the ball studs) and then the 3mm rod ends wouldn't fit the oversize turnbuckles without drilling/reaming.
I think the solution is going to have to be to thread the screw from the front, and accept that I'm going to have to trim the clutch cover for clearance. I'm going to try not using a spacer between the rod end and bulkhead, but I think it's going to cause the turnbuckle to run up against the shock spring.
As a tangent, I was wondering if XXX SCT CV axles would fit on an LXT w/XX Retrofit transmission. Mine has the LRM so it probably won't work.
Losi LXT (JRX-T Conversion)
Losi JRX Pro SE
Kyosho Rocky
Parts-Car-to-Runner Kyosho Rocky
Yokomo YZ10 WCS '95 Pavidis
RJ Speed Spec10 "Chew Toy Mk1"
Redcat Lightning STK "Chew Toy Mk 2"
Kyosho Lazer ZX, ZX-R, ZX-RR
Losi JRX Pro SE
Kyosho Rocky
Parts-Car-to-Runner Kyosho Rocky
Yokomo YZ10 WCS '95 Pavidis
RJ Speed Spec10 "Chew Toy Mk1"
Redcat Lightning STK "Chew Toy Mk 2"
Kyosho Lazer ZX, ZX-R, ZX-RR
-
RogueIV
- Super Member
- Posts: 505
- Joined: Sat Aug 27, 2022 10:04 pm
- Location: W. Mass
- Has thanked: 1080 times
- Been thanked: 428 times
Re: Rebuilding my JRX Pro-SE
They won't. The XXXT has a much longer CV shaft.
Consistency is the key I keep misplacing.
-
HS-YZ250
- Super Member
- Posts: 263
- Joined: Sun Mar 24, 2013 1:14 pm
- Location: Georgia, USA
- Has thanked: 79 times
- Been thanked: 77 times
Re: Rebuilding my JRX Pro-SE
So, I wasn't really happy with how the XXX-SCT Buggy rod ends fit into things, particularly with it interfering with the slipper cover and the added mix of parts, so I took a chance on the TLR 22 ball studs with the 14mm long thread. I got lucky and it was JUST long enough to fit through the bulk head to a 3mm lock nut (kyosho) with a 3mm spacer to clear the shock springs. It was a tight fit, but I was also able to get a flat wrench onto the lock nut and there was enough clearance to tighten it against the bulkhead without TOO much slipping off. I can also now get the slipper cover on without modification.
I did a little driving in my concrete driveway with this rear end arrangement and I think it's made the chassis more likely to swap ends under brakes. I may have had a little too much camber in it, as this arrangement does gain some camber at the bottom of the stroke. But it may also stick the rear end a little better in throttle-on turns. Of course, this is all on concrete. Don't know I'll ever make it back to an actual track.
These are the studs I used. I tried looking for some that were slightly longer for some extra threads past the nut, but I think this is as long as Losi makes, and it looks like (just from pictures that may not be accurate) other manufacturers list the overall length of the ball stud instead of just the threaded length, which Losi seems to do. There was an HPI part I was looking at that had the same ball diameter, but the 15mm looked more like a losi 8mm, or so.
- IMG_20221115_201951325.jpg (815.04 KiB) Viewed 851 times
- IMG_20221115_201951325.jpg (815.04 KiB) Viewed 851 times
I did a little driving in my concrete driveway with this rear end arrangement and I think it's made the chassis more likely to swap ends under brakes. I may have had a little too much camber in it, as this arrangement does gain some camber at the bottom of the stroke. But it may also stick the rear end a little better in throttle-on turns. Of course, this is all on concrete. Don't know I'll ever make it back to an actual track.
These are the studs I used. I tried looking for some that were slightly longer for some extra threads past the nut, but I think this is as long as Losi makes, and it looks like (just from pictures that may not be accurate) other manufacturers list the overall length of the ball stud instead of just the threaded length, which Losi seems to do. There was an HPI part I was looking at that had the same ball diameter, but the 15mm looked more like a losi 8mm, or so.
Losi LXT (JRX-T Conversion)
Losi JRX Pro SE
Kyosho Rocky
Parts-Car-to-Runner Kyosho Rocky
Yokomo YZ10 WCS '95 Pavidis
RJ Speed Spec10 "Chew Toy Mk1"
Redcat Lightning STK "Chew Toy Mk 2"
Kyosho Lazer ZX, ZX-R, ZX-RR
Losi JRX Pro SE
Kyosho Rocky
Parts-Car-to-Runner Kyosho Rocky
Yokomo YZ10 WCS '95 Pavidis
RJ Speed Spec10 "Chew Toy Mk1"
Redcat Lightning STK "Chew Toy Mk 2"
Kyosho Lazer ZX, ZX-R, ZX-RR
-
RogueIV
- Super Member
- Posts: 505
- Joined: Sat Aug 27, 2022 10:04 pm
- Location: W. Mass
- Has thanked: 1080 times
- Been thanked: 428 times
Re: Rebuilding my JRX Pro-SE
You've given me an idea. If you put it in extended wheelbase you could use a appropriate length female threaded standoff with a short screw on the front and that extended ballstud. I'm not sure how thread engagement would be in that tiny space though.
Consistency is the key I keep misplacing.
-
HS-YZ250
- Super Member
- Posts: 263
- Joined: Sun Mar 24, 2013 1:14 pm
- Location: Georgia, USA
- Has thanked: 79 times
- Been thanked: 77 times
Re: Rebuilding my JRX Pro-SE
Just an update about running the Pro SE. It's been a bit since I've tinkered with it, but I've had it ready to run since the fall. Managed to get it out on that tennis court "dog park" this past weekend and really get a feel for the handling with the Jack Johnson setup. On a dirty hard surface, anyway.
So, to preface: I was never an accomplished rc racer and had very little time racing Pro SE. That little experience in the 90's I remembered you have to be more mindful of how you go into corners with the buggy than with the truck, which I had raced for years and could be pretty cavalier in driving. I presume this is because there's so much less rubber to work with, especially on the front. Also, I'm not going to claim my setup is any kind of correct. In fact, on this day I noticed I somehow ended up with the front toed out fairly noticeably despite several attempts at a basic eyeballed setup.
My habit at the start of the day was to brake while turning. I think I developed this while running around undefined spaces the my driveway and the "dog park", from my truck racing days, or maybe even my quad racing days as I used to slide to scrub speed in fast, good grip corners so I could get pointed where I want to go and on the throttle sooner. With this Jack Johnson setup I was immediately swapping ends any time I combine braking and turning. To really get a feel, I set out a few tennis balls for a rudimentary "course" to drive around. I found myself spinning a lot.
So I tried adjusting my driving to get the braking done in a straight line, before touching the steering. It's much more disciplined driving than I instinctually do, but it helped a great deal with the ends wanting to swap. I would have to enter the corner ready to get back on the throttle rather than sideways. But if I steered the slightest bit while braking, around she'd go. Before making this change, I hadn't really paid attention to how the "factory setup" handled, but I WANT to say it was much more forgiving of driving it "sideways" than this one. And maybe the corner exit habits are different as well. The Jack Johnson setup seems to really plant and understeer under throttle, where I THINK the factory setup would want to oversteer on the corner exit, though not to the same severity as the corner entry on the JJ setup.
So, I'm not sure which one I prefer. Since I'm not racing or running on a closed course, I sort of feel like the factory setup might be the better option for freestyle driving. Although, having a course to follow is kind of nice. I made the reliefs in the motor plate already, so I could put a stud in the old locations and try swapping back and forth.
I wonder if this is an insight to the driving style of the pro rc drivers. If this is closer to how all the fast guys do it, or was just Jack Johnson's personal style.
Losi LXT (JRX-T Conversion)
Losi JRX Pro SE
Kyosho Rocky
Parts-Car-to-Runner Kyosho Rocky
Yokomo YZ10 WCS '95 Pavidis
RJ Speed Spec10 "Chew Toy Mk1"
Redcat Lightning STK "Chew Toy Mk 2"
Kyosho Lazer ZX, ZX-R, ZX-RR
Losi JRX Pro SE
Kyosho Rocky
Parts-Car-to-Runner Kyosho Rocky
Yokomo YZ10 WCS '95 Pavidis
RJ Speed Spec10 "Chew Toy Mk1"
Redcat Lightning STK "Chew Toy Mk 2"
Kyosho Lazer ZX, ZX-R, ZX-RR
-
HS-YZ250
- Super Member
- Posts: 263
- Joined: Sun Mar 24, 2013 1:14 pm
- Location: Georgia, USA
- Has thanked: 79 times
- Been thanked: 77 times
Re: Rebuilding my JRX Pro-SE
I don't think I've made any component changes to the car since last posting, but I've run it a few times and eventually decided to do a rough setup for running at the upcoming burn. Doubt I'll have time to run it or anyone to run with, but that's neither here nor there. Anyway, I set the rear ride height to where the axles were fully horizontal like in the old setup sheet. I had been running around with a lot of sag in the rear, evidently. I also equalized the front and rear camber. I forget what I put them to, but I want to say about one-half to one degree in the rear, and a few in the front, maybe? At any rate, took a test spin in the driveway again and this time it felt a LOT more planted entering turns. Before, it would swap ends if i dared not do ALL of my braking in a straight line. Now it didn't seem to want to come loose at all. It also didn't want to roll over as much, which seemed strange for running more ride height. I'm a lot happier with the handling, now.
Eventually I want to get a new body and wing for it, but I'll want to keep the flying tigers' livery.
Eventually I want to get a new body and wing for it, but I'll want to keep the flying tigers' livery.
Losi LXT (JRX-T Conversion)
Losi JRX Pro SE
Kyosho Rocky
Parts-Car-to-Runner Kyosho Rocky
Yokomo YZ10 WCS '95 Pavidis
RJ Speed Spec10 "Chew Toy Mk1"
Redcat Lightning STK "Chew Toy Mk 2"
Kyosho Lazer ZX, ZX-R, ZX-RR
Losi JRX Pro SE
Kyosho Rocky
Parts-Car-to-Runner Kyosho Rocky
Yokomo YZ10 WCS '95 Pavidis
RJ Speed Spec10 "Chew Toy Mk1"
Redcat Lightning STK "Chew Toy Mk 2"
Kyosho Lazer ZX, ZX-R, ZX-RR
Create an account or sign in to join the discussion
You need to be a member in order to post a reply
Create an account
Not a member? register to join our community
Members can start their own topics & subscribe to topics
It’s free and only takes a minute
Sign in
-
- Similar Topics
- Replies
- Views
- Last post
-
- 4 Replies
- 766 Views
-
Last post by cas22
-
- 8 Replies
- 1078 Views
-
Last post by Momo5
-
- 9 Replies
- 1118 Views
-
Last post by Bongo Fury
-
- 11 Replies
- 3299 Views
-
Last post by RCveteran
-
- 23 Replies
- 2787 Views
-
Last post by RCveteran
-
- 11 Replies
- 2049 Views
-
Last post by kaiser
-
- 6 Replies
- 957 Views
-
Last post by mrlexan
-
- 2 Replies
- 704 Views
-
Last post by MelvinsArmy


Who is online
Users browsing this forum: No registered users and 3 guests