More progress... actually more progress over the past week than the past year

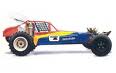
First - nothing, I say NOTHING beats the looks of a white bumper on a Team Truck:

Now, a few words on fitting a body to a car (not just a 10T). This is something that keeps coming up as a Q on the forums, so here is MY take on it. I'm not saying it's the best, but I've been in RC for 30+ yrs now, so I think I've learnt a few tricks, although not all. This is how *I* do it.
I fit BEFORE I paint. This allows to (1) do it better as you see through the stuff and (2) save the paint from the cutting tools.
Needed for cut:
- Clear Body (TBG repop in this case, I do with what I have, Jay is not with us any more...)
- New-bladed X-acto

Apply pressure as you follow along the cutting lines, on the OUTSIDE of the body - you want to cut through the protective film. You don't want to cut through the body though. This means having a steady hand btw, so make sure both the (car) body and your wrist are resting on something solid so you don't rip...

Then initiate the cut with scissors (in this case lexan body scissors)

And then carefully start tearing the body out... as you've cut through at least part of the lexan, the tear will follow the line. This is whyyou need a steady hand with the blade, because if you screw up the cut, the tearing will go in that (wrong) direction:

Front end done

All done now.

Frankly, this is the EASIEST way to cut a body. All it takes is a blade, and a steady hand. Forget those scissors marks forever

Now, time to drill the body for the posts.
Needed tools:
- Body reamer
- holes marker

This Turnigy kit has it all, but really nothing beats the good ole Hudy Special reamer, especially when engraved with your name... I've had this one since the last millenium, I've tried many reamers, this is the only one that "turns" rather than "cut into" the lexan. Best design and materials

The turnigy kit, like most such designs, is designed for 6mm posts, but has inserts for 5mm posts. Well, the 10T's post are somewhere in between, so you have to press-fit the 5mm insert somehow...

Same on the front, then you slide on the magnet inserts:

Then you position the body, and drop on the top-side magnets and let them sit on the magnet inserts:

then you mark the holes with a sharpie, then use the reamer to make the hole, and voila:

On the 10T, two mods that must be done for a proper fit at the front:
First, the front bumper screws hit the lexan:

Second, the front fenders hit the lower shock mount screws:
Here's how *I* fix it:
Dremel a notch in the lower grille part:

fixed!

Then a good cut with the scissors to free up some space around the shock parts:

Et voila

Now off to the dreaded paint job part!
Paul
AE RC10 - Made In The Eighties, Loved By The Ladies.
Blue Was Better - now, Blue Is Bankrupt.
Facebook affiliate program manager: "They go out and find the morons for me".
Life is short. Waste it wisely.