Dogfighter 2013
-
Bad Company
- Approved Member
- Posts: 26
- Joined: Wed Mar 06, 2013 9:10 am
- Location: Bremerhaven , Germany
Dogfighter 2013
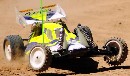
Reactivating just finished last Friday afternoon and it survived its first race after 20 years last weekend:
-
Bad Company
- Approved Member
- Posts: 26
- Joined: Wed Mar 06, 2013 9:10 am
- Location: Bremerhaven , Germany
-
a01butal

- Approved Member
- Posts: 2397
- Joined: Sat Jan 12, 2008 9:15 am
- Location: Shorewood, IL
- Has thanked: 34 times
- Been thanked: 40 times
Re: Dogfighter 2013
Very interesting Yok 834b you've got there, lots of mods. Can we see more of the belt drive conversion? Thanks for sharing your pictures.
___________________________________________________________
This is all very interesting!
This is all very interesting!
-
Bad Company
- Approved Member
- Posts: 26
- Joined: Wed Mar 06, 2013 9:10 am
- Location: Bremerhaven , Germany
-
Bad Company
- Approved Member
- Posts: 26
- Joined: Wed Mar 06, 2013 9:10 am
- Location: Bremerhaven , Germany
Re: Dogfighter 2013
So the belt conversion is home made , just as all the other modificated parts ( the Asso shocks are not home made of course...).
I've not build up this car again to be a shelfer , but to run this complete season on the NRW Off Road Cup. So I produced a lot of replacement parts to save the original parts , like dogbones the bellcranks , the rims and the chain drive and some other small parts.
The Car is equipped with a LRP X12 17,5 Turn brushless motor and a saddle pack lipo in a L-shape arrangment on the CFK chassis.
The front dogbones and the rear (now) CVD's are made from alloy.
The car survived the last raceweekend , which was the first run for the cup this year without any mean damages ( only one broken c-hub).
Any other problems were to find between the ears of the driver ( me) , woh reactivated himself after 20 years too
-
Bormac
- Approved Member
- Posts: 3113
- Joined: Wed Sep 05, 2007 3:52 pm
- Location: CENTRAL COAST, NSW AUSTRALIA
- Has thanked: 20 times
- Been thanked: 11 times
-
Bad Company
- Approved Member
- Posts: 26
- Joined: Wed Mar 06, 2013 9:10 am
- Location: Bremerhaven , Germany
Re: Dogfighter 2013
I start to disassemble the car for looking for worn out parts and to make some more detailed pictures for this threat.
On this pictures you can see all parts of the belt drive placed in the car.
-
Bad Company
- Approved Member
- Posts: 26
- Joined: Wed Mar 06, 2013 9:10 am
- Location: Bremerhaven , Germany
Re: Dogfighter 2013
the front drive parts of the belt conversion
The parts are all made from hardalloy ; the pulley was a standardpulley , wihich I bring too the needed size with my lathe.
On the last picture we can see the wear after about one and a half hour of running.
I guess it will be good for another one and a half hour ( with the 17,5 Turn brushlessmotor) and then need to be replaced by a new one.
This is OK for me ; it takes about 45 Minutes to produce a new one and the costs for the alloy are less than 1 Euro.
For me it was only important to find out , if the parts will stand a complete race weekend and now I know they will.
-
Bad Company
- Approved Member
- Posts: 26
- Joined: Wed Mar 06, 2013 9:10 am
- Location: Bremerhaven , Germany
Re: Dogfighter 2013
The rear drive parts of the belt drive conversion
The gear shaft is made from hard alloy too ; its inside the gearbox a little big longer than the original ( that minimizes the axial lash of the original shaft) ; shaft and shim are one piece ; into the shaft is a 3 mm threadrod screwed and glueed for the pulley and the ( original) slipper parts.
-
Bad Company
- Approved Member
- Posts: 26
- Joined: Wed Mar 06, 2013 9:10 am
- Location: Bremerhaven , Germany
Re: Dogfighter 2013
One belt tensioner
Depending on whhich pulley is used on the reardrive , there are needed 0 , 1 or 2 belttensioners.
Due to the dimensions of the other carparts on the front drive its only possible to use a 24 teeth (MXL) pulley.
But on the rear drive you , äh I can use either a 22 , a 24 or a 26 teeth pulley.
For the 26 one ( overdrive) no tensioner is needed , for the 24 pulley one tensioner is needed ( rear :front =1:1) and for the 22 pulley two tensioners are needed ( rear to front = 0 point something : 1).
For mounting the tensioners I use the oiginal bores and threads of the gearbox ; for the second tensioner I use the upper bore of the gearbox.
-
Bad Company
- Approved Member
- Posts: 26
- Joined: Wed Mar 06, 2013 9:10 am
- Location: Bremerhaven , Germany
Re: Dogfighter 2013
Front dogbones and rear CVD's
All parts a made from hardalloy again , exept the balls of the front dogbone and ( of course) all pins.
To produce the front dogbones is very easy : First I make with the lathe a shaft with 3.5 mm diameter on the
last 5 mm on each end and 3 mm diameter between the ends.
Then I drill 3.mm holes in two alloyballs ( take alloyballs for softairguns , 6mm) .
Then pull the balls over the shaft and drill in on each end 2mm holes for the pins.
2 drops of glue , pull in the 2mm pins ( hardened steel) and ready is the dogbone.
To produce the rear CVD's is a little bit more tricky , but after a little training not soo difficult.
After about 1.5 hours of running there is no wear to see .
To my own surprise all alloyparts are able to handle the power of the 17,5 T brushlessmotor.
The shaftdiameter of the front ones is 3 mm and on this parts I was afraid they will not hold ; on the rear shafts I
tke shaftdiameters of 3.5 mm and I was quite sure , they will hold.
-
Bad Company
- Approved Member
- Posts: 26
- Joined: Wed Mar 06, 2013 9:10 am
- Location: Bremerhaven , Germany
Re: Dogfighter 2013
bellcranks
I replaced the original yellow steering parts through own produced ones.
Now there is no servosaver anymore , but the Savöx servo seems to be able to handle this.
To make exact holes for ball bearings is not so easy like it sounds and if the holes are not exact you produce a lot of lash ; so I decided to build bushings from bearingbronx ; to produce a special outer diameter for shafts - so that they will pass strong in a hole- is a easy thing.
This system is easy to build and with the upper sleeves and screws it's possible to adjust evrything easy going and lashfree.
-
Bad Company
- Approved Member
- Posts: 26
- Joined: Wed Mar 06, 2013 9:10 am
- Location: Bremerhaven , Germany
Re: Dogfighter 2013
Rear bar
Tp build a onepiece bar with exact sizes is not so easy without a bending machine , so I decide to build
a other system.
To bend the 90 degree is easy , even without an special tool ; after bending only the lenghts of the ends
have to be cut and the holes have to be drilled.
I connect the two parts with two tubes with a thread inside ; for the backtube I have drilled two different
height holes in the bars ; these holes are for the mounting of the shocks and depending on wich holes are used ,
the ground clearance will change.
-
59burst

- Approved Member
- Posts: 1011
- Joined: Sat Jul 26, 2008 9:52 am
- Location: Bothell, WA
- Has thanked: 2 times
Re: Dogfighter 2013
the ideas and the parts are awesome. i'm drawing my own belt conversion and it's great to see yours as well
Create an account or sign in to join the discussion
You need to be a member in order to post a reply
Create an account
Not a member? register to join our community
Members can start their own topics & subscribe to topics
It’s free and only takes a minute
Sign in
-
- Similar Topics
- Replies
- Views
- Last post
-
- 4 Replies
- 1216 Views
-
Last post by Mikeyboy
-
- 2 Replies
- 1271 Views
-
Last post by GJW
-
- 18 Replies
- 1447 Views
-
Last post by fakiee
-
- 7 Replies
- 1289 Views
-
Last post by j-sou
-
- 7 Replies
- 1889 Views
-
Last post by RC10resto
-
- 4 Replies
- 1065 Views
-
Last post by besty22
-
- 4 Replies
- 940 Views
-
Last post by THEYTOOKMYTHUMB
-
- 196 Replies
- 21768 Views
-
Last post by Dadio
Who is online
Users browsing this forum: No registered users and 2 guests