Javelin rere build

The place for all things re-release Kyosho.

Moderators: scr8p, klavy69

User avatar
EvolutionRevolution
Approved Member
Posts: 1495
Joined: Tue Feb 01, 2011 3:24 pm
Location: Netherlands
Has thanked: 20 times
Been thanked: 36 times

Re: Javelin rere build

Post by EvolutionRevolution »

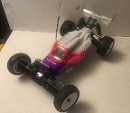
The last thing I did on the day of the last update was to get started with the shocks:
IMG_2616.jpg
IMG_2617.jpg
IMG_2618.jpg
I'm not very fond of the updated design on these, particularly the way the o-rings are "held" into the bottom cartridge. On most of Kyosho's other modern shock designs there is a c-clip holding the bottom cartridge together, or the bottom cartridge is screwed shut. Here there is a mere plastic part holding the o-rings in position, and I can see how with wear and tear the o-rings will slip out of the bottom cartridge and the shock will bleed itself out all over the suspension. I had a lot of trouble getting the same amount of rebound on all four shocks, too, and it's pretty much impossible to fill these without getting shock oil all over your hands.

As an aside, use locktite on all of the steering links, or they may spontaneously disassemble. Also, workign on this car to for example get access to the steering when something like that happens is a royal pain in the behind. :evil:

Then it was time to wait for my new parts to arrive, which did yesterday:
IMG_2618_2.jpg
First I attached the lower tray:
IMG_2619.jpg
IMG_2620.jpg
Getting this to click into place took way too much force, I had to resort to pliers to push the last bit into place, as I could not exercise enough force by hand. The problem are the countersunk holes at the rear plus the part being a very tight fit in general.

Hard front mount comparison with stock part:
IMG_2621.jpg
IMG_2622.jpg
It also comes with the proper 8 mm screws.

Upper link mounts comparison:
IMG_2623.jpg
continued next post...

User avatar
EvolutionRevolution
Approved Member
Posts: 1495
Joined: Tue Feb 01, 2011 3:24 pm
Location: Netherlands
Has thanked: 20 times
Been thanked: 36 times

Re: Javelin rere build

Post by EvolutionRevolution »

Parts needed for the front when using universals (note: universal spacer shown in wrong location, see later):
IMG_2624.jpg
Assembled front end:
IMG_2625.jpg
IMG_2626.jpg
But!
IMG_2627.jpg
The universals come with a spacer. According to Kyosho, on the Optima and Javelin (but not Turbo Optima) this spacer should be placed on the outside of the uprights. This results in the problem shown above, the inner part of the universal does not go into the diff outdrive far enough.

The same problem exists at the rear:
IMG_2628.jpg
So instead of what Kyosho says in their instructions, put the spacer on the inside of the uprights, like for the Turbo Optima.

The rear end also had an additional problem, namely that the universal spacer provided is too thick to be able to still attach the drive hex (the pin can't be inserted). It's 0.75 mm thick, while the axle needs to be spaced 0.6 mm. With proper shimming everything fits together fine:
IMG_2630.jpg
I then finished the assembly of the shocks:
IMG_2631.jpg
More issues here, the lower spring perch doesn't fit onto the eyelet properly unless you spread it out with some pliers while putting it in place. I also hope the upper spring perches won't suffer the same fate as on the vintage shocks, where they often end up splitting.

Attached to the car:
IMG_2632.jpg
IMG_2633.jpg

User avatar
EvolutionRevolution
Approved Member
Posts: 1495
Joined: Tue Feb 01, 2011 3:24 pm
Location: Netherlands
Has thanked: 20 times
Been thanked: 36 times

Re: Javelin rere build

Post by EvolutionRevolution »

I then added the alloy side guards:
IMG_2638.jpg
IMG_2640.jpg
I spent some of the time I was waiting for the additional parts on decorating the body. I didn't go for box art:
IMG_2634.jpg
IMG_2635.jpg
IMG_2637.jpg
IMG_2636.jpg
I used some bottles Pactra and Tamiya lexan paints on the interior, and did not forget to remove the protective film before applying the stickers. I had to recut some stickers and apply them in parts to get everything to fit. I still have to finish the driver helmet.

After finishing these and finishing most of the assembly of the chassis, I attached the rear cage:
IMG_2641.jpg
IMG_2642.jpg
With single screw holding both the swing bar and front part of rear cage in place.

It's starting to look complete:
IMG_2643.jpg
This weekend I will have a look at what electronics I can find for it, and whether the servo works.

Post Reply

Create an account or sign in to join the discussion

You need to be a member in order to post a reply

Create an account

Not a member? register to join our community
Members can start their own topics & subscribe to topics
It’s free and only takes a minute

Register

Sign in

  • Similar Topics
    Replies
    Views
    Last post
  • oil weight for rear shock on optima and javelin rere
    by AYKBOBCAT » » in Kyosho Re-Release Forum
    1 Replies
    955 Views
    Last post by Coelacanth
  • Tomahawk rere build
    by EvolutionRevolution » » in Kyosho Re-Release Forum
    2 Replies
    760 Views
    Last post by EvolutionRevolution
  • A ReRe Frog Build
    by VTBruiser » » in Tamiya Forum
    3 Replies
    1935 Views
    Last post by VTBruiser
  • rere Turbo Scorpion build
    by asciibaron » » in Kyosho Re-Release Forum
    4 Replies
    1025 Views
    Last post by silvertriple
  • Top Force Rere Build
    by jkelm24 » » in Tamiya Forum
    17 Replies
    2662 Views
    Last post by jkelm24
  • ReRe Scorpion build pics
    by GoMachV » » in Kyosho Re-Release Forum
    66 Replies
    5892 Views
    Last post by SMOKE-DOG
  • My Box Art ReRe build
    by lotus15racer » » in RC10 Buggy Re-Release Forum
    3 Replies
    1175 Views
    Last post by lotus15racer
  • Mat's World's ReRe - Build #2 - RaceReady
    by lmw94002 » » in RC10 Buggy Re-Release Forum
    45 Replies
    6787 Views
    Last post by lmw94002

Return to “Kyosho Re-Release Forum”

Who is online

Users browsing this forum: No registered users and 2 guests