al is working on getting a shot of it.scr8p wrote:no different car. i don't have that snagit thing anymore to pull a screen shot of the 12th scale from the video.
"Edge" Saved and Headed for the Back Page - (Curtis Husting)
-
scr8p

- Administrator
- Posts: 16816
- Joined: Tue Feb 07, 2006 9:46 pm
- Location: Northampton, PA
- Has thanked: 36 times
- Been thanked: 1318 times
Re: "Edge" Saved and Headed for the Back Page
-
a01butal

- Approved Member
- Posts: 2397
- Joined: Sat Jan 12, 2008 9:15 am
- Location: Shorewood, IL
- Has thanked: 34 times
- Been thanked: 40 times
Re: "Edge" Saved and Headed for the Back Page
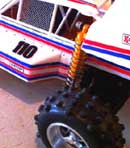
Sorry, not the best shot but it does show the colors.
___________________________________________________________
This is all very interesting!
This is all very interesting!
-
scr8p
- Administrator
- Posts: 16816
- Joined: Tue Feb 07, 2006 9:46 pm
- Location: Northampton, PA
- Has thanked: 36 times
- Been thanked: 1318 times
-
scr8p
- Administrator
- Posts: 16816
- Joined: Tue Feb 07, 2006 9:46 pm
- Location: Northampton, PA
- Has thanked: 36 times
- Been thanked: 1318 times
Re: "Edge" Saved and Headed for the Back Page
they're quite easy to do. just lay out strips of tape, let's say 1/4", in one direction, side by side. then take a piece of tape the same size, lay it down in the opposite direction. take a razor blade/xacto and cut down both sides. then lift that piece of tape up, and move it over so that the edge of the tape is along side of the cut you just made, and cut along the other side. keep doing that until the entire area is cut into squares. pull out every other piece to create the checkerboard pattern. spray your first color. pull off the rest of the tape, and spray the other. all done.bearrickster wrote:the checkerboard is going to be a nightmare to paint good luck guys I am not that ambitious
-
bearrickster

- Approved Member
- Posts: 4372
- Joined: Thu Mar 06, 2008 11:36 am
- Location: Hollywood Maryland
- Been thanked: 8 times
Re: "Edge" Saved and Headed for the Back Page
I get it, but recreating that wavy pattern correctly I think is going to be a chore no matter how you slice itscr8p wrote:what curtis did was lay out the tape front to back straight, then cut curvy lines left to right. but it's still the same process.
doing your own patter is onething redoing someone else is going to be hard. I have a real problem with bleeding all the time, I hate painting anymore the tape today sucks
-
Y'ernat Al

- Approved Member
- Posts: 920
- Joined: Wed Jan 14, 2009 1:15 am
- Location: Spokane WA
- Has thanked: 7 times
- Been thanked: 17 times
Re: "Edge" Saved and Headed for the Back Page
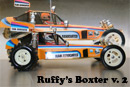
Damn it gentlmen.  Thanks to Ruffy and the honorable Husting clan, I have no choice but to dive into the deep end on this one. No turning back now...
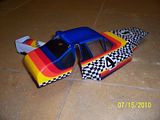

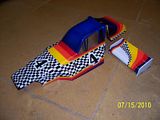
Let's go SCR8P, time to step it up. Not gonna let you off this one. These are for you so you know what it should look like from other angles. Just don't do like me and forget to back the blue with white before going onto the other colors
  .
.
I just looked up your Cutlass SCR8P. That looks fun..but probably 100 times more time consuming these little 1/10 buggies. I'm impressed with guys that can do 1:1 projects (my dad is retired and is in the home stretch on a frame up resto of a 55 Pontiac). Especially when you see those tv shows with crews of guys and money and cash and even more guys behind the scenes. Whew!


Let's go SCR8P, time to step it up. Not gonna let you off this one. These are for you so you know what it should look like from other angles.
I just looked up your Cutlass SCR8P. That looks fun..but probably 100 times more time consuming these little 1/10 buggies. I'm impressed with guys that can do 1:1 projects (my dad is retired and is in the home stretch on a frame up resto of a 55 Pontiac). Especially when you see those tv shows with crews of guys and money and cash and even more guys behind the scenes. Whew!
-
scr8p
- Administrator
- Posts: 16816
- Joined: Tue Feb 07, 2006 9:46 pm
- Location: Northampton, PA
- Has thanked: 36 times
- Been thanked: 1318 times
Re: "Edge" Saved and Headed for the Back Page
nice job, dude! 
don't expect to see a painted body on my car for quite awhile. i don't have an old style protech to use yet. i'm not cutting the widows out of it, so i atleast want it to have the wavy window net. so until i actually get one, then paint it, god knows how long that'll be.
to be honest, if it doesn't happen before i get to work on my 68 cutlass, i'm probably not even gonna care. it might never get done. that'll include other builds, too.
-
Toasted Coastie
- Approved Member
- Posts: 662
- Joined: Sun Apr 11, 2010 9:22 pm
- Location: Nashua, NH
- Been thanked: 1 time
Re: "Edge" Saved and Headed for the Back Page
The paint is amazing. I don't think I have the patients to mask that much.
-
Y'ernat Al
- Approved Member
- Posts: 920
- Joined: Wed Jan 14, 2009 1:15 am
- Location: Spokane WA
- Has thanked: 7 times
- Been thanked: 17 times
Re: "Edge" Saved and Headed for the Back Page
A little bleed in a couple places, and I had to do some damage control at a couple points in the process, but I'm fine with it. I didn't keep track of the total time invested, but let's just say I lost count of the Sportcenter episodes, considering how they run them back to back 
-
slotcarrod

- Approved Member
- Posts: 4415
- Joined: Tue Nov 25, 2008 10:57 pm
- Location: Calgary Alberta Canada
- Has thanked: 1 time
- Been thanked: 45 times
Re: "Edge" Saved and Headed for the Back Page
OH MY! That is nice looking!
Rod Littau
Slotcarrod's Rumpus Room: http://www.rc10talk.com/viewtopic.php?f=77&t=16113
25 Years of the RC10: http://www.rc10talk.com/viewtopic.php?f=35&t=13059
Slotcarrod's Rumpus Room: http://www.rc10talk.com/viewtopic.php?f=77&t=16113
25 Years of the RC10: http://www.rc10talk.com/viewtopic.php?f=35&t=13059
-
vintage AE
- Approved Member
- Posts: 3012
- Joined: Fri Nov 14, 2008 1:47 pm
- Location: Sunken Lake, Nova Scotia
- Has thanked: 29 times
- Been thanked: 36 times
Re: "Edge" Saved and Headed for the Back Page
WOW, you have great discipline. Cant wait to see the rest of the progress
-
cyclepsych0

- Approved Member
- Posts: 189
- Joined: Wed Mar 19, 2008 1:21 am
- Location: San Marcos, CA
Re: "Edge" Saved and Headed for the Back Page
^^^ X2!! I am truely envious of your paint skills....
"Relax. Alright? My Old Man is a television repairman....... Got this ultimate set of tools... I can fix it!!" - Spicoli
-
m_vice

- Approved Member
- Posts: 1312
- Joined: Fri Feb 23, 2007 12:46 pm
- Location: Dallas, TX
- Been thanked: 2 times
Re: "Edge" Saved and Headed for the Back Page
Man, that looks awesome. Great job on this buggy.
can't wait to see it all together.
can't wait to see it all together.

-
Y'ernat Al
- Approved Member
- Posts: 920
- Joined: Wed Jan 14, 2009 1:15 am
- Location: Spokane WA
- Has thanked: 7 times
- Been thanked: 17 times
Re: "Edge" Saved and Headed for the Back Page
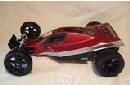
Jake hooked me up with the proper shock hardware so it's coming back together now. I can't bring myself to dye anything black, but I think a few details based on the box art and other first cars are appropriate, notice the shorter-than-usual sway bar connection, etc...
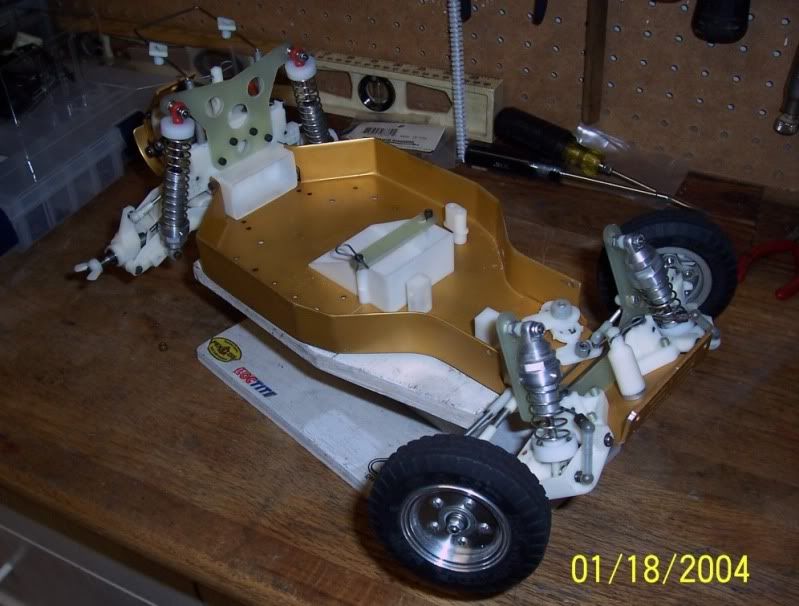
The steering setup with the wing-wire and collars between the two servo savers is actually a decent idea for these old servo savers that don't have that little lump of extra support for a ball stud like the later ones did. It operates really smooth and doesn't scratch into the nose piece like the (slightly too long) ball studs always do...
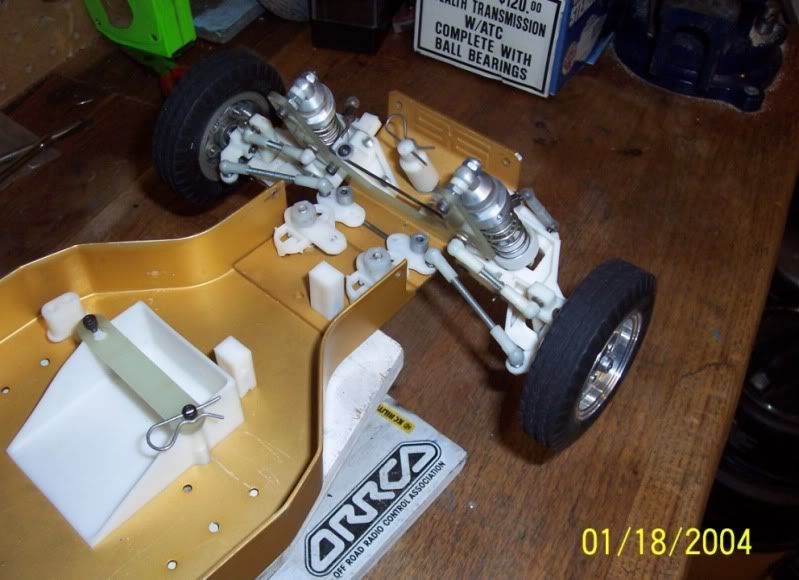
(The hunt is on for rear wheels and more decals. And I've got a growing list of parts that could use a gold anno dip. )
The steering setup with the wing-wire and collars between the two servo savers is actually a decent idea for these old servo savers that don't have that little lump of extra support for a ball stud like the later ones did. It operates really smooth and doesn't scratch into the nose piece like the (slightly too long) ball studs always do...
(The hunt is on for rear wheels and more decals. And I've got a growing list of parts that could use a gold anno dip.
Create an account or sign in to join the discussion
You need to be a member in order to post a reply
Create an account
Not a member? register to join our community
Members can start their own topics & subscribe to topics
It’s free and only takes a minute
Sign in
-
- Similar Topics
- Replies
- Views
- Last post
-
- 18 Replies
- 3238 Views
-
Last post by Vintagemishal
-
- 10 Replies
- 1978 Views
-
Last post by THEYTOOKMYTHUMB
-
- 2 Replies
- 1107 Views
-
Last post by toybaron
-
- 15 Replies
- 3526 Views
-
Last post by Beatnik
-
- 84 Replies
- 8761 Views
-
Last post by soniccj5
-
- 37 Replies
- 5402 Views
-
Last post by SnoopMaxx
-
- 1 Replies
- 798 Views
-
Last post by AscotConversion
-
- 7 Replies
- 1113 Views
-
Last post by GoMachV
Who is online
Users browsing this forum: ![]() Tbot [Bot] and 3 guests
Tbot [Bot] and 3 guests