My RC10 projects and pics!
-
carloco8

- Approved Member
- Posts: 882
- Joined: Sun Jun 04, 2006 2:02 pm
- Location: SoCal
- Has thanked: 74 times
- Been thanked: 271 times
Re: Pics of my RC10's
MOmo, the rear CF tower on my tekin is 2.2mm thick. Id say 2mm is as thin as you should go for a shock tower. 2.5mm-3mm is nice and anything thicker is a little overkill. After I cut it out, I ran a bead of super glue along the edges to protect it and make it a bit stiffer too. When working with CF, just make sure you're in a well ventilated area and have a mask. Mine was made free hand and honestly it was a mediocre outline job, but with very sharp and fresh bits and cutting disks, everything came out nicely and aligned perfectly. 
Old school racing all the way!
-
SteveK
- Approved Member
- Posts: 748
- Joined: Wed Aug 26, 2009 3:43 pm
- Location: Syracuse, NY
- Has thanked: 1 time
- Been thanked: 2 times
Re: Pics of my RC10's
Fiberglass too, or anything that throws off dust. I highly recommend a vacuum as well as a mask, because that dust gets EVERYWHERE. I clamp my Shop Vac hose to the workbench and cut parts in front of that; it's cool to see the dust get sucked backwards into the hose when the wheel is turning away from it. Even a cheap vacuum with a drywall filter is worth it, even if it's just to keep your significant other from killing you.carloco8 wrote:MOmo, the rear CF tower on my tekin is 2.2mm thick. Id say 2mm is as thin as you should go for a shock tower. 2.5mm-3mm is nice and anything thicker is a little overkill. After I cut it out, I ran a bead of super glue along the edges to protect it and make it a bit stiffer too. When working with CF, just make sure you're in a well ventilated area and have a mask. Mine was made free hand and honestly it was a mediocre outline job, but with very sharp and fresh bits and cutting disks, everything came out nicely and aligned perfectly.
-
SteveK
- Approved Member
- Posts: 748
- Joined: Wed Aug 26, 2009 3:43 pm
- Location: Syracuse, NY
- Has thanked: 1 time
- Been thanked: 2 times
Re: Pics of my RC10's
This could be a good alternative, but a regular Shop Vac is cheaper:
http://www.shopvac.com/vacs/detail.asp?ID=242&HdnSource=index&StoreID=
http://www.shopvac.com/vacs/detail.asp?ID=242&HdnSource=index&StoreID=
-
carloco8
- Approved Member
- Posts: 882
- Joined: Sun Jun 04, 2006 2:02 pm
- Location: SoCal
- Has thanked: 74 times
- Been thanked: 271 times
Re: Pics of my RC10's
Here is my newest project and I decided that it would be of a "what is old is new" sort, however, with a twist. Back in the day before rc stadium trucks, converting buggies was the thing and that is what I wanted to do here- to make a full blown rc10 Monster Truck track car. For this build, I'll be using a standard rc10 graphite chassis for the base. It will be set up to use regular rc10t/t2/t3/t4 rims and tires
- Attachments
-
Old school racing all the way!
-
carloco8
- Approved Member
- Posts: 882
- Joined: Sun Jun 04, 2006 2:02 pm
- Location: SoCal
- Has thanked: 74 times
- Been thanked: 271 times
Re: Pics of my RC10's
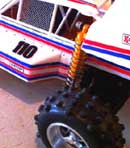
The Front end build. I started with a rc10 world's bell crank with bearings and an associated servo saver for the MGT. It looks similar to the tamiya version but has much more tension with an extra metal clip/spring. I had an extra set of JG monster truck conversion shock towers that were perfect for this project and would allow me to use longer front shocks and get some extra up travel. Standard front a-arms were the ticket for this being that I wanted it to have a regular buggy width, axle-to-axle. For a body mount, I cut and bent one from kydex to be mounted to the top of the shock tower and used some rc12 body posts. Next, was perhaps the most time consuming and it was finding the right steering knuckle combination to prevent larger truck tires from rubbing against the arms, but in the end it was T4 25 degree blocks run backwards and and trimmed and T4 inline axles that worked best. With the new RPM shorty bumpers available, I knew I had to have one for this build for the best front end protection and light weight purposes. I'm still waiting on some titanium turnbuckles, but for now the front is done!
- Attachments
-
-
-
-
-
-
-
-
Old school racing all the way!
-
carloco8
- Approved Member
- Posts: 882
- Joined: Sun Jun 04, 2006 2:02 pm
- Location: SoCal
- Has thanked: 74 times
- Been thanked: 271 times
Re: Pics of my RC10's
Rear end build. In the rear, I used a standard late version bulkhead, but any one with the inner most camber link postion is preferred along with a JG rear shock tower. I chose this shock tower to match the front and for its standard holes that allowed me to mount rc10t rear body mounts directly to it without any modification and lastly, some rc12 body posts. The rear arms, DYNOTECH ofcourse! With most truck conversions using short front arms and standard rear arms I had to use wider rear arms since I was using the standard front long a-arms to retain equal front and rear track widths. I am also using RPM rc10gt hubs due to binding issues with standard ae hubs and dynotech arms. With the RPM hubs having 0 degree toe-in, I opted for the later 3 degree rear arm mounts. Based from other knowledgeable site members, B44 axles and cvd's were the hot ticket and worked perfectly, but I was having binding issues from tightening wheel nuts to hard. To fix this, I found that B44 front axle crush tubes/bearing spacers fit perfectly in the RPM hub and let the avid bearings to their job right. After putting these parts together, I'm almost there!
- Attachments
-
-
-
-
-
Old school racing all the way!
-
carloco8
- Approved Member
- Posts: 882
- Joined: Sun Jun 04, 2006 2:02 pm
- Location: SoCal
- Has thanked: 74 times
- Been thanked: 271 times
Re: Pics of my RC10's
Transmission. I knew I was going to use a 3-gear stealth type of transmission for this project and this used MIP 2.6 ratio change box conversion was just waiting to be used. This conversion includes the trans case halves, a special idler gear and diff gear. The rest is a bunch of fresh used stealth parts except for a new B4 top shaft and slipper unit. I was able to use an older version of the B4 gear cover as well by modifying the lower mount hole on the cover, leaving the motor plate untouched. With the top hole fitting perfect, I flattened the excess plastic around the bottom area before cutting it out to give myself more plastic to put a screw through. I threw on a good 'ole graphite trans brace, mounted the unit to the chassis and now its all solid.
- Attachments
-
-
-
-
-
Old school racing all the way!
-
carloco8
- Approved Member
- Posts: 882
- Joined: Sun Jun 04, 2006 2:02 pm
- Location: SoCal
- Has thanked: 74 times
- Been thanked: 271 times
Re: Pics of my RC10's
Shocks.
Pretty much I was able to use what you would find on an rc10t.
1.02 shock body kit for the front
1.32 shock body kit for the rear
I put some tires on and a battery in it so its rolling around now. Just about there!
Pretty much I was able to use what you would find on an rc10t.
1.02 shock body kit for the front
1.32 shock body kit for the rear
I put some tires on and a battery in it so its rolling around now. Just about there!
- Attachments
-
-
Old school racing all the way!
-
carloco8
- Approved Member
- Posts: 882
- Joined: Sun Jun 04, 2006 2:02 pm
- Location: SoCal
- Has thanked: 74 times
- Been thanked: 271 times
Re: Pics of my RC10's
Body. I was set on not using a stadium truck body for this project because I wanted it to look more like a monster truck/converted buggy. I found two great options from proline (72' and 50's pickup bodies for the stampede), but being a C10 guy I had to have the '72 chevy body. The front fenders were a problem, but nothing a pair of scissors couldn't fix. I had a blast making an old is new truck style conversion and I hope you guys enjoy it too. As for now, it is ready to hit the track and get dirty!
- Attachments
-
-
-
-
-
-
-
-
Old school racing all the way!
-
bearrickster

- Approved Member
- Posts: 4372
- Joined: Thu Mar 06, 2008 11:36 am
- Location: Hollywood Maryland
- Been thanked: 8 times
-
vintage AE
- Approved Member
- Posts: 3012
- Joined: Fri Nov 14, 2008 1:47 pm
- Location: Sunken Lake, Nova Scotia
- Has thanked: 29 times
- Been thanked: 36 times
-
slotcarrod

- Approved Member
- Posts: 4415
- Joined: Tue Nov 25, 2008 10:57 pm
- Location: Calgary Alberta Canada
- Has thanked: 1 time
- Been thanked: 45 times
Re: Pics of my RC10's
Neat stuff! That old Chev looks neat on that RC10. Nice builds!
Rod Littau
Slotcarrod's Rumpus Room: http://www.rc10talk.com/viewtopic.php?f=77&t=16113
25 Years of the RC10: http://www.rc10talk.com/viewtopic.php?f=35&t=13059
Slotcarrod's Rumpus Room: http://www.rc10talk.com/viewtopic.php?f=77&t=16113
25 Years of the RC10: http://www.rc10talk.com/viewtopic.php?f=35&t=13059
-
carloco8
- Approved Member
- Posts: 882
- Joined: Sun Jun 04, 2006 2:02 pm
- Location: SoCal
- Has thanked: 74 times
- Been thanked: 271 times
Re: My RC10 projects and pics!
I acquired a rc10t early last year that appeared to have minimal run time, however showing few but deep scratches and a bent nose plate. It sat in my garage up until recently when I spent some time upgrading my current b44 to a 44.2. I had the original b44 lipo tray that I removed and a saddle pack set to the side of my bench next to where the 10t was sitting and stared at all three when it hit me! I decided to try something different, and build a long wheel base mod class saddle pack buggy, now with a slightly more centralized weight distribution. With a few cuts of the lipo tray and the vision of a different battery position, this project was under way! Here are some pics of the completed chassis and everyting is now straight again. Still waiting for the receiver to arrive and need to make a longer jumper cable for the saddle. More details of part alterations and body to follow......
- Attachments
-
-
-
Old school racing all the way!

Create an account or sign in to join the discussion
You need to be a member in order to post a reply
Create an account
Not a member? register to join our community
Members can start their own topics & subscribe to topics
It’s free and only takes a minute
Sign in
-
- Similar Topics
- Replies
- Views
- Last post
-
- 7 Replies
- 1292 Views
-
Last post by tizeye
-
- 5 Replies
- 296 Views
-
Last post by tgfarrell
-
- 17 Replies
- 2159 Views
-
Last post by karnivool
-
- 16 Replies
- 2057 Views
-
Last post by dnewsome
-
- 41 Replies
- 4557 Views
-
Last post by clm
-
- 15 Replies
- 2387 Views
-
Last post by JPAE07
-
- 15 Replies
- 3033 Views
-
Last post by Hangtime
-
- 25 Replies
- 3251 Views
-
Last post by Tadracket
Who is online
Users browsing this forum: ![]() Tbot [Bot] and 7 guests
Tbot [Bot] and 7 guests