My Old is New RC10 with some custom parts.
My Old is New RC10 with some custom parts.
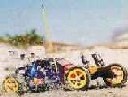
After seeing all the old is new buggies on here I was inspired (compelled) to build one of my own. Almost the entire car is made from NIP parts. I used Stainless hardware just about everywhere. I wanted my car to be a little different from everyone else’s so I made a custom chassis from 1/8” plate graphite and milled the connection point to the front nose plate so they would line up and the chassis would not hang down. I still wanted to use nose tubes to strengthen the front end but the standard length tubes put the braces in the way of the steering components so I made longer tubes and moved the braces back. I am getting some tube stock and will make permanent tubes soon rather than the two piece ones on the car currently. I made the front shock tower from some fiberglass I had and it is shaped like an original rc10t tower except for the inside, which was enlarged to let a body pass through. I modified a standard rear tower to put the dip in the top of it. I think it makes it look more interesting. The rear transmission brace is also made from some thinner graphite plate that I had. I still need to put a center drag link on it, replace the white rear body mount (I have one coming from the bay), and cut out a body. I probably will just mount a viper because they are the easiest to body to get. I plan on making a graphite front shock tower soon and dyeing the arms black. I think overall the car had a good look and I am happy with the shape I made for the chassis and I like the look of the long front tubes.
- Attachments
-
-
-
-

Re: My Old is New RC10 with some custom parts.
Very nice! I really like the custom touches.
RC10 old/new project underway * Losi XX4 - Heavy Metal * RC10T4 * Kyosho ZX-5 SP * BMI DB12RR
-
shodog
- Approved Member
- Posts: 3813
- Joined: Thu Oct 05, 2006 3:09 pm
- Location: Washington
- Has thanked: 3 times
- Been thanked: 91 times
-
Mr. ED

- Approved Member
- Posts: 5483
- Joined: Thu Dec 21, 2006 1:30 am
- Location: Back @ home: Belgium
- Has thanked: 62 times
- Been thanked: 62 times
Re: My Old is New RC10 with some custom parts.
Nice work and original. Maybe look a bit out-of-the-box for the body choice also?
I used a tamiya desert gator body on my ultima and think it would look excellent on this also. Some of the later and still available losi bodies are cool and might fit... Plenty of choices
I used a tamiya desert gator body on my ultima and think it would look excellent on this also. Some of the later and still available losi bodies are cool and might fit... Plenty of choices
-
RichieRich
- Approved Member
- Posts: 2360
- Joined: Wed Jun 14, 2006 11:42 pm
- Location: Los Angeles, CA
- Has thanked: 39 times
- Been thanked: 25 times

-
mrlexan

- Approved Member
- Posts: 6250
- Joined: Wed Dec 06, 2006 6:49 pm
- Location: Upstate SC
- Been thanked: 12 times
Re: My Old is New RC10 with some custom parts.
How do you guys get your lines so straight? Someone is going to have to do a how to.faceman2k wrote:I made the front shock tower from some fiberglass I had and it is shaped like an original rc10t tower except for the inside, which was enlarged to let a body pass through.
Nicely done!
I am not here cause I am playing photographer and on my mountain bike.
www.gojammedia.com
www.gojammedia.com
Re: My Old is New RC10 with some custom parts.
Thanks to everyone for the kind words.
I don’t know about everyone else but I do all of my templates in AutoCad and plot them 1:1. I then use the really thin clear double-sided tape to attach the template to my material and use a scroll saw to rough-cut the part. After the part is cut I use a belt/disk sander and an oscillating spindle sander to clean the part up to the lines on the template. After that I drill it and remove the remainder of the template.
I have a PCB routing machine sitting on the back dock at my work that I plan to get running and learn how to program at some point. Once I get it running I can make all the custom parts I want with perfect cnc precision.
-
jwscab

- Approved Member
- Posts: 6571
- Joined: Wed Jan 28, 2009 9:42 am
- Location: Chalfont, PA
- Has thanked: 16 times
- Been thanked: 498 times
Re: My Old is New RC10 with some custom parts.
for fiberglass or carbon fiber, or even aluminum, I always lay it out with tape covering the flat surface, and make sure I'm happy with the layout, then follow up the pencil/pen lines with a nice sharp #11 exacto to score the material. Then you can either remove the tape, or leave it on for rough cuts, and for most parts, I always cut slightly fat and final fit with sharp files to the score line. It helps to have a nice flexible machinist's scale for the nice straight edge.
the hardest part is when you are making an internal radius, I try and use the closest drill I can find to match the radius, and the hard part is making sure you don't make the radius in the wrong place, that is, you put the center of the drill too far in, and make the radius too far into the piece, then you have to smooth that out to match the orginal cut line.
nice car BTW, looks very cool. Love seeing the custom stuff and non 'standard' shapes. What are you using to attach the nose tubes to the chassis, right in front of the battery cup? Is that something that is a factory part? It's hard to see in the photos.
-
SMOKE-DOG

- Approved Member
- Posts: 723
- Joined: Wed Jul 23, 2008 1:03 pm
- Location: Columbus, Ohio
- Been thanked: 1 time
Re: My Old is New RC10 with some custom parts.
Wow... nice professional work. Looks super lightweight.
TC showroom: http://tamiyaclub.com/showroom.asp?id=18447
-
m_vice
- Approved Member
- Posts: 1312
- Joined: Fri Feb 23, 2007 12:46 pm
- Location: Dallas, TX
- Been thanked: 2 times
Re: My Old is New RC10 with some custom parts.
Looks really good, I like it. It reminds me of my fiberglass RC10T.
http://www.rc10talk.com/viewtopic.php?f=36&t=5690 -
http://www.rc10talk.com/viewtopic.php?f=36&t=5690 -


-
SteveK
- Approved Member
- Posts: 748
- Joined: Wed Aug 26, 2009 3:43 pm
- Location: Syracuse, NY
- Has thanked: 1 time
- Been thanked: 2 times
Re: My Old is New RC10 with some custom parts.
You can get these 8.5x11 adhesive-backed sheets at office supply stores; they are basically giant labels. I print designs on these and stick them directly to the material, no shifting or wrinkling or anything. If your design is longer than 11", draw a break line and print it on two sheets and cut and line them up.
For inside radius holes, or any holes, don't forget to insert crosshairs at the center point. Forget to do it once and it ruins your day lol
For inside radius holes, or any holes, don't forget to insert crosshairs at the center point. Forget to do it once and it ruins your day lol
Re: My Old is New RC10 with some custom parts.
WOW THAT LOOKS GREAT.WHAT ARE THOSE BRACES YOU ARE USING?WAS CONTEMPLATING DOING THIS WITH A GRAPHITE CHASSIS I HAVE LYING AROUND(MAYBE GOING MID MOTOR)BUT COULDNT FIGURE THE BEST WAY TO ATTACH THE NOSE TUBES TO THE CHASSIS.
rc10b4,rc10b44,tc3,tc5,rc10 worlds,rc10t,rc10ce,rc10 team,rc18t
-
mrlexan
- Approved Member
- Posts: 6250
- Joined: Wed Dec 06, 2006 6:49 pm
- Location: Upstate SC
- Been thanked: 12 times
Re: My Old is New RC10 with some custom parts.
A suggestion, caps lock off please sir.
I am not here cause I am playing photographer and on my mountain bike.
www.gojammedia.com
www.gojammedia.com
Create an account or sign in to join the discussion
You need to be a member in order to post a reply
Create an account
Not a member? register to join our community
Members can start their own topics & subscribe to topics
It’s free and only takes a minute
Sign in
-
- Similar Topics
- Replies
- Views
- Last post
-
- 37 Replies
- 6977 Views
-
Last post by m_vice
-
- 25 Replies
- 4828 Views
-
Last post by m_vice
-
- 25 Replies
- 2362 Views
-
Last post by Bugle
-
- 6 Replies
- 1320 Views
-
Last post by Jim85IROC
-
- 1 Replies
- 1114 Views
-
Last post by KidAgain
-
- 2 Replies
- 631 Views
-
Last post by GoMachV
-
- 3 Replies
- 873 Views
-
Last post by racingkids
-
- 6 Replies
- 2529 Views
-
Last post by Dadio
Who is online
Users browsing this forum: ![]() Amazon [Bot] and 7 guests
Amazon [Bot] and 7 guests