scr8p wrote:looks to me like using the sassy chassis as a template for hole placement has kinda bit you in the a$$ again.............
the sassy chassis has 3 degrees of toe in already built into it. because of that, the sides of the chassis by the arm mounts taper towards the bulkhead. that way, the holes will line up with the arm mounts. you used the sassy hole placement, then cut the chassis straight (like a normal chassis), so now you can't attach the arm mount to the chassis.
There was two version of the sassis chassis the 3° and the straight (I have both) but you may be right. My friend had the 3° chassis in hand and a gold stock one. He may have used the wrong one for hole placement. Thanks for that.
fastang wrote:I know you are well into the development of the chassis and it looks really good but what about this idea? Make the front of the chassis 1/2"-3/4" longer and bend it up like the OG gold pan nose plate. This would allow the use of nose tubes with the GT mounts. It would really stiffen up the front end. You'd be surprised how one good lick will bent the front of that chassis.
Otherwise it looks great!
Well we have checked that already. We did a bunch of computer simulations for the force needed to bend the chassis. It's very strong. The aluminum is also thicker than the gold tub. This chassis is WAY stiffer than the sassy chassis too.
AYKBOBCAT wrote:Ok guys... a little update on our project
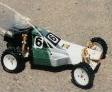
I just received a few pictures of our chassis assembled with the rest of the parts. It looks very good but we have a few problems to fix as the rear holes do not align properly. We'll fix that of course.
The steering parts will have to be shimed a little to clear the chassis as the original front plate is a bit lower. We'll probably supply shim tubes or something like that with the chassis. It has to be a cheap and simple solution. Here are a few pictures...
Don't pay attention to the orientation of the rear wheels. My friend used the wrong holes on the suspension mounts before taking the picture.
For the final version we will reposition the row of holes back by one hole and anodize the thing (likely black).
Now I need to find a rear bumbper for the graphite chassis to test the position of the two rear holes. If someone has one to spare let me know. Condition doesn't matter it's for testing...
Seems like there would be a lot of flex in the front and the back of this chassis which can be good bit too much is not good. I think that chassis would be a great chassis for some A&L chassis braces? Looks great though please tell us how it's working out.
eBay ID: Nsr250_sp_repsol
Location: McChord AFB, WA