are you sure the spring just didn't stay in the outdrive when you took it apart? then when putting it back together, you just put it right back how it was supposed to be?
the spring really is necessary in order to make the diff smooth and adjustable. You could leave it out, but I don't know how well the diff will stay adjusted when running the car.....I also don't know if you could thread the screw in completely without causing binding of the dogbone, as the bolt would stick way out of the little white nut thingie, preventing you from putting the dogbone in all the way.
if you haven't checked it out yet, try going to rc10.com and looking in the manuals in the discontinued section for a championship edition RC10 manual, and take a look at the stealth assembly.
My first rc10 restoration (pink chassis!)
Re: My first rc10 restoration (pink chassis!)
well i found why i couldn't find the spring yet the diff gear worked. There were 2 plastic spaces and one of those split washers which have a slight spring effect. Very basic, but i guess it worked.
I did find out that there's a bearing missing in the diff gear (supposed to be 2, right?), and another bearing (different size) where actually it supposed to be a bushing (in the spurt gear). Not a big deal i guess. I'm just trying to spend as little as possible. I kind of like to "Macgyver" things back to life.
Anyway, I've been busy as i've got 2 midterms coming up, just had my anniversary, and the world exploded last week.
Here's what's happening:

Some of the screws (such as the ones holding the rear shock tower) are not original. As a matter of fact, the car didn't have the original screws before i tore it apart. I went to buy some AE screws: 3 BUCKS for 4 screws??? Screw that! No pun intended. I could have put back the screws that were holding the tower originally, but they were varied in length and color. I found 4 screws with just about the correct threading and thickness, i grinded them to the right size and voila'. One of the screws is much shinier. I would have used 4 like that, but i had only one. Transmission, electronics, body, "wing", and wheels left.
The new arrival:

Arrived yesterday. I was afraid to open the box. I have to say this buggy was proof of my impulse buying. Maybe i'm going to call it "Impulse"
I need someone to cheer me up and give me hope: show me something in worse conditions than this, which they managed to restore.
My RC10 armada. The one on the left Miss Dumpster Buggy #1 (making the pink one #2).

I have the shocks for it but, oddly enough, the front shocks look like these tamiya ones:

May need to buy more appropriate shocks, eh?
Ok, i better pay attention to the professor now. Talk to you guys later!
I did find out that there's a bearing missing in the diff gear (supposed to be 2, right?), and another bearing (different size) where actually it supposed to be a bushing (in the spurt gear). Not a big deal i guess. I'm just trying to spend as little as possible. I kind of like to "Macgyver" things back to life.
Anyway, I've been busy as i've got 2 midterms coming up, just had my anniversary, and the world exploded last week.
Here's what's happening:
Some of the screws (such as the ones holding the rear shock tower) are not original. As a matter of fact, the car didn't have the original screws before i tore it apart. I went to buy some AE screws: 3 BUCKS for 4 screws??? Screw that! No pun intended. I could have put back the screws that were holding the tower originally, but they were varied in length and color. I found 4 screws with just about the correct threading and thickness, i grinded them to the right size and voila'. One of the screws is much shinier. I would have used 4 like that, but i had only one. Transmission, electronics, body, "wing", and wheels left.
The new arrival:
Arrived yesterday. I was afraid to open the box. I have to say this buggy was proof of my impulse buying. Maybe i'm going to call it "Impulse"
I need someone to cheer me up and give me hope: show me something in worse conditions than this, which they managed to restore.
My RC10 armada. The one on the left Miss Dumpster Buggy #1 (making the pink one #2).
I have the shocks for it but, oddly enough, the front shocks look like these tamiya ones:
May need to buy more appropriate shocks, eh?
Ok, i better pay attention to the professor now. Talk to you guys later!
-
JK Racing

- Approved Member
- Posts: 4619
- Joined: Thu Jul 19, 2007 2:32 pm
- Location: Placentia, CA
- Has thanked: 139 times
- Been thanked: 246 times
Re: My first rc10 restoration (pink chassis!)
That car is completely salvagable...
From this:
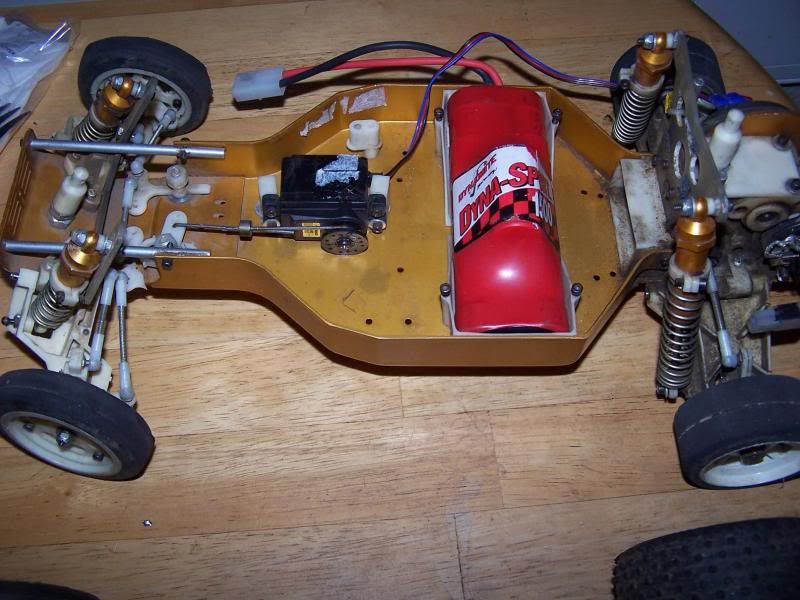
to this:
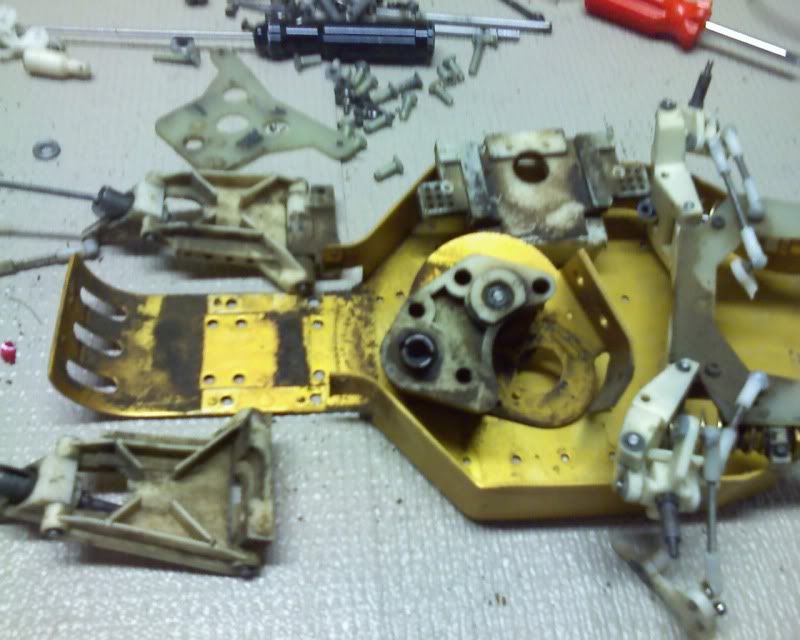
to me totally messing it up to this:
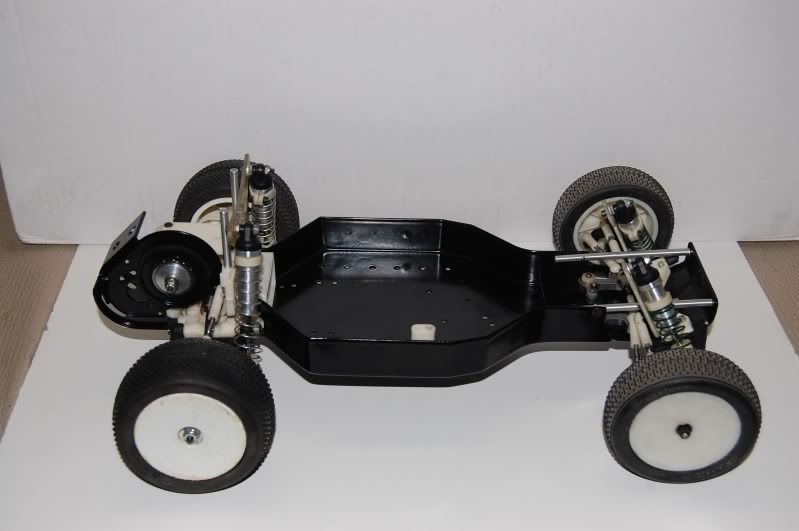
To now this...
From this:
to this:
to me totally messing it up to this:
To now this...
--Joey --
Vintage A&L and Factory Works
Old School Racer & Vintage RC Car nut
JKRacingRC.com
Vintage A&L and Factory Works
Old School Racer & Vintage RC Car nut
JKRacingRC.com
-
jwscab

- Approved Member
- Posts: 6580
- Joined: Wed Jan 28, 2009 9:42 am
- Location: Chalfont, PA
- Has thanked: 16 times
- Been thanked: 505 times
Re: My first rc10 restoration (pink chassis!)
yeah, that car will be mostly salvageable.
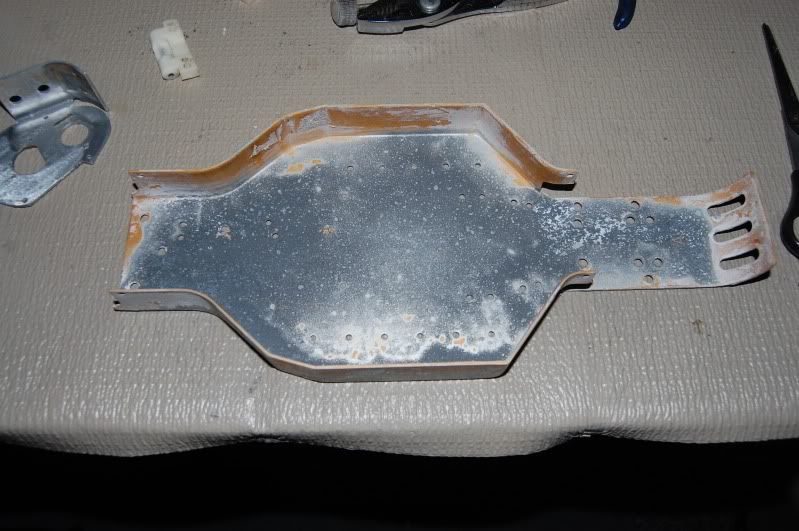
it appears that the nose plate is homemade, and everything has paint on it.....I'd strip everything down completely, use acetone or something like it on the chassis to strip all the colors, and simple green all the plastic parts.
then see where you are. you might only need some new hardware and a noseplate/tubes to make it a complete usable buggy.
Re: My first rc10 restoration (pink chassis!)
I've been busy with other stuff lately, so i didn't have time to dedicate to the car. I finally got some more work in. Here's the results.
I didn't have the plastic rod that holds the battery down so i decided to make one instead. I could go out and buy one but i'm trying to do this car with as little $$$ spent as possible. So far the only purchase has been prestone dot 4 to clean the body, and eventually the spray paint.
In my other hobby (1/32 mini4wd and trikes: they're not rc and not quite slot cars), i use pc board as a cheap alternative to FRP (Fiber Reinforced Polymer). It's strong, it's free, and it's really easy to work with.

Apparently i didn't have that rear plate that hooks the drive train to the shock tower, so i made one of those as well. Notice the tires in this shot.

I finally get to the electronics. All recycled stuff. These are all the electronics that i was using 10 years ago. I had to go through each one and find what was working. To my surprise there was only 2 non functional speed controls (on the left) and 1 that's working but gets hot fast (on the right). I picked one of the functional power pulse (saving the tekin for when i restore my b3, and the novak for the garbage-found rc10L). Unfortunately the reverse doesn't seem to work anymore, but i can live with that.

And here are all the servos...broken of course. The circuit boards and motors work fine, but each one has at least one broken gear. I'd have to dig around in my old parts bags to find replacement gears.

While looking through the bags, i actually found the rear plastic piece. Hurray...i guess. I was really looking forward to use the piece i made. Oh well. You can see my finished battery holder in this shot.

And at last, the motor!

I don't recall how many turns it has, but i know it was my friends and was not treated all that well. All i know is that it's pink!
And voila!

I cleaned the interior of the motor as well. Performance feels stock-ish, but i'm also running on 2 inch rims and a 20T pinion (not sure about the spur). Sure does have good torque though.

Remember i told you guys to notice the tires in the other picture? Now look at them here. I didn't clean them. I ran the car and went over grass which was lightly moist and it did the work for me. Thanks Lawn!
The body still needs repainting. The wing belongs to an old b3 body and is just there for aesthetics for now.

Side to side with a b3 i recently purchased.

I'm sure this is nothing new for you guys, but its the first time i get to compare the 2 cars next to each other. I never had both a rc10 and a b3 functional at a same time, so it's a first for me. Oh joy! Now i need a B2 and a B4 to complete the set...and of course the inevitable B5, whenever that will be. What's the difference between the B4 and B4.1, anyway?

While driving the car, i found out that one of the gears i used in my servo had a couple of missing teeth. The car had severe trouble turning left. I couldn't find the correct replacement, so i went with another servo and found the replacement gears for that one. A new servo was installed and that problem was solved.
After that, i had trouble keeping the car going straight. When the servo was in neutral position, there was some play in the parts which made the car turn either slight left or slight right depending which way i turned last. I solved my problem with some paper.

In the ball cups (yellow) and in the servo saver (purple) small pieces of paper eliminate some of play, as well as a small piece of tape on the servo's end of the rod (green).

Unfortunately i'm running on plastic bushings on the front wheels, but other than that, there's no more play in the steering. It's just point and shoot.
All that's left now is the body. Cleaning is the easy (and more annoying) part, but i need to come up with a nice paint scheme that will go with the pink chassis. Something related to the Pink Panther, maybe?
I didn't have the plastic rod that holds the battery down so i decided to make one instead. I could go out and buy one but i'm trying to do this car with as little $$$ spent as possible. So far the only purchase has been prestone dot 4 to clean the body, and eventually the spray paint.
In my other hobby (1/32 mini4wd and trikes: they're not rc and not quite slot cars), i use pc board as a cheap alternative to FRP (Fiber Reinforced Polymer). It's strong, it's free, and it's really easy to work with.
Apparently i didn't have that rear plate that hooks the drive train to the shock tower, so i made one of those as well. Notice the tires in this shot.
I finally get to the electronics. All recycled stuff. These are all the electronics that i was using 10 years ago. I had to go through each one and find what was working. To my surprise there was only 2 non functional speed controls (on the left) and 1 that's working but gets hot fast (on the right). I picked one of the functional power pulse (saving the tekin for when i restore my b3, and the novak for the garbage-found rc10L). Unfortunately the reverse doesn't seem to work anymore, but i can live with that.
And here are all the servos...broken of course. The circuit boards and motors work fine, but each one has at least one broken gear. I'd have to dig around in my old parts bags to find replacement gears.
While looking through the bags, i actually found the rear plastic piece. Hurray...i guess. I was really looking forward to use the piece i made. Oh well. You can see my finished battery holder in this shot.
And at last, the motor!
I don't recall how many turns it has, but i know it was my friends and was not treated all that well. All i know is that it's pink!
And voila!
I cleaned the interior of the motor as well. Performance feels stock-ish, but i'm also running on 2 inch rims and a 20T pinion (not sure about the spur). Sure does have good torque though.
Remember i told you guys to notice the tires in the other picture? Now look at them here. I didn't clean them. I ran the car and went over grass which was lightly moist and it did the work for me. Thanks Lawn!
The body still needs repainting. The wing belongs to an old b3 body and is just there for aesthetics for now.
Side to side with a b3 i recently purchased.
I'm sure this is nothing new for you guys, but its the first time i get to compare the 2 cars next to each other. I never had both a rc10 and a b3 functional at a same time, so it's a first for me. Oh joy! Now i need a B2 and a B4 to complete the set...and of course the inevitable B5, whenever that will be. What's the difference between the B4 and B4.1, anyway?
While driving the car, i found out that one of the gears i used in my servo had a couple of missing teeth. The car had severe trouble turning left. I couldn't find the correct replacement, so i went with another servo and found the replacement gears for that one. A new servo was installed and that problem was solved.
After that, i had trouble keeping the car going straight. When the servo was in neutral position, there was some play in the parts which made the car turn either slight left or slight right depending which way i turned last. I solved my problem with some paper.
In the ball cups (yellow) and in the servo saver (purple) small pieces of paper eliminate some of play, as well as a small piece of tape on the servo's end of the rod (green).
Unfortunately i'm running on plastic bushings on the front wheels, but other than that, there's no more play in the steering. It's just point and shoot.
All that's left now is the body. Cleaning is the easy (and more annoying) part, but i need to come up with a nice paint scheme that will go with the pink chassis. Something related to the Pink Panther, maybe?
-
JK Racing
- Approved Member
- Posts: 4619
- Joined: Thu Jul 19, 2007 2:32 pm
- Location: Placentia, CA
- Has thanked: 139 times
- Been thanked: 246 times
Re: My first rc10 restoration (pink chassis!)
another popular solution to the steering was using a zip tie on the saver side (purple area). a small one fits really nice between the little out croppings on the sides of the steering piece.
that motor is stock (as far as I can tell). do you see how the plastic endbell and can are notched so you can only put in on in spot? that is so you cannot advance or change in any (legal) way the timing on the stock motors for "fair" racing. also, the pink can stock motors were 36 degrees of timing (versus the ROAR rule of 24 degree).
car is looking good.
--Joey --
Vintage A&L and Factory Works
Old School Racer & Vintage RC Car nut
JKRacingRC.com
Vintage A&L and Factory Works
Old School Racer & Vintage RC Car nut
JKRacingRC.com
Re: My first rc10 restoration (pink chassis!)
thanks on the motor info.JK Racing wrote:another popular solution to the steering was using a zip tie on the saver side (purple area). a small one fits really nice between the little out croppings on the sides of the steering piece.
that motor is stock (as far as I can tell). do you see how the plastic endbell and can are notched so you can only put in on in spot? that is so you cannot advance or change in any (legal) way the timing on the stock motors for "fair" racing. also, the pink can stock motors were 36 degrees of timing (versus the ROAR rule of 24 degree).
car is looking good.
As far as the zip tie, do you mean you actually go around the 4 little extrusions?
-
JK Racing
- Approved Member
- Posts: 4619
- Joined: Thu Jul 19, 2007 2:32 pm
- Location: Placentia, CA
- Has thanked: 139 times
- Been thanked: 246 times
Re: My first rc10 restoration (pink chassis!)
blue line....
- Attachments
-
--Joey --
Vintage A&L and Factory Works
Old School Racer & Vintage RC Car nut
JKRacingRC.com
Vintage A&L and Factory Works
Old School Racer & Vintage RC Car nut
JKRacingRC.com
Create an account or sign in to join the discussion
You need to be a member in order to post a reply
Create an account
Not a member? register to join our community
Members can start their own topics & subscribe to topics
It’s free and only takes a minute
Sign in
-
- Similar Topics
- Replies
- Views
- Last post
-
- 13 Replies
- 2694 Views
-
Last post by rc-stu
-
- 0 Replies
- 797 Views
-
Last post by Devilbrad
-
- 6 Replies
- 1153 Views
-
Last post by isobarik
-
- 53 Replies
- 5705 Views
-
Last post by scr8p
-
- 10 Replies
- 1968 Views
-
Last post by Blacktiger355
-
- 2 Replies
- 683 Views
-
Last post by burnsmonkey
-
- 4 Replies
- 1485 Views
-
Last post by mikea96
-
- 13 Replies
- 3515 Views
-
Last post by badhoopty
Who is online
Users browsing this forum: ![]() Ahrefs [Bot],
Ahrefs [Bot], ![]() Amazon [Bot],
Amazon [Bot], ![]() Bing [Bot] and 7 guests
Bing [Bot] and 7 guests