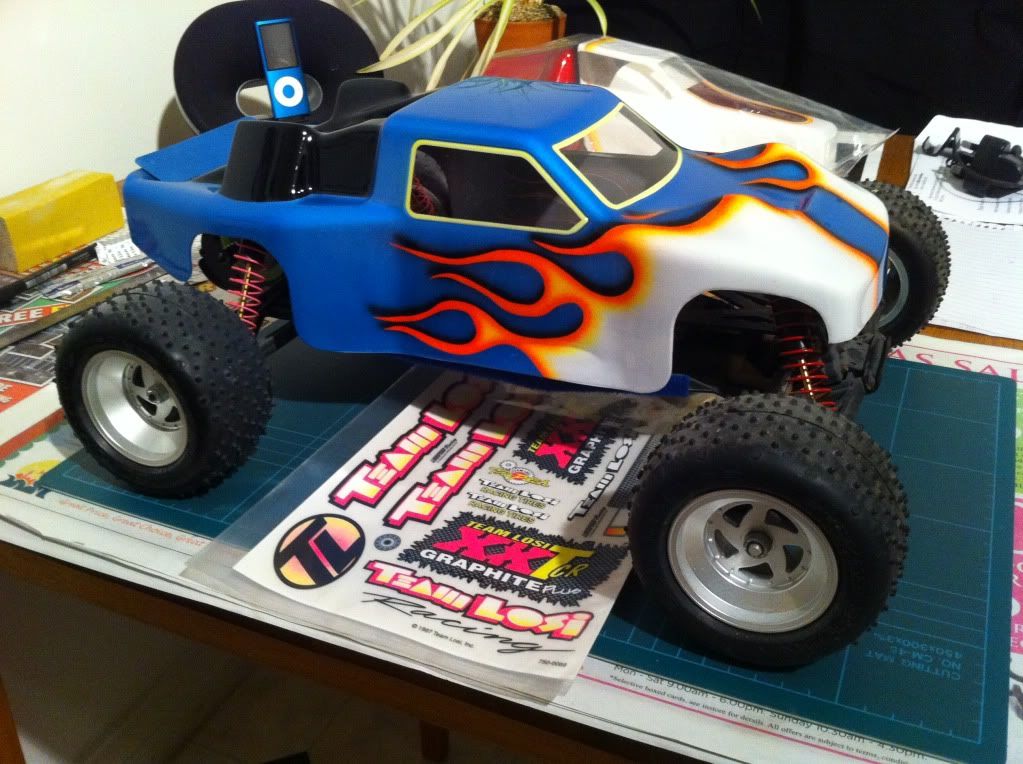
Sweeeeet Painted Lady! (Elton John) i guess you dont need that sticker set no more, in my opinion i will not wrap that good looking paint with stickers!DerbyDan wrote:Thanks Ben for going to the trouble to dig out those shells & taking the photos. The difference between them is rather minimal to say the least! But like you I think I prefer the more aggressive 'humps' to the front on the original XXT shell.
I actually came to the same conclusion when I cut the shell out last night & offered it up on top of the chassis... the rear holes have to drilled as per the moulded-in 'pimples' or else the rear shocks will not pass cleanly up into the lumps on the back of the shell - the variation to take up the length has to occur at the front - as confirmed by your photos of the 'CR' shell. The only problem I can see (& the reason I guess why the CR shell has a 'flatter' front) is that the XXT shell will sit a bit high at the front - as the mount are now further down the slope of the shell..... if you catch my drift? Now the challenge now is to drill the front holes... taking into account the angle of the mounts.
Here's how it looks cut out & (temporarily) placed on top of the truck
I think the paint scheme suits those RPM wheels
@ Gary, i'm afraid the chassis itself still looks like it does in the top picture - but I don't it would take much to get it cleaned up... the diff definately needs some work - but I managed to score a full set of NIP parts to re-fresh that. Would like to get it up & running for something to play with next year - should be fun with the 'vintage' sensor-less BL set-up I have lined up for it!!
Yes the liquid mask has its place - for some designs its the only way they can be realistically achieved. But I think I will stick to what I know (tape) for the majority of my bodyshells.
Ebay Bargain XXT G+ (Finished Pics on Page.3)
-
geeforce59

- Approved Member
- Posts: 407
- Joined: Sat Jul 25, 2009 5:52 am
- Location: Manila Philippines
Re: Ebay Bargain XXT G+ (Shell Painted!)
-
jamin

- Approved Member
- Posts: 1157
- Joined: Thu Dec 16, 2010 5:58 am
- Location: Suffolk, UK
- Has thanked: 3 times
- Been thanked: 28 times
Re: Ebay Bargain XXT G+ (Shell Painted!)
Go to : http://www.dms-racing.com/ Under the 'Sale' section, select 'Losi'. They still list the XXT-CR G+ sticker sheet - they may have some still in stock.geeforce59 wrote:Sweeeeet Painted Lady! (Elton John) i guess you dont need that sticker set no more, in my opinion i will not wrap that good looking paint with stickers!give it to me!
Team Losi: XX-CR | XXT | XXT-CR Graphite+ | XX4 | Street Weapon IWC Edition
-
DerbyDan

- Approved Member
- Posts: 1837
- Joined: Tue Sep 08, 2009 8:04 am
- Location: Northampton UK
- Has thanked: 2 times
- Been thanked: 19 times
Re: Ebay Bargain XXT G+ (Shell Painted!)
Good idea! To be honest I've gotten used to cutting shells & drilling the mount holes after painting as its easier to avoid overspray onto the outside if it's sprayed before being cut-out, also with TC shells it's possible to mark the mount holes without having to cut the shell out first, with a touring car though, the body posts normally run vertically. I can easily mark those front holes using the blue tack trick, but of cause the where the shell rests on the post is further back than the post at its tip.jamin wrote:
Probably best to drill a very small hole where you think it needs to be, and then see where it ends up, then drill/file from there perhaps?
My T.C Showroom; http://www.tamiyaclub.com/member.asp?id=28990
-
GJW
- Approved Member
- Posts: 2325
- Joined: Mon Oct 15, 2007 7:22 pm
- Location: AUSTRALIA!!
- Been thanked: 1 time
Re: Ebay Bargain XXT G+ (Shell Painted!)
love to hear body marking/ painting tip's it's a rather grey area for me but always keen to improve 
i have quite a few arm set's for xxt dan so if ya ever need any sir
i have quite a few arm set's for xxt dan so if ya ever need any sir
-
DerbyDan
- Approved Member
- Posts: 1837
- Joined: Tue Sep 08, 2009 8:04 am
- Location: Northampton UK
- Has thanked: 2 times
- Been thanked: 19 times
Re: Ebay Bargain XXT G+ (Shell Painted!)
Miniscule update;
Marked & drilled/reemed the holes on the shell - as highlighted by Jamin on the previous page the 'pimples' marking the front holes on the original XXT shell are further back than they need to be for mounting the shell on the longer 'CR' spec model like my Graphite plus. First I drilled the holes on the rear, as per the markings, then I flattened out some blue tack & spread it thinly roughly where the front mounts occur when mounted, on the inside of the shell. The shell was then placed over the rear mounts & gently lowered at the front, making sure its straight/central over the chassis, the blue tack gets in-dented by the front body posts, from which the centre for each hole can be determined (& I mark into the shell with a centre-punch). Because of the angle of the front body posts I marked a 2nd centre 1.5mm back from each of the first - I then pilot drilled the holes & opened them up with a body reamer.
Marked & drilled/reemed the holes on the shell - as highlighted by Jamin on the previous page the 'pimples' marking the front holes on the original XXT shell are further back than they need to be for mounting the shell on the longer 'CR' spec model like my Graphite plus. First I drilled the holes on the rear, as per the markings, then I flattened out some blue tack & spread it thinly roughly where the front mounts occur when mounted, on the inside of the shell. The shell was then placed over the rear mounts & gently lowered at the front, making sure its straight/central over the chassis, the blue tack gets in-dented by the front body posts, from which the centre for each hole can be determined (& I mark into the shell with a centre-punch). Because of the angle of the front body posts I marked a 2nd centre 1.5mm back from each of the first - I then pilot drilled the holes & opened them up with a body reamer.
My T.C Showroom; http://www.tamiyaclub.com/member.asp?id=28990
-
jamin
- Approved Member
- Posts: 1157
- Joined: Thu Dec 16, 2010 5:58 am
- Location: Suffolk, UK
- Has thanked: 3 times
- Been thanked: 28 times
Re: Ebay Bargain XXT G+ (Shell Painted!)
Sweet Dan, glad you got it mounted ok. Needs a few stickers to set it off IMO.
I hope to update my G+ thread shortly, I did the shell this week, just need to add a couple of finishing touches and I'll get some pics up - really happy with it
I hope to update my G+ thread shortly, I did the shell this week, just need to add a couple of finishing touches and I'll get some pics up - really happy with it
Team Losi: XX-CR | XXT | XXT-CR Graphite+ | XX4 | Street Weapon IWC Edition
-
DerbyDan
- Approved Member
- Posts: 1837
- Joined: Tue Sep 08, 2009 8:04 am
- Location: Northampton UK
- Has thanked: 2 times
- Been thanked: 19 times
Re: Ebay Bargain XXT G+ (Shell Painted!)
Yeah, going to add some decals soonjamin wrote:Sweet Dan, glad you got it mounted ok. Needs a few stickers to set it off IMO.
I hope to update my G+ thread shortly, I did the shell this week, just need to add a couple of finishing touches and I'll get some pics up - really happy with it
Looking forward to seeing the update for your G+ ..... sounds good
My T.C Showroom; http://www.tamiyaclub.com/member.asp?id=28990
-
DerbyDan
- Approved Member
- Posts: 1837
- Joined: Tue Sep 08, 2009 8:04 am
- Location: Northampton UK
- Has thanked: 2 times
- Been thanked: 19 times
Re: Ebay Bargain XXT G+ (Shell Painted!)
So I was off work sick the other week (unusual for me!) & the daytime telly was making me feel even more unwell.... so I set-about stripping down this old XXT thats been gradually gathering a thick layer of dust sitting in the R/C 'den'
I then spent the previous weekend toothbrush in hand scrubbing at each individual part. On the strip-down it became apparent that the car had probably been either previously stored in a damp enviroment, or had been put away wet after its last race meeting, as all the hinge pins had rusted & the tiny steering bearing on the bottom of the servo saver had rusted solid & had fused itself with the bottom of the shaft (hence the need for the need for the new steering hardware set) - There was even rust on the balls & plates within the diff!! (so that would explain the notchy diff!)
Anyway, fast forward to the weekend just gone & the re-build started in ernest (once I had polished up the hinge pins & honed the original diff plates both with wet & dry paper)
Some new bits - including that XX steering hardware set & replacement Ti turnbuckles courtesy of Ben 'Jamin';
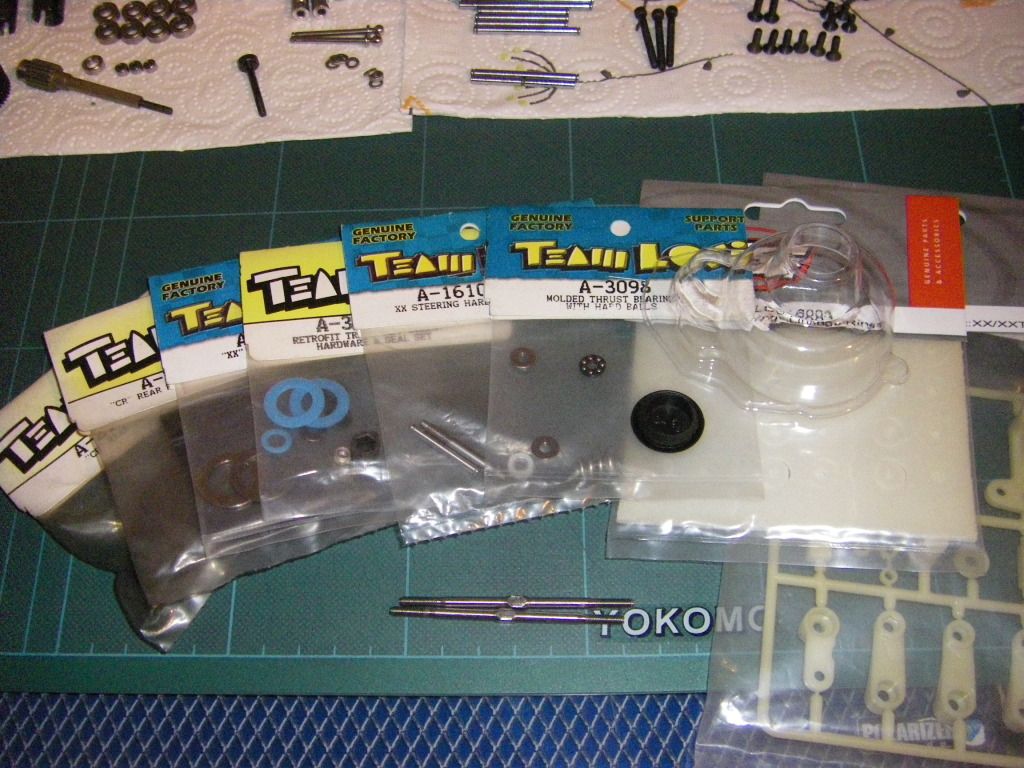
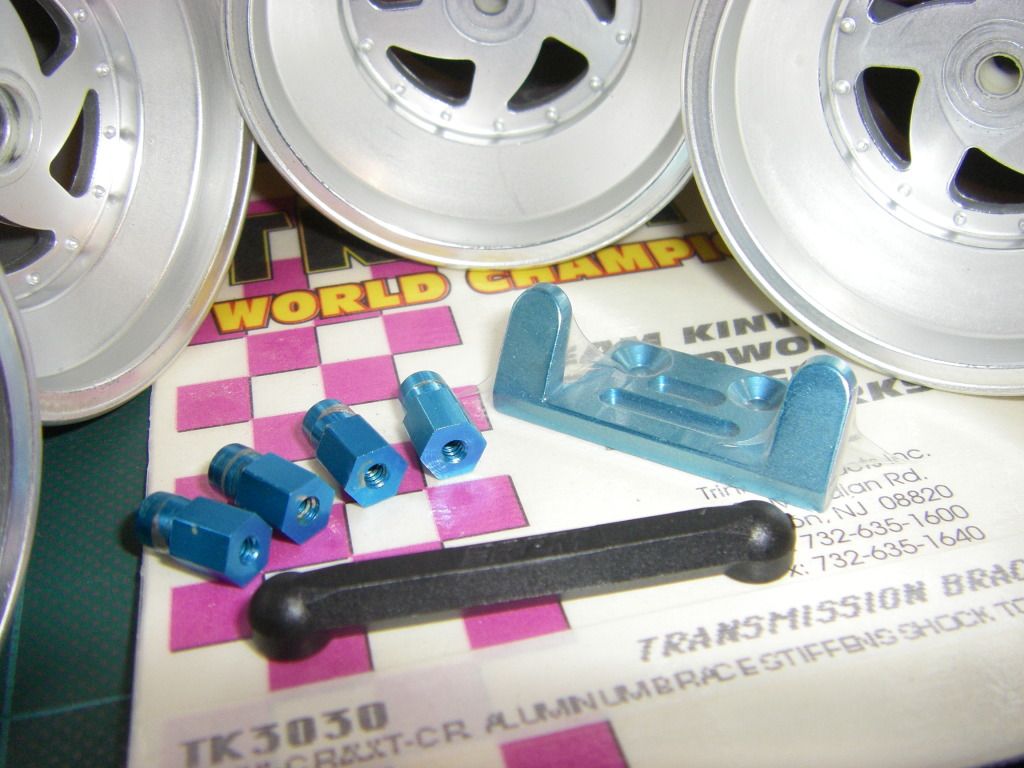
Some nice bits - the Trinity gearbox brace is new but the other bits were already on the truck;
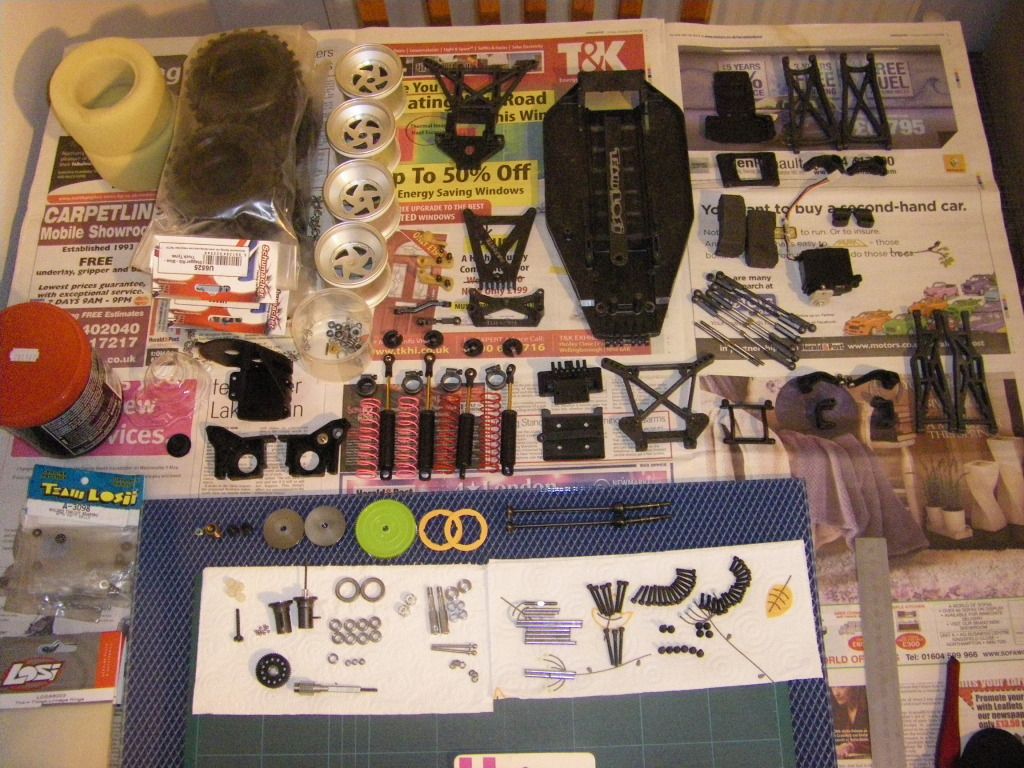
Cleaned parts all laid out ready;
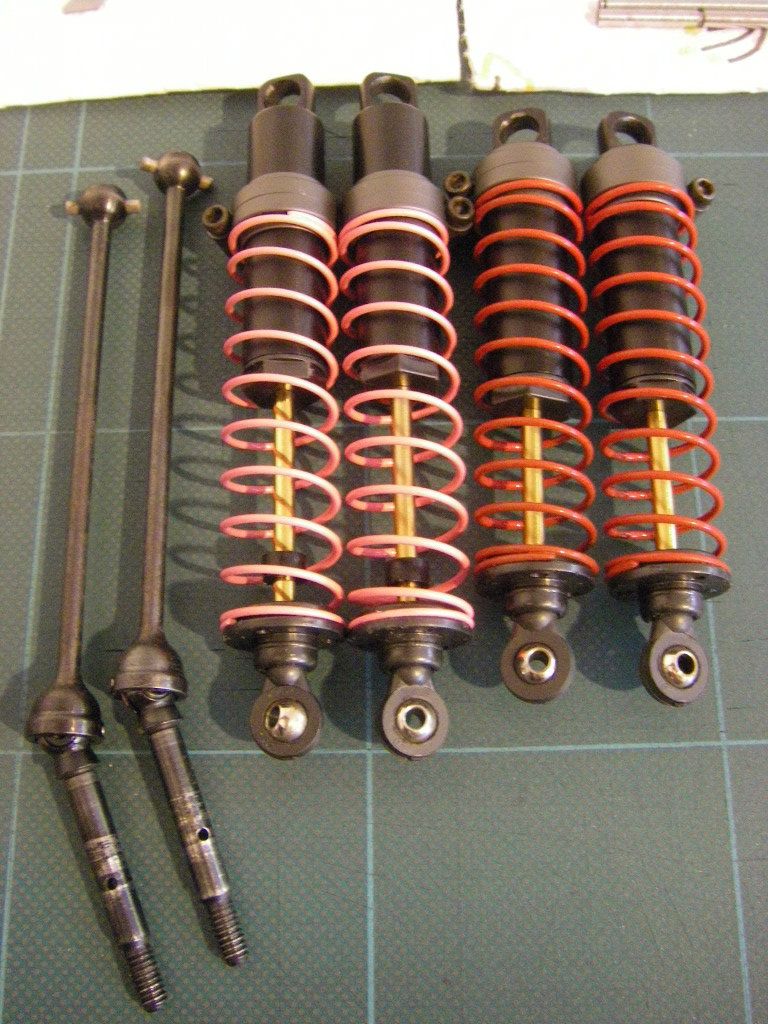
CVDs re-built & cleaned shockers re-assembled (I chose not to bother re-filling them as they were still smooth & 'Squelch' free)
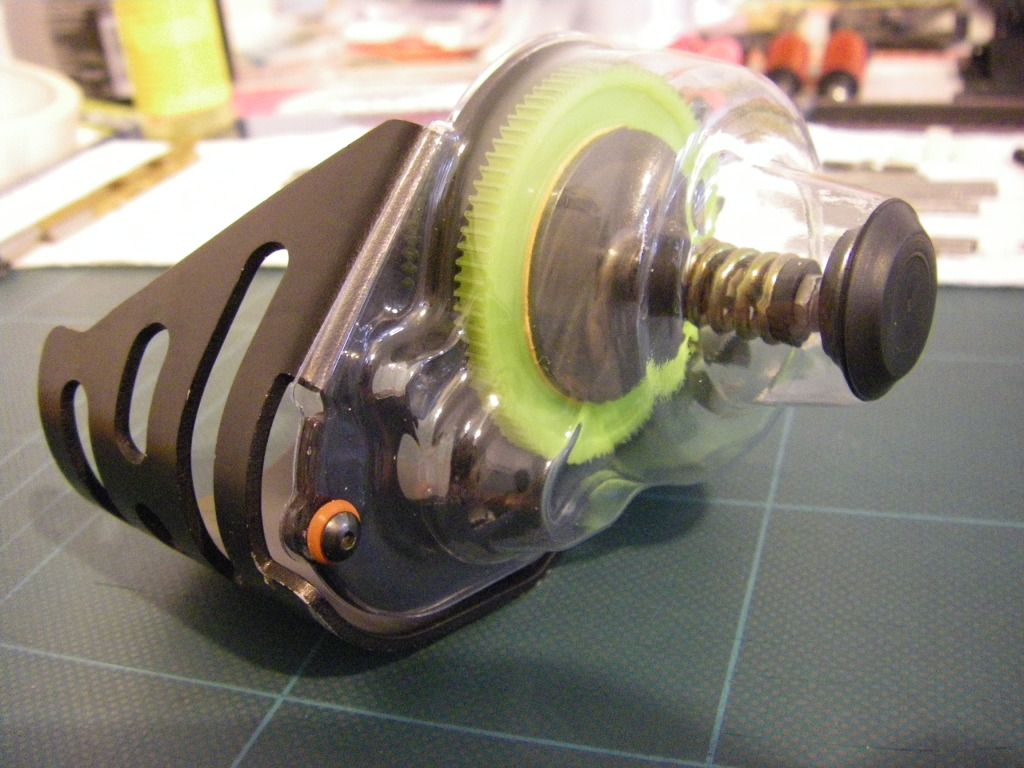
Diff/gearbox assembled with new lexan cover;
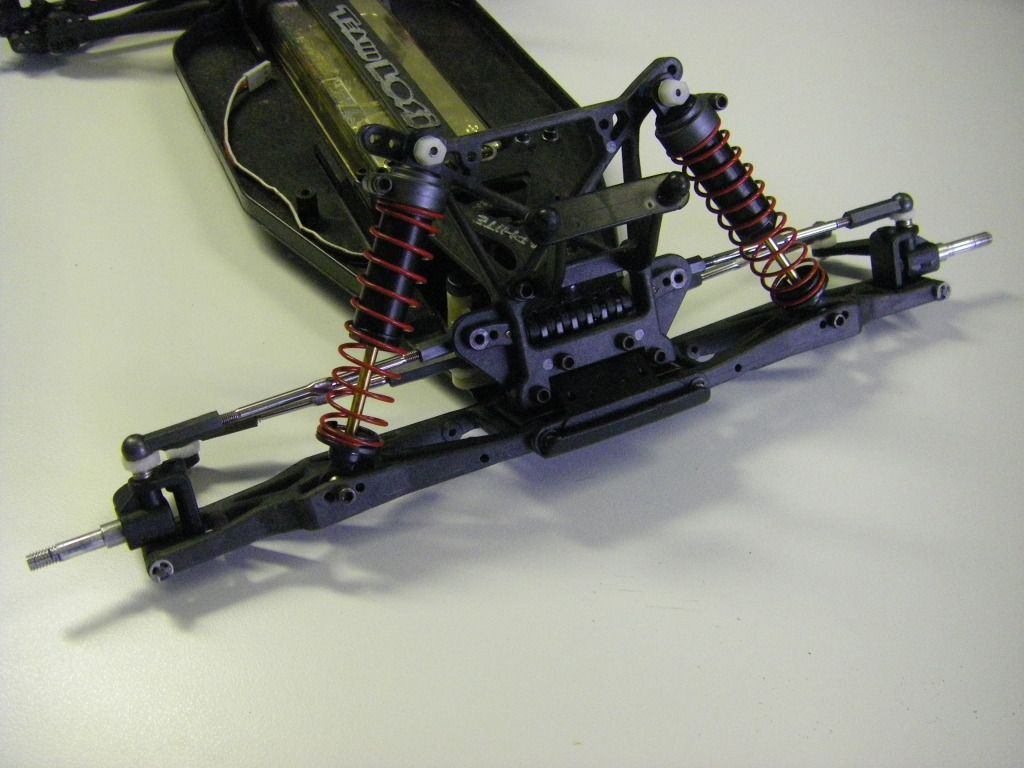
As far as I've got so far, rear end assembled;
All-in-all, the truck is in great shape & its nice to get aquainted with the XX platform again
I then spent the previous weekend toothbrush in hand scrubbing at each individual part. On the strip-down it became apparent that the car had probably been either previously stored in a damp enviroment, or had been put away wet after its last race meeting, as all the hinge pins had rusted & the tiny steering bearing on the bottom of the servo saver had rusted solid & had fused itself with the bottom of the shaft (hence the need for the need for the new steering hardware set) - There was even rust on the balls & plates within the diff!! (so that would explain the notchy diff!)
Anyway, fast forward to the weekend just gone & the re-build started in ernest (once I had polished up the hinge pins & honed the original diff plates both with wet & dry paper)
Some new bits - including that XX steering hardware set & replacement Ti turnbuckles courtesy of Ben 'Jamin';
Some nice bits - the Trinity gearbox brace is new but the other bits were already on the truck;
Cleaned parts all laid out ready;
CVDs re-built & cleaned shockers re-assembled (I chose not to bother re-filling them as they were still smooth & 'Squelch' free)
Diff/gearbox assembled with new lexan cover;
As far as I've got so far, rear end assembled;
All-in-all, the truck is in great shape & its nice to get aquainted with the XX platform again
My T.C Showroom; http://www.tamiyaclub.com/member.asp?id=28990
-
jamin
- Approved Member
- Posts: 1157
- Joined: Thu Dec 16, 2010 5:58 am
- Location: Suffolk, UK
- Has thanked: 3 times
- Been thanked: 28 times
Re: Ebay Bargain XXT G+ (Re-build time!)
Looks great Dan! It's cleaned up real nice, I love to see that raw graphite look in the chassis etc, looks awesome! Glad those turnbuckles are ok, that was a while ago!
Looking forward to seeing the finished result!
Seeing this made me get out all my parts for my XXT G+ build, I started on the transmission like you, but found out I am missing a couple of small vital pieces, so it will have to wait for another day
Looking forward to seeing the finished result!
Seeing this made me get out all my parts for my XXT G+ build, I started on the transmission like you, but found out I am missing a couple of small vital pieces, so it will have to wait for another day
Team Losi: XX-CR | XXT | XXT-CR Graphite+ | XX4 | Street Weapon IWC Edition
-
DerbyDan
- Approved Member
- Posts: 1837
- Joined: Tue Sep 08, 2009 8:04 am
- Location: Northampton UK
- Has thanked: 2 times
- Been thanked: 19 times
Re: Ebay Bargain XXT G+ (Re-build time!)
Thanks Ben - yeah the truck is in good condition, I'm guessing its had very little run-time, just a few minor scratches underneath are really the only evidence of it being runjamin wrote:Looks great Dan! It's cleaned up real nice, I love to see that raw graphite look in the chassis etc, looks awesome! Glad those turnbuckles are ok, that was a while ago!
Looking forward to seeing the finished result!
Seeing this made me get out all my parts for my XXT G+ build, I started on the transmission like you, but found out I am missing a couple of small vital pieces, so it will have to wait for another day
Its funny, the dirt is almost impossible to get off some of the parts.... like its in-grained into the material, the results of a damn good clean seem a little less satifying than with say a regular XX but the flash on the camera really does show off that graphite grain
Glad my re-build is encouraging you to get on with yours Ben.... what parts are you needing to complete that gearbox?
My T.C Showroom; http://www.tamiyaclub.com/member.asp?id=28990
-
jamin
- Approved Member
- Posts: 1157
- Joined: Thu Dec 16, 2010 5:58 am
- Location: Suffolk, UK
- Has thanked: 3 times
- Been thanked: 28 times
Re: Ebay Bargain XXT G+ (Re-build time!)
I needed the small shim that sits by the bearing and thrust race, which I have since found, but more importantly I need a diff nut! I've ordered a couple from Horizon, hopefully they'll arrive tomorrow. Can't believe I don't have any spare!!!!
Team Losi: XX-CR | XXT | XXT-CR Graphite+ | XX4 | Street Weapon IWC Edition
-
DerbyDan
- Approved Member
- Posts: 1837
- Joined: Tue Sep 08, 2009 8:04 am
- Location: Northampton UK
- Has thanked: 2 times
- Been thanked: 19 times
Re: Ebay Bargain XXT G+ (Re-build time!)
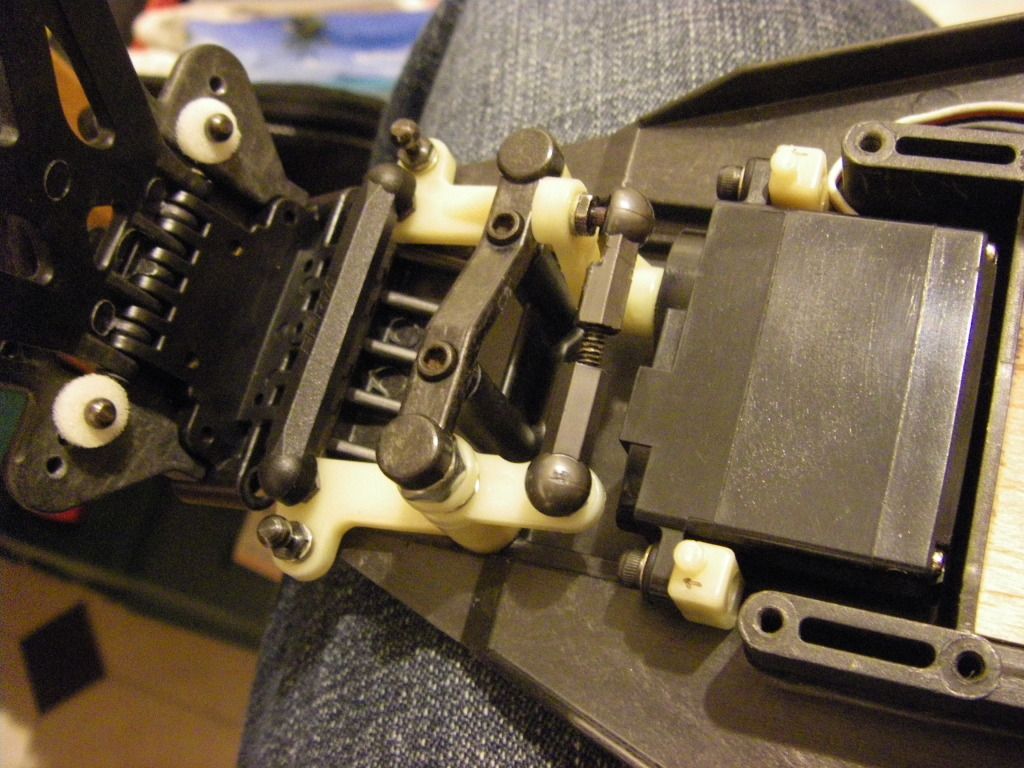
More progress;
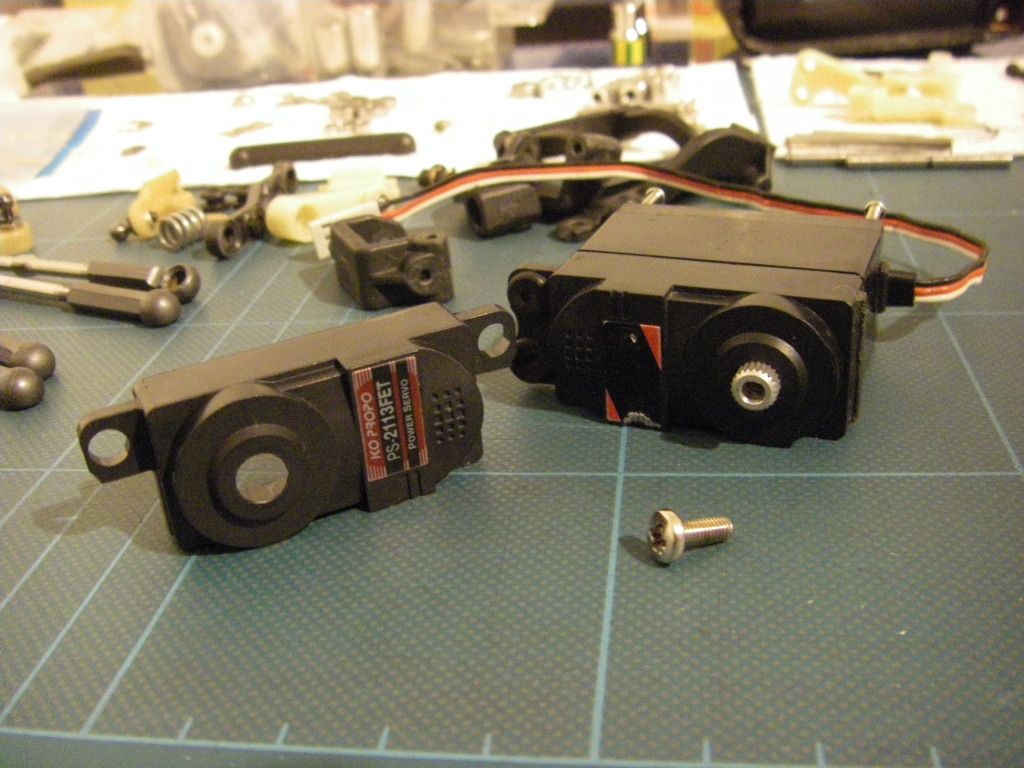
Decided to use the KO Servo that has recently been made redundent from my touring car racer (in Favour of a new low-profile Savox) - unfortunately to fit into the TC I had to cut off one of the lugs, which made it useless for fitting into the XXT, luckily I had a new 2000 series case set, so I trimmed the lugs on the new cap part as per the Losi instruction (for clearance over the chassis)& swapped them across....
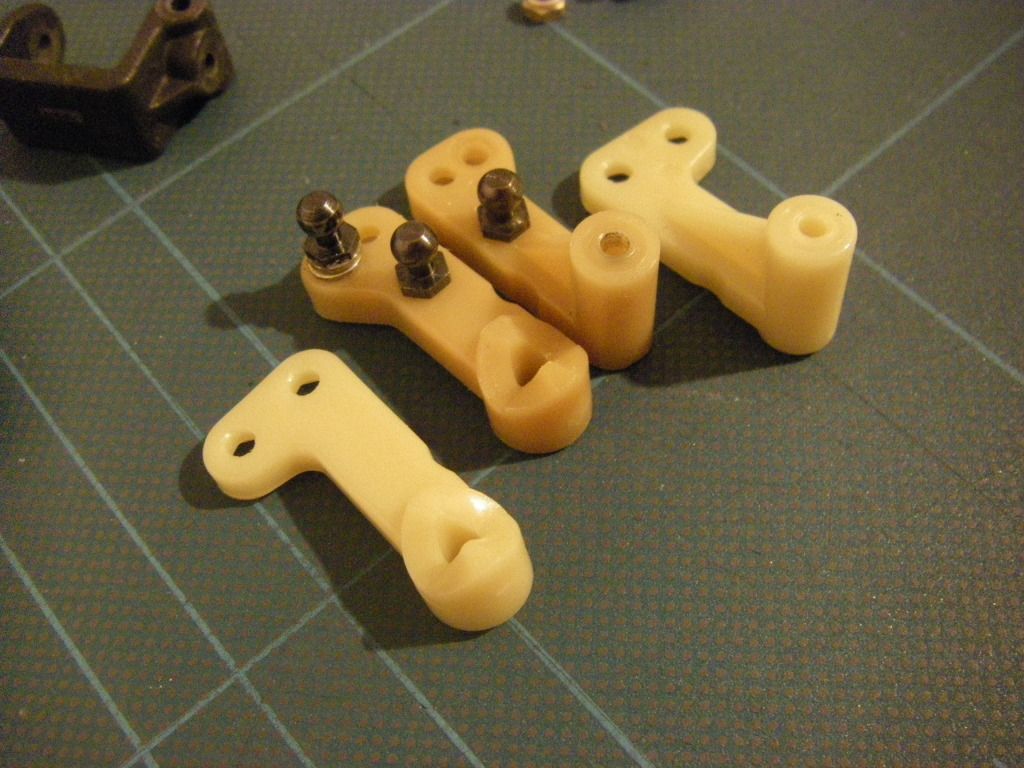
I then moved onto the bellcranks for the steering mechanism... i brought a new steering levers set (A-1602) for the servo horn & servo mounting posts which were missing from the truck... but I decided that as these parts were nice & bright compared to the yellow bellcrank arms/servo saver assembly I decided to use the new ones - so that they are all nice & bright... this is when I noticed that the new parts are different - the drag link arm is now in-line with the main steering linkages;
Completed servo installation & steering mechanism;
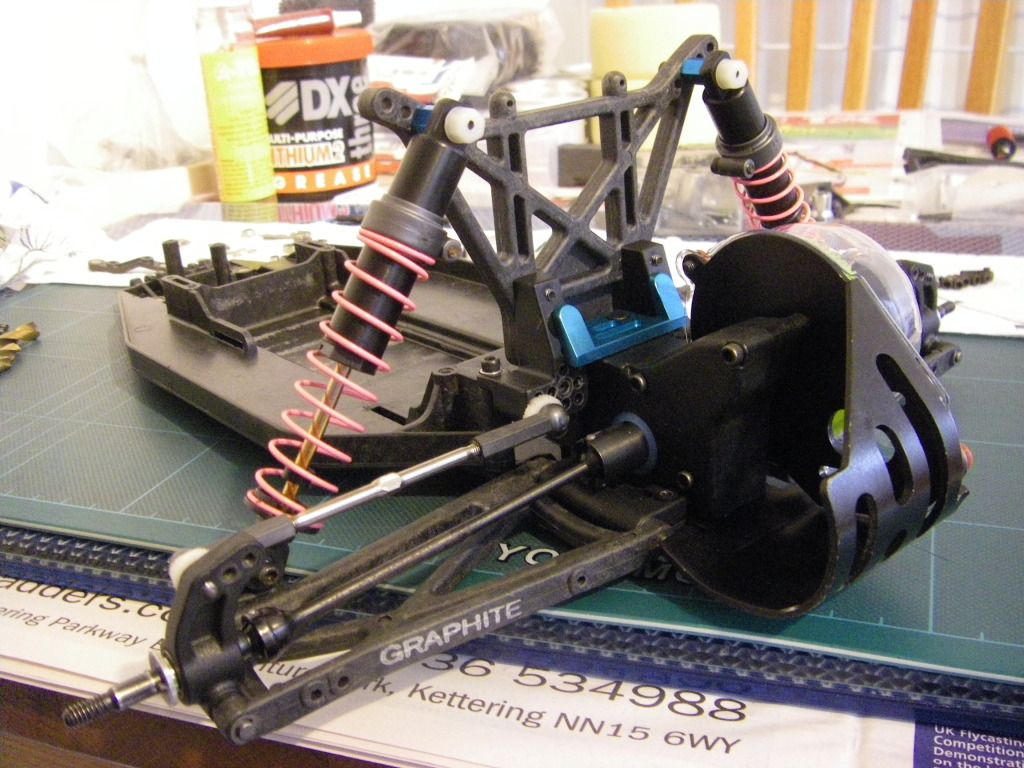
I then went on to finish the rest of the front end (I still want to re-thread the turnbuckles so gain even thread depth into the ball cups at each end);
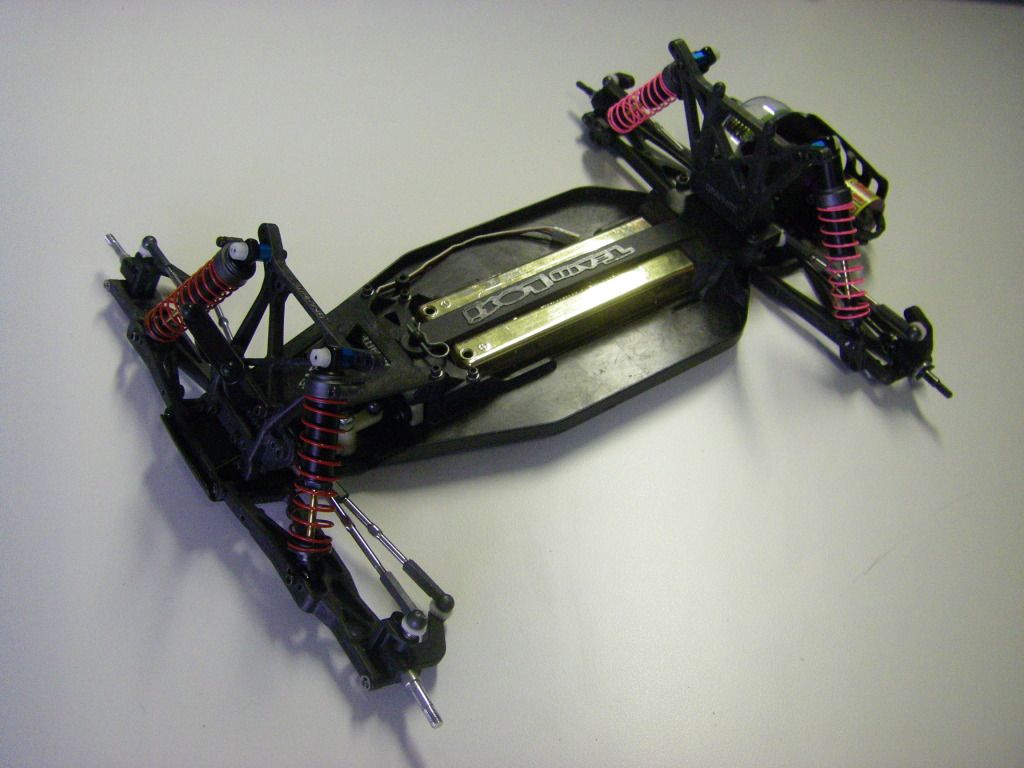
So the basic build is now about there... just a few bits to tidy, add the wheels/tyres & install the electrics (note the 380 size BL motor now installed
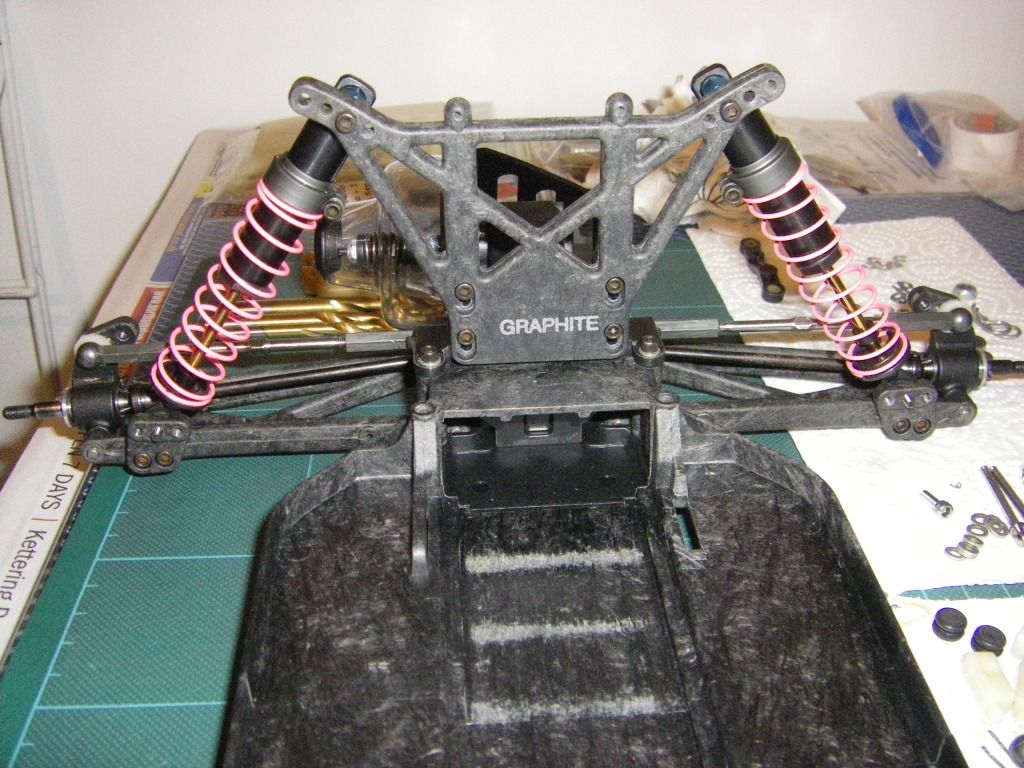
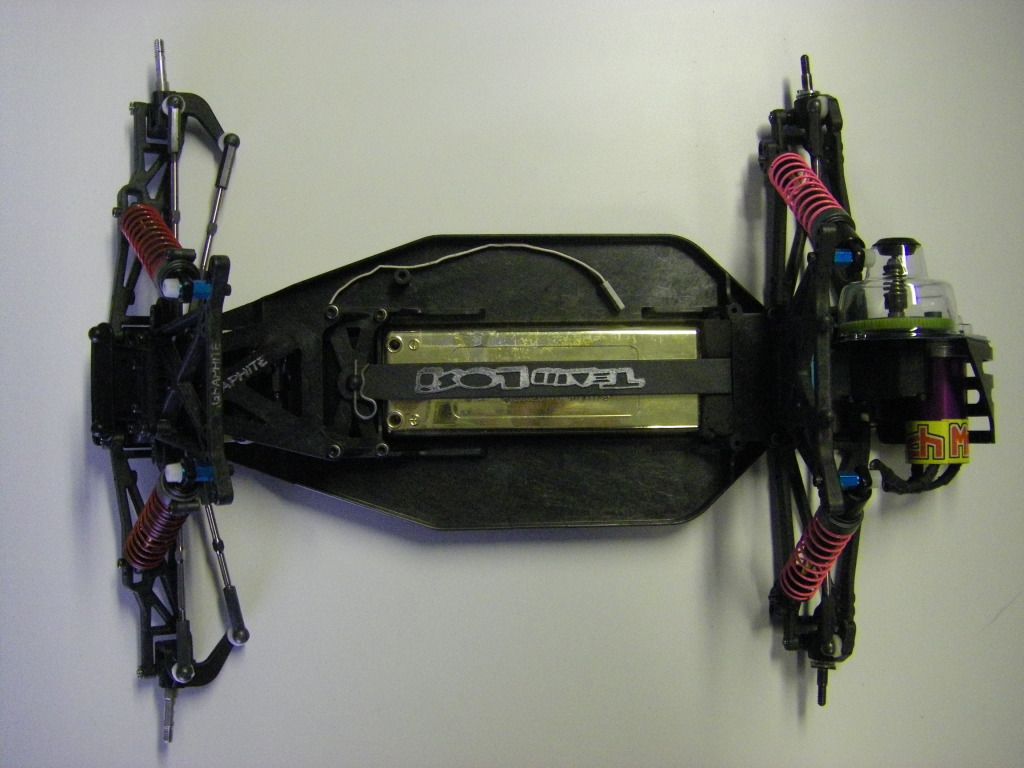
Plan view;
Decided to use the KO Servo that has recently been made redundent from my touring car racer (in Favour of a new low-profile Savox) - unfortunately to fit into the TC I had to cut off one of the lugs, which made it useless for fitting into the XXT, luckily I had a new 2000 series case set, so I trimmed the lugs on the new cap part as per the Losi instruction (for clearance over the chassis)& swapped them across....
I then moved onto the bellcranks for the steering mechanism... i brought a new steering levers set (A-1602) for the servo horn & servo mounting posts which were missing from the truck... but I decided that as these parts were nice & bright compared to the yellow bellcrank arms/servo saver assembly I decided to use the new ones - so that they are all nice & bright... this is when I noticed that the new parts are different - the drag link arm is now in-line with the main steering linkages;
Completed servo installation & steering mechanism;
I then went on to finish the rest of the front end (I still want to re-thread the turnbuckles so gain even thread depth into the ball cups at each end);
So the basic build is now about there... just a few bits to tidy, add the wheels/tyres & install the electrics (note the 380 size BL motor now installed
Plan view;
My T.C Showroom; http://www.tamiyaclub.com/member.asp?id=28990
-
jamin
- Approved Member
- Posts: 1157
- Joined: Thu Dec 16, 2010 5:58 am
- Location: Suffolk, UK
- Has thanked: 3 times
- Been thanked: 28 times
Re: Ebay Bargain XXT G+ (Re-build time!)
I've got two different sets of steering arms too Dan, only noticed this the other day, I think the later version is te one where they have moved the drag link rearward so thy you can adjust the steering turnbuckle length.
Great update too BTW, looking good!
Great update too BTW, looking good!
Team Losi: XX-CR | XXT | XXT-CR Graphite+ | XX4 | Street Weapon IWC Edition
-
mytimac

- Business Member
- Posts: 944
- Joined: Mon Apr 28, 2008 8:42 pm
- Location: Rochester MN
- Has thanked: 7 times
- Been thanked: 56 times
Re: Ebay Bargain XXT G+ (Re-build time!)
The original XX and XXT used the whiter ones you have, a1601. The XXCR XXTCR and XXTCR Graphite used the original ones you have, a1602. Oddly, the XX Kinwald buggy went back to a1601.
http://oldrc.com - Find parts for older Losi, Associated, Tamiya and others.
http://vintagelosi.com - Manuals and information on older Team Losi models
http://vintagelosi.com - Manuals and information on older Team Losi models
-
DerbyDan
- Approved Member
- Posts: 1837
- Joined: Tue Sep 08, 2009 8:04 am
- Location: Northampton UK
- Has thanked: 2 times
- Been thanked: 19 times
Re: Ebay Bargain XXT G+ (Re-build time!)
Well you do learn something new every day!!
On the subject of these levers - i'd like to find a set in the grey colour - these would be for by XX buggy, the kit I have has the parts in white, but as I want to match the original car I owned BITD which had the grey levers - maybe someone out there has a set??
On the subject of these levers - i'd like to find a set in the grey colour - these would be for by XX buggy, the kit I have has the parts in white, but as I want to match the original car I owned BITD which had the grey levers - maybe someone out there has a set??
My T.C Showroom; http://www.tamiyaclub.com/member.asp?id=28990
Create an account or sign in to join the discussion
You need to be a member in order to post a reply
Create an account
Not a member? register to join our community
Members can start their own topics & subscribe to topics
It’s free and only takes a minute
Sign in
-
- Similar Topics
- Replies
- Views
- Last post
-
- 47 Replies
- 5721 Views
-
Last post by LosiXXkid
-
- 6 Replies
- 1474 Views
-
Last post by variant45
-
- 64 Replies
- 7331 Views
-
Last post by 59burst
-
- 101 Replies
- 15132 Views
-
Last post by Lavigna
-
- 15 Replies
- 1613 Views
-
Last post by marlo
-
- 6 Replies
- 2507 Views
-
Last post by EvolutionRevolution
-
- 24 Replies
- 2414 Views
-
Last post by tom_chang79
-
- 17 Replies
- 3329 Views
-
Last post by RichieRich
Who is online
Users browsing this forum: No registered users and 4 guests