Wore out Gold Pan Bronco Buggy
-
markbt73
- Approved Member
- Posts: 664
- Joined: Sun Apr 15, 2012 4:04 pm
- Location: Portland, OR USA
- Been thanked: 1 time
Re: Wore out Gold Pan
If you could scare up a Dual Sport conversion kit, that would get it down to around 8" wide. From there you could probably add fender flares to make up the difference. Don't know how hard the conversion kits are to find these days, though.
-
Russ Winn

- Approved Member
- Posts: 460
- Joined: Sat Nov 20, 2010 9:52 am
- Location: Hillbilly Hell, Fl.
- Has thanked: 49 times
- Been thanked: 80 times
Re: Wore out Gold Pan
Well it's good to see you've decided on what to do with what car!!!66sprint6 wrote:Well, all the GoldPans are in and I think I can decide which one will serve what purpose
I've been following this little saga since the first post....Have fun and send pics!
-
Phin

- Approved Member
- Posts: 2818
- Joined: Tue Feb 21, 2012 5:17 pm
- Location: NY²
- Has thanked: 87 times
- Been thanked: 248 times
Re: Wore out Gold Pan
A couple of alternatives...
...if you really want to use the Bronco body you could do a monster truck conversion...
...or if you're open to different bodies RJ Speed makes a 9" wide Jammin (GMC) Jimmy body and TBG sells repros of the MRP Dodge Stepside pick up body which are both better fits for a stock width RC10.
...if you really want to use the Bronco body you could do a monster truck conversion...
...or if you're open to different bodies RJ Speed makes a 9" wide Jammin (GMC) Jimmy body and TBG sells repros of the MRP Dodge Stepside pick up body which are both better fits for a stock width RC10.
-
knucklebuster
- Approved Member
- Posts: 822
- Joined: Mon Aug 07, 2006 11:05 pm
- Location: Florida
- Been thanked: 2 times
Re: Wore out Gold Pan
B4 front and rear rims will narrow the buggy close to 1 inch. Not sure about fitment of the B4 fronts on short arms. You will need to convert the rear axle. Many, many posts on this topic. IMO the simplest approach is the B2/B3 (Phoenix) cvds, 10t carriers, bearings, shims. You will be limited to the inner shock mount locations on the stock rear arm. A cheaper alternative would be the B2/B3 axles. You might even try the B4 axles for fitment, I don't know that anyone has posted on that non-CVD note.66sprint6 wrote:Yeah, there was a Beetle thread on here that gave me the idea on shortening up the chassis. What Im most concerned about is "skinnying" up the track width the better fit eithe the Bronco or Beetle body. I have some ideas after some searching but would still like to get a couple more oppinions and see if there are any shorter arms available.
Matt
Re: Wore out Gold Pan
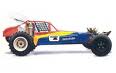
Thanks for the heads up guys. I looked into the DS swap and would rather use parts I can get quick and easy lol. I decided to get over myself and start modding. First I mocked up the wheelbase and width roughly where I wanted it to get a look at what I was shooting for.


I started on the front, taking the bent and scratched nose, bending it back into shape the best I can and drilling new holes to move the arm mounts inwards a bit. Yes...I do appear to be loosing my hair as well

The mounts are now as close to perfectly aligned as possible. In this shot they were only loosely mocked up for the pic and to check where i needed to make cuts.

I then mocked everything up and made the cuts needed for the arms to clear


I trimmed the stock shock tower and drilled new holes to mount it to the arm mounts. I also shortened up the turnbuckles the best I could. Ill make fine adjustments later.


Its lookin like I might be able to keep the nose mounted in the stock location and have the wheelbase where I want it. If not, I will have to slide it in slightly, drill new holes and then cut the sides of the pan slightly to allow clearance for the steering. Thats it for tonight, I will move on to the rear from here. Looks like I might get away with only havin to do minor tweaks to get everything together back there! I know its not a restoration piece but the way I see it, Im takin a rough, tweaked, beat up and otherwise unused buggy and makin into somethin I hope to enjoy from here on out. Besides, I was lookin to get 3 buggies so I could build 1 nice one and lucked out...now its lookin like Ill have 3 running rigs out of the deal LOL
Matt
I started on the front, taking the bent and scratched nose, bending it back into shape the best I can and drilling new holes to move the arm mounts inwards a bit. Yes...I do appear to be loosing my hair as well
The mounts are now as close to perfectly aligned as possible. In this shot they were only loosely mocked up for the pic and to check where i needed to make cuts.
I then mocked everything up and made the cuts needed for the arms to clear
I trimmed the stock shock tower and drilled new holes to mount it to the arm mounts. I also shortened up the turnbuckles the best I could. Ill make fine adjustments later.
Its lookin like I might be able to keep the nose mounted in the stock location and have the wheelbase where I want it. If not, I will have to slide it in slightly, drill new holes and then cut the sides of the pan slightly to allow clearance for the steering. Thats it for tonight, I will move on to the rear from here. Looks like I might get away with only havin to do minor tweaks to get everything together back there! I know its not a restoration piece but the way I see it, Im takin a rough, tweaked, beat up and otherwise unused buggy and makin into somethin I hope to enjoy from here on out. Besides, I was lookin to get 3 buggies so I could build 1 nice one and lucked out...now its lookin like Ill have 3 running rigs out of the deal LOL
Matt
-
REMJ666
- Approved Member
- Posts: 802
- Joined: Tue Nov 08, 2011 9:43 am
- Location: Mount Airy , Maryland
- Been thanked: 1 time
Re: Wore out Gold Pan Bronco Buggy
Nice looking rig so far...
Late Edinger Gold Pan # 6010 .....Vintage Blackfoot....Electrix Circuit Stadium Truck ....Kyosho Ultima Pro XL
-
slotcarrod
- Approved Member
- Posts: 4415
- Joined: Tue Nov 25, 2008 10:57 pm
- Location: Calgary Alberta Canada
- Has thanked: 1 time
- Been thanked: 45 times
Re: Wore out Gold Pan Bronco Buggy
When I first read the title, I was thinking blah! But looking at the mock up pics, I really like the idea. I think is super cool now!  Never judge a book by it's cover!
Rod Littau
Slotcarrod's Rumpus Room: http://www.rc10talk.com/viewtopic.php?f=77&t=16113
25 Years of the RC10: http://www.rc10talk.com/viewtopic.php?f=35&t=13059
Slotcarrod's Rumpus Room: http://www.rc10talk.com/viewtopic.php?f=77&t=16113
25 Years of the RC10: http://www.rc10talk.com/viewtopic.php?f=35&t=13059
Re: Wore out Gold Pan Bronco Buggy
Before last night I got in a Blah mood about the idea myself. I couldnt make it work with how skinny the body was but I couldnt talk myself into building another body with it except maybe a Beetle and even then Ide have to do much of the same work. I kept picturing this short wheelbase buggy bouncin around and how much fun it would be to just bash around in the sand or dirt and then I finally got motivated. After last night Im excited to mess with it again!!! Itll be a fun addition to my Bronco Scaler which is the body you see used for mockup. I got the idea from some research I was doing on Baja racing on Google which uncovered some strange (and one super famous) 2wd conversion Broncos that were pretty effective in the desert races. Thought it would be fun to do a little Tamiya Bronco with a SandScorcher vibe.

Re: Wore out Gold Pan Bronco Buggy
Got a bit more done last night...now shes a roller!!! At least in mock-up form.
After finishing up roughing the front, I decided to tackle the rear. I stole an idea from a couple of the Scorcher builds Ive read about and mounted the rear arms under the pan. I was going to put the mounts together to get the width as skinny as I could but decided, for the sake of simplicity, to mount them using the rear bulkhead holes and then drilled the rear holes out on the mounts and bolt it all up using the front tranny screws.

I will need to find some longer screws to make this work but it looks like itll work out. I then took the chassis and after bending the rear back into shape (didnt realize how tweaked it was till I really got to lookin it over) I marked my cuts and got to work.

While I was at it, I also took the dremel and did a little work to the rear arms allowing them to droop further and clearanced the hole so the dogbone and cup could have more room.


This shot shows the chassis cut

I then put it all together, made some minor tweaks here and there and then got to work on the shock towers and shocks. The rear shocks wont allow very much droop as it sits in the rear, so Ill have to work somethin out but for now its a roller!!!


Rough body height shots are promising.


This isnt the body Ill be using so Ill either make the fender opening higher so I can drop the body lower or I will make some aluminum "sliders" for the sides to cover up the chassis and make everything look cleaner. I will also put in some fender wells to make it look a little more realistic. Thats it for now, hopefully Ill have it closer to running sometime this week!
Matt
After finishing up roughing the front, I decided to tackle the rear. I stole an idea from a couple of the Scorcher builds Ive read about and mounted the rear arms under the pan. I was going to put the mounts together to get the width as skinny as I could but decided, for the sake of simplicity, to mount them using the rear bulkhead holes and then drilled the rear holes out on the mounts and bolt it all up using the front tranny screws.
I will need to find some longer screws to make this work but it looks like itll work out. I then took the chassis and after bending the rear back into shape (didnt realize how tweaked it was till I really got to lookin it over) I marked my cuts and got to work.
While I was at it, I also took the dremel and did a little work to the rear arms allowing them to droop further and clearanced the hole so the dogbone and cup could have more room.
This shot shows the chassis cut
I then put it all together, made some minor tweaks here and there and then got to work on the shock towers and shocks. The rear shocks wont allow very much droop as it sits in the rear, so Ill have to work somethin out but for now its a roller!!!
Rough body height shots are promising.
This isnt the body Ill be using so Ill either make the fender opening higher so I can drop the body lower or I will make some aluminum "sliders" for the sides to cover up the chassis and make everything look cleaner. I will also put in some fender wells to make it look a little more realistic. Thats it for now, hopefully Ill have it closer to running sometime this week!
Matt
-
REMJ666
- Approved Member
- Posts: 802
- Joined: Tue Nov 08, 2011 9:43 am
- Location: Mount Airy , Maryland
- Been thanked: 1 time
Re: Wore out Gold Pan Bronco Buggy
Nice job...Can't wait to see it finished...
Late Edinger Gold Pan # 6010 .....Vintage Blackfoot....Electrix Circuit Stadium Truck ....Kyosho Ultima Pro XL
Re: Wore out Gold Pan Bronco Buggy
Thanks. I ended up cleanin out the Hobby Room to make room for some stuff in the guest bedroom we are tryin to put together so I didnt get to work on it much last night, but i did cut the fenders on the body Im using and I think Im gonna have to end up shortening the front ever so slightly. Im gonna mock everything up one more time and make for sure before I do any more modding. I want the wheels to be slightly forward of center in the front at full droop and tuck closer to center when fully compressed. With the cuts i made to the body, the tires wont tuck into the fenders but I have enough room to now drop the body low enough to cover the tub from the sides which was one of my goals. Im gonna mess with it tonight some, Ill put together some pics when I get em!
Matt
Matt
Re: Wore out Gold Pan Bronco Buggy
Little more progress. This is a slow build for me, but its all new territory and Im tryin to cut and drill as little as possible to keep this thing as clean and straight as I can. Im not the best but Im doin what I can 
I mocked everything up and sure enough, the wheelbase was about 1/4" too long so out came the sharpie, drill and the dremel.
Drill the holes needed to mount the nose further back in the tub

Then I cut the excess off the tub and massaged it a bit with a grinder bit and some hand files. Unfortunately the cutting wheel broke and my cut isnt the straightest (plus I knicked the tub a bit when it broke) but some scratches from bashing and you will never know. Still a little annoyed but life goes on.

Then I mounted the nose to the tub, tossed together the stock steering (for now) and went about drilling the tub and nose braces.


One of the braces was severely bent, as was the nose plate which I fixed earlier. I flattened it out as much as possible, and bein a basher I didnt worry about perfection. I also bent the nose plate ever so slightly where the Associated logo is and will have to figure out how to get the screws flush again, itll have to do for initial mock up

I then set about figuring out how to mount the body. For the rear I stole the body mount that I had layin around from a Jeep build I recently traded (for the nice GoldPan). I drill 4 small holes in the rear shock mount and will screw it together once I get the height figured out.

Now I need to figure out the front mounts and I will be ready to move on. Here is the crappy body I plan on using. Its in the middle of havin the paint stripped and I cut the rear fenders off intending to use it for another build. They will be ShoeGoo-ed back on after the paint is stripped. The body will hopefully be a little lower when Im done with it, but heres another body on shot

I like this angle for some reason

I wasnt too keen on shortening the wheelbase up, but I realize now that if the Bronco Body just doesnt work out or gets old, I can now toss a Scorcher or other Beetle body on and be set!
Matt
I mocked everything up and sure enough, the wheelbase was about 1/4" too long so out came the sharpie, drill and the dremel.
Drill the holes needed to mount the nose further back in the tub
Then I cut the excess off the tub and massaged it a bit with a grinder bit and some hand files. Unfortunately the cutting wheel broke and my cut isnt the straightest (plus I knicked the tub a bit when it broke) but some scratches from bashing and you will never know. Still a little annoyed but life goes on.
Then I mounted the nose to the tub, tossed together the stock steering (for now) and went about drilling the tub and nose braces.
One of the braces was severely bent, as was the nose plate which I fixed earlier. I flattened it out as much as possible, and bein a basher I didnt worry about perfection. I also bent the nose plate ever so slightly where the Associated logo is and will have to figure out how to get the screws flush again, itll have to do for initial mock up
I then set about figuring out how to mount the body. For the rear I stole the body mount that I had layin around from a Jeep build I recently traded (for the nice GoldPan). I drill 4 small holes in the rear shock mount and will screw it together once I get the height figured out.
Now I need to figure out the front mounts and I will be ready to move on. Here is the crappy body I plan on using. Its in the middle of havin the paint stripped and I cut the rear fenders off intending to use it for another build. They will be ShoeGoo-ed back on after the paint is stripped. The body will hopefully be a little lower when Im done with it, but heres another body on shot
I like this angle for some reason
I wasnt too keen on shortening the wheelbase up, but I realize now that if the Bronco Body just doesnt work out or gets old, I can now toss a Scorcher or other Beetle body on and be set!
Matt
-
REMJ666
- Approved Member
- Posts: 802
- Joined: Tue Nov 08, 2011 9:43 am
- Location: Mount Airy , Maryland
- Been thanked: 1 time
Re: Wore out Gold Pan Bronco Buggy
Nice The front view reminds me of a sand drag car..Hopefully the body won't haze up on you after stripping it...
Late Edinger Gold Pan # 6010 .....Vintage Blackfoot....Electrix Circuit Stadium Truck ....Kyosho Ultima Pro XL
Re: Wore out Gold Pan Bronco Buggy
Ive stripped a handful of lexan shells for my Crawlers and they never haze up enough to matter. They are usually scratched all the hell from crawlin which hazes more than stripping the paint does Ill prolly have to paint this one on the outside tho in order to hide all the glueing but once I get it all done and find that I like it Ill prolly order up a new body and make it alot cleaner.
Matt
Matt
Create an account or sign in to join the discussion
You need to be a member in order to post a reply
Create an account
Not a member? register to join our community
Members can start their own topics & subscribe to topics
It’s free and only takes a minute
Sign in
-
- Similar Topics
- Replies
- Views
- Last post
-
- 21 Replies
- 3595 Views
-
Last post by Daryl Lane
-
- 7 Replies
- 1103 Views
-
Last post by pj81
-
- 40 Replies
- 5808 Views
-
Last post by chiefin
-
- 15 Replies
- 2146 Views
-
Last post by rc-10 gold pan
-
- 3 Replies
- 798 Views
-
Last post by matthew john
-
- 2 Replies
- 549 Views
-
Last post by matthew john
-
- 3 Replies
- 1278 Views
-
Last post by DarthRacer
-
- 8 Replies
- 1249 Views
-
Last post by SRTracer121
Who is online
Users browsing this forum: ![]() Tbot [Bot] and 11 guests
Tbot [Bot] and 11 guests