The "Heavy Metal Lunchbox" thread got me motivated to freshen up my LB with some upgrades.
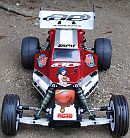
These are some pics of the CRP front end conversion kit that I just recently installed(much better photos than the ones I previously posted). The kit is made for the FX-10, and can still be bought on ebay. One note is that the hinge pins are smaller than standard AE/losi. They appear to be the same diameter as the stock screw pins that hold the front uprights on the lunchbox. I don't have much in the way of metric cars so I am not sure what size they are. The tires stay flat on the ground for the full suspension travel, with nearly no change in toe-in. The geometry of the arms also allows for a bit more steering throw. The inside tire seems to turn proportionally more than on the stock truck(more ackerman?) but that may be because I changed the servo saver to a large kimbrough from the stock unit, so the servo side of the links have signifigantly different geometry as well.
This first set of photos compares the converted truck to a stock truck at full extension and compression of the suspension. Next round of pics will be close-ups of the actual conversion.
2009 vonats lunchbox build
-
aconsola
- Approved Member
- Posts: 1999
- Joined: Fri Feb 16, 2007 10:09 pm
- Location: Upstate NY
- Been thanked: 12 times
Re: Lunchbox with CRP front end conversion
There are a couple modifications to the stock CRP arms that need to be made to get them to fit. First, the inboard mounting pins/lugs are a bit too long, so one side has to be trimmed. This is very easy to see if you put one up against the stock arm.
The other modification is to cut the area where the shock mounts. I cut about 1/4" off and swapped it to the other side to get the shock more centered in the arm. If this is not done then the shock interferes with the steering rods, even with them in the outer hole of a large servo saver. With the shock relocated like this, it is centered right between the camber link and the tierods. The standard pin that goes through the arm fits perfectly inside one of the brash bushings that tamiya uses on the stock shock mounts, so that was an easy fit.
The outer mount for the camber link on the standard CRP setup is a large plastic piece that goes in the center of the c-carrier. This also serves to keep the king pin in place. I could not get the geometry to work with the link there so I mounted it on the front of the carrier, with a nut under the ball to allow for clearance. The metal blocks in the middle of the carrier do two things: first they hold the king pin in, and second, they keep the 2 tabs from bending inwards. These metal pieces were engine mount spacers that OS includes with some of their nitro motors. I just cut it to length with a bolt cutter and used the screw hole that was already there. I found I still needed a small shim to take up some of the slack between the tabs. The camberlinks look like tecnacraft titanium, but are actually customworks steel(swiped off my new outlaw sprinter where they were replaced with Ti)
For the inboard mount I just drilled 2 holes in the stock bulkhead. I used large washers on the ball-stud side, and on the inside I have a short piece of scrap aluminum that goes the length of the bulkhead, and is about1/2" wide. Hopefully that will be enough support to keep the screws from tearing out of the bulkhead in a crash.
The front end is slightly wider than stock. The rerelease tierods will still reach with a decent amount of threads engaged in the rod ends, but I decided to replace them with turnbuckles that were slightly longer. I realized when looking at the pics that I forgot to add retention washers to the top of the balls.
The shocks are mounted signifigantly more inboard with this setup, so it will need heavier dampening and a stiffer spring due to the increased leverage.
- Attachments
-
-
-
-
-
scr8p

- Administrator
- Posts: 16810
- Joined: Tue Feb 07, 2006 9:46 pm
- Location: Northampton, PA
- Has thanked: 36 times
- Been thanked: 1318 times
Re: Lunchbox with CRP front end conversion
that's just not right. the lunch box isn't supposed to handle. 

look pretty sweet, anthony.
look pretty sweet, anthony.
-
shodog
- Approved Member
- Posts: 3813
- Joined: Thu Oct 05, 2006 3:09 pm
- Location: Washington
- Has thanked: 3 times
- Been thanked: 91 times
Re: Lunchbox with CRP front end conversion
MMM!! tecnacraft
thanks for the write up Anthony. I have been wanting to do this mod and I have had all the parts for several years, just never got around to doing it.
thanks for the write up Anthony. I have been wanting to do this mod and I have had all the parts for several years, just never got around to doing it.
-
bearrickster

- Approved Member
- Posts: 4372
- Joined: Thu Mar 06, 2008 11:36 am
- Location: Hollywood Maryland
- Been thanked: 8 times
Re: Lunchbox with CRP front end conversion
Looks great, I did the same thing years ago on mine but I used Panda Cyclone front parts? it worked the same. nice Job!!

-
aconsola
- Approved Member
- Posts: 1999
- Joined: Fri Feb 16, 2007 10:09 pm
- Location: Upstate NY
- Been thanked: 12 times
Re: 2009 vonats lunchbox build
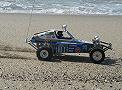
Well I changed the thread title, and will put a little more here about the buildup. I started with a re-re lunchbox that had been upgraded with yellow cva dampers, and a jg front bumper. I ran it basically stock like this with a hard body last year at the Vonats. It didn't do too much in the way of steering, but was lots of fun to "race"
This year I decided to go all out and this is what I came up with. First I added the CRP conversion kit as above. I had to rebuild the front shocks with much heavier oil and stiffer springs due to the more inboard mounting location, and the added lead weight up front.
I have widened the track front and rear by about 2cm. Up front was simple to do with 5mm barrel nuts, and inboard spacers. On the rear I used a compbination of hubs and barrel nuts to get the spacing. From inside to out is a stock hub, HPI tamiya to hex adapter, CRP kyosho to blackfoot adapter, and a 5mm barrel nut.
Between the better front camber geometry and the wider track, the truck turns very well even at speed.
I switched out the Heavy hard body for a NOS parma replacement lexan lid, which has had extra lexan panels siliconed to the inside around the body mount holes to strenghten and prevent tears. Unfortunately it proved to be too strong in testing, and now I need a new body mount(I made it through the whole race weekend last year on these mounts and was on my lid a few times surprising I didn't break one then). Paint is parma fascolor, and should be pretty easy to see in traffic.
In the rear I added a short kyosho gold shock for the popular "3rd shock mod" to dampen the axle movement when on and off throttle as the stock puny springs had broken.
There are AE 3" titanium turnbuckles combined with traxxas rod ends used for rear chassis supports, and a steel traxxas turnbuckle up front to tie the two front shock mounts together for some chassis stiffening.
The tires are glued securely to the rims, and then they were all balanced. It took a fair amount of lead to get rid of the wobble, but now the truck can go full throttle down the straights without hopping and bouncing all over due to the unbalanced wheels.
The transponder mount is a piece of scrap lexan, bent and screwed to the servo mount location.
Electronics are an s-3003 steering servo, LRP quantum super reverse ESC, and a losi Spektrum rx. The long antenna tube sticking out of the body is merely for show. Motor is a trinity blue 27t stocker. With a 3200 lipo pack it is rediculously fast, and handling is not so good as the front wheels are usually in the air, even with the weight added there. The 3000mah nimh stick pack has somewhat slower speed and combined with the extra weight seems to actually handle better.
I am considering running the aluminum wheels up front to put a little more weight up there but am undecided.
- Attachments
-
-
-
-
-
-
-
MelvinsArmy

- Approved Member
- Posts: 3224
- Joined: Tue Feb 07, 2006 10:22 pm
- Location: Des Moines, IA
- Has thanked: 1 time
- Been thanked: 11 times
-
mrlexan

- Approved Member
- Posts: 6250
- Joined: Wed Dec 06, 2006 6:49 pm
- Location: Upstate SC
- Been thanked: 12 times
Re: 2009 vonats lunchbox build
Handling or not, he'll probably still live up to his name "End over Anthony"
I am not here cause I am playing photographer and on my mountain bike.
www.gojammedia.com
www.gojammedia.com
-
aconsola
- Approved Member
- Posts: 1999
- Joined: Fri Feb 16, 2007 10:09 pm
- Location: Upstate NY
- Been thanked: 12 times
Re: 2009 vonats lunchbox build
mrlexan wrote:Handling or not, he'll probably still live up to his name "End over Anthony"
3 months to find some aluminum body mounts. . .
-
MelvinsArmy
- Approved Member
- Posts: 3224
- Joined: Tue Feb 07, 2006 10:22 pm
- Location: Des Moines, IA
- Has thanked: 1 time
- Been thanked: 11 times
Re: 2009 vonats lunchbox build
mrlexan wrote:Handling or not, he'll probably still live up to his name "End over Anthony"
-
RichieRich
- Approved Member
- Posts: 2360
- Joined: Wed Jun 14, 2006 11:42 pm
- Location: Los Angeles, CA
- Has thanked: 39 times
- Been thanked: 25 times
Re: 2009 vonats lunchbox build
LOL! End ovah Ant'neeMelvinsArmy wrote:mrlexan wrote:Handling or not, he'll probably still live up to his name "End over Anthony"Oh man. Around here, that name would have a totally different meaning.
Re: 2009 vonats lunchbox build
that it awsome! i ran my stock lunchbox in a vintage race to be funny but yours would work
xxx,lunchbox,blackfoot,t4,2 rc10ce's,rc10 graphite,rc10 worlds car,2 rc10 t's,xx4---GONE:mip4wdrc10,rpm worlds,houge rc10,super clod,sand scorcher,f103,frog,xxxt,b2,b3,tc3,jrx2,fox,yr4-m2 usa,yz-10 many more LOL
-
bearrickster
- Approved Member
- Posts: 4372
- Joined: Thu Mar 06, 2008 11:36 am
- Location: Hollywood Maryland
- Been thanked: 8 times
Re: 2009 vonats lunchbox build
Looks great I just ordered my suspenion kit thanks for the motvation !!
-
aconsola
- Approved Member
- Posts: 1999
- Joined: Fri Feb 16, 2007 10:09 pm
- Location: Upstate NY
- Been thanked: 12 times
Re: 2009 vonats lunchbox build
if you are going to do the front suspension build take a look at this thread over at tamiyaclub. I posted over there and got a few others to post and all have some different implementations of the same basic parts, it is quite interesting to see the variations.
http://www.tamiyaclub.com/forum/index.php?showtopic=50292
http://www.tamiyaclub.com/forum/index.php?showtopic=50292
Create an account or sign in to join the discussion
You need to be a member in order to post a reply
Create an account
Not a member? register to join our community
Members can start their own topics & subscribe to topics
It’s free and only takes a minute
Sign in
-
- Similar Topics
- Replies
- Views
- Last post
-
- 12 Replies
- 1569 Views
-
Last post by Sir
-
- 13 Replies
- 1864 Views
-
Last post by civilguy
-
- 0 Replies
- 626 Views
-
Last post by airbats801
-
- 17 Replies
- 3009 Views
-
Last post by tecnica2001
-
- 26 Replies
- 2480 Views
-
Last post by Charlie don't surf
-
- 1 Replies
- 504 Views
-
Last post by mikea96
-
- 17 Replies
- 2690 Views
-
Last post by soniccj5
-
- 31 Replies
- 4218 Views
-
Last post by kaiser
Who is online
Users browsing this forum: No registered users and 3 guests