Well here it is: taking over lots of parts from its racing brother which is currently in the garage for another face-lift.
what's special? Basically I tried to make the best: most fun, of parts I won't use for my vintage-illegal racer.
And I'm pretty happy with the result sofar.
1) The in-length battery configuration was abandoned for the standard side-ways for 2 reasons:
- to lower the CG: making space to mount the electronics in the tub.
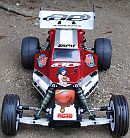
- to reduce the number of nose scrubs on the jumps. By shortening the chassis by an inch and inversing the front-arms the wheelbase is almost the same. The wheels are however further forward from the nose for the same ground-clearance in height.
2) Heavy old ESC: placed low and upfront for low forward CG.
3) Standard full-size servo right behind the battery: again to keep the CG forward and mounted standing up to allow lower mounting of the light receiver behind it.
4) original 2mm chassis: countersunk and using small-head screws: lighter than the 3mm turbo chassis.
This doesn't compensate for the heavier body and electronics, but it helps.
5) single arm steering swivel: to reduce the play in the steering. worked perfect, but as you can see in the pic I should have used a servo saver on the servo outdrive. I was in such a hurry to get the car track-ready I simply forgot

The horn in the pic was the 2nd servo horn I broke with 1 pack and it ended the fun at thtrack for today.