Btw in my opinion it’s an homage to the oh so secret stealth cars they never produced
Converting RC10 Graphite to RC10 Graphite Replica
-
MarkyDents

- Approved Member
- Posts: 1187
- Joined: Sun Jan 10, 2021 11:52 am
- Location: Staten Island, N.Y.
- Has thanked: 1809 times
- Been thanked: 643 times
Re: Converting RC10 Graphite to RC10 Graphite Replica
It’s the last versions of the graphite team car. Apparently no info on exactly how many or how long it was around.
Btw in my opinion it’s an homage to the oh so secret stealth cars they never produced
Btw in my opinion it’s an homage to the oh so secret stealth cars they never produced
Who do you race for ?
Me……. I race for me.
That’s impossible, I was told you need a sponsor to race.
Hey Cru ! Go balls out
Me……. I race for me.
That’s impossible, I was told you need a sponsor to race.
Hey Cru ! Go balls out
-
Frankentruck
- Super Member
- Posts: 3810
- Joined: Fri Feb 19, 2021 9:59 am
- Location: Texas, USA
- Has thanked: 2605 times
- Been thanked: 2980 times
Re: Converting RC10 Graphite to RC10 Graphite Replica
Parts arriving! Once I get the standoffs I can start work on the front end attachment blocks.
.
.
Frankensteined RC10T3 / Franky Jr RC10GT-e (x2) / A+ stamp / Toy Story RC / Graphite replica / B1.5 BFG 5LTi / Clonewald / Hyper Hornet
"I love the effort, but it sure looks like you took the long way around to a tub again"
"I love the effort, but it sure looks like you took the long way around to a tub again"
-
MarkyDents
- Approved Member
- Posts: 1187
- Joined: Sun Jan 10, 2021 11:52 am
- Location: Staten Island, N.Y.
- Has thanked: 1809 times
- Been thanked: 643 times
Re: Converting RC10 Graphite to RC10 Graphite Replica
Nice looking pieces
Who do you race for ?
Me……. I race for me.
That’s impossible, I was told you need a sponsor to race.
Hey Cru ! Go balls out
Me……. I race for me.
That’s impossible, I was told you need a sponsor to race.
Hey Cru ! Go balls out
-
juicedcoupe

- Super Member
- Posts: 3540
- Joined: Sun Aug 16, 2020 4:05 pm
- Location: Pascagoula, MS
- Has thanked: 269 times
- Been thanked: 2095 times
Re: Converting RC10 Graphite to RC10 Graphite Replica
Standoffs are easy. The same K&S tubing for nose and wing tubes works.
Cut it to length. Then drill/tap while holding it with shock pliers. Then you can do a brushed finish with a foam sanding block or polish them.
Cut it to length. Then drill/tap while holding it with shock pliers. Then you can do a brushed finish with a foam sanding block or polish them.
Always looking for new and interesting ways to waste money.
-
Frankentruck
- Super Member
- Posts: 3810
- Joined: Fri Feb 19, 2021 9:59 am
- Location: Texas, USA
- Has thanked: 2605 times
- Been thanked: 2980 times
Re: Converting RC10 Graphite to RC10 Graphite Replica
I was going to do exactly that but I've got some No Coast stand offs on the way. They have a nice flare on the ends. And I'm also an expert in breaking off taps in that tubing when I rush things too much. I've got some tap lube now and know I should back off to break the chips and periodically back out to clean out the flutes, yet sometimes I still get stupid.
Frankensteined RC10T3 / Franky Jr RC10GT-e (x2) / A+ stamp / Toy Story RC / Graphite replica / B1.5 BFG 5LTi / Clonewald / Hyper Hornet
"I love the effort, but it sure looks like you took the long way around to a tub again"
"I love the effort, but it sure looks like you took the long way around to a tub again"
-
juicedcoupe
- Super Member
- Posts: 3540
- Joined: Sun Aug 16, 2020 4:05 pm
- Location: Pascagoula, MS
- Has thanked: 269 times
- Been thanked: 2095 times
Re: Converting RC10 Graphite to RC10 Graphite Replica
Open the tubing up with a 3/32 drill bit and hold the tap with something easier to control.
I use this.
I use this.
Always looking for new and interesting ways to waste money.
-
RogueIV
- Approved Member
- Posts: 1165
- Joined: Sat Aug 27, 2022 10:04 pm
- Location: W. Mass
- Has thanked: 2139 times
- Been thanked: 1100 times
Re: Converting RC10 Graphite to RC10 Graphite Replica
for the amount of work it's easier to just use aluminum standoffs that are already tapped. They are common and cheap. Bonus is they're usually a hex so you can put a wrench on them if you need to keep it from spinning.
Consistency is the key I keep misplacing.
-
Frankentruck
- Super Member
- Posts: 3810
- Joined: Fri Feb 19, 2021 9:59 am
- Location: Texas, USA
- Has thanked: 2605 times
- Been thanked: 2980 times
Re: Converting RC10 Graphite to RC10 Graphite Replica
This is my current tap setup for the tubes. I possibly should look into higher quality taps, but with something as small as 4-40, if it gets rushed in aluminum it will start galling and load up the cutting teeth of any tap pretty quickly. If I did the tapping with everything submerged in ice water, maybe that would help...
.
.
Frankensteined RC10T3 / Franky Jr RC10GT-e (x2) / A+ stamp / Toy Story RC / Graphite replica / B1.5 BFG 5LTi / Clonewald / Hyper Hornet
"I love the effort, but it sure looks like you took the long way around to a tub again"
"I love the effort, but it sure looks like you took the long way around to a tub again"
-
juicedcoupe
- Super Member
- Posts: 3540
- Joined: Sun Aug 16, 2020 4:05 pm
- Location: Pascagoula, MS
- Has thanked: 269 times
- Been thanked: 2095 times
Re: Converting RC10 Graphite to RC10 Graphite Replica
I've been using Bosch taps lately. They seem a little better than Irwin. The pre-drilling to 3/32 makes a huge difference (a little larger than standard). Instead of cutting oil, I use Corrosion X.
Always looking for new and interesting ways to waste money.
-
jwscab

- Approved Member
- Posts: 6580
- Joined: Wed Jan 28, 2009 9:42 am
- Location: Chalfont, PA
- Has thanked: 16 times
- Been thanked: 505 times
Re: Converting RC10 Graphite to RC10 Graphite Replica
McMaster Carr sells industrial quality tools. For a 4-40 tap, a 2 flute is best for aluminum and they are not terrible on price.
Use fingertip control for small taps...... Wd40 also works great for tapping aluminum.
Use fingertip control for small taps...... Wd40 also works great for tapping aluminum.
-
Frankentruck
- Super Member
- Posts: 3810
- Joined: Fri Feb 19, 2021 9:59 am
- Location: Texas, USA
- Has thanked: 2605 times
- Been thanked: 2980 times
Re: Converting RC10 Graphite to RC10 Graphite Replica
There are definitely better quality taps available, I just have been using what was locally available. Greenfield taps used to be a go to for durability.
But for now, my standoff need is filled! USPS came! Woohoo!
.
But for now, my standoff need is filled! USPS came! Woohoo!
.
Frankensteined RC10T3 / Franky Jr RC10GT-e (x2) / A+ stamp / Toy Story RC / Graphite replica / B1.5 BFG 5LTi / Clonewald / Hyper Hornet
"I love the effort, but it sure looks like you took the long way around to a tub again"
"I love the effort, but it sure looks like you took the long way around to a tub again"
-
juicedcoupe
- Super Member
- Posts: 3540
- Joined: Sun Aug 16, 2020 4:05 pm
- Location: Pascagoula, MS
- Has thanked: 269 times
- Been thanked: 2095 times
Re: Converting RC10 Graphite to RC10 Graphite Replica
I have some Greenfield impact/drill taps. Unfortunately, 6-32 is the smallest. They are nicer than my Dewalt and Milwaukee ones, but damn $$$.
Always looking for new and interesting ways to waste money.
-
Frankentruck
- Super Member
- Posts: 3810
- Joined: Fri Feb 19, 2021 9:59 am
- Location: Texas, USA
- Has thanked: 2605 times
- Been thanked: 2980 times
Re: Converting RC10 Graphite to RC10 Graphite Replica
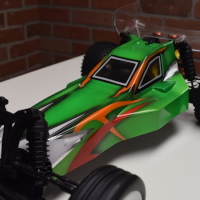
Upper deck is installed and I like how it turned out. Goodbye nose tubes, hello carbon fiber! I also put on some AE TQ tires in place of the Losi tires.
.
.
.
Frankensteined RC10T3 / Franky Jr RC10GT-e (x2) / A+ stamp / Toy Story RC / Graphite replica / B1.5 BFG 5LTi / Clonewald / Hyper Hornet
"I love the effort, but it sure looks like you took the long way around to a tub again"
"I love the effort, but it sure looks like you took the long way around to a tub again"
-
MarkyDents
- Approved Member
- Posts: 1187
- Joined: Sun Jan 10, 2021 11:52 am
- Location: Staten Island, N.Y.
- Has thanked: 1809 times
- Been thanked: 643 times
Re: Converting RC10 Graphite to RC10 Graphite Replica
Looks pretty menacing, nicely done
Who do you race for ?
Me……. I race for me.
That’s impossible, I was told you need a sponsor to race.
Hey Cru ! Go balls out
Me……. I race for me.
That’s impossible, I was told you need a sponsor to race.
Hey Cru ! Go balls out
-
Frankentruck
- Super Member
- Posts: 3810
- Joined: Fri Feb 19, 2021 9:59 am
- Location: Texas, USA
- Has thanked: 2605 times
- Been thanked: 2980 times
Re: Converting RC10 Graphite to RC10 Graphite Replica
An evil twin happened...
.
.
Frankensteined RC10T3 / Franky Jr RC10GT-e (x2) / A+ stamp / Toy Story RC / Graphite replica / B1.5 BFG 5LTi / Clonewald / Hyper Hornet
"I love the effort, but it sure looks like you took the long way around to a tub again"
"I love the effort, but it sure looks like you took the long way around to a tub again"
Create an account or sign in to join the discussion
You need to be a member in order to post a reply
Create an account
Not a member? register to join our community
Members can start their own topics & subscribe to topics
It’s free and only takes a minute
Sign in
-
- Similar Topics
- Replies
- Views
- Last post
-
- 2 Replies
- 2201 Views
-
Last post by scr8p
-
- 4 Replies
- 2616 Views
-
Last post by lexus-5
-
- 11 Replies
- 1722 Views
-
Last post by scr8p
-
- 8 Replies
- 3304 Views
-
Last post by Beau S
-
- 9 Replies
- 529 Views
-
Last post by Frankentruck
-
- 10 Replies
- 1664 Views
-
Last post by wlewis
-
- 4 Replies
- 956 Views
-
Last post by corkyjohnson75
-
- 2 Replies
- 1301 Views
-
Last post by skunk.werkz
Who is online
Users browsing this forum: ![]() DotNetDotCom.org [Bot] and 17 guests
DotNetDotCom.org [Bot] and 17 guests