SteveK's Classic build.

Everything pertaining to the RC10 buggy re-releases.
Classic, Classic Clear, World's, etc...

Moderators: scr8p, klavy69

SteveK
Approved Member
Posts: 748
Joined: Wed Aug 26, 2009 3:43 pm
Location: Syracuse, NY
Has thanked: 1 time
Been thanked: 2 times

SteveK's Classic build.

Post by SteveK »

Still need to build the shocks and install the electronics, and paint the body.

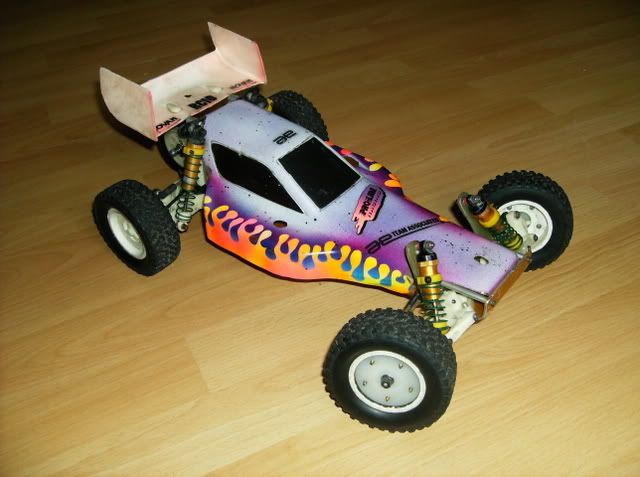
I might end up running this body:

Image

Image

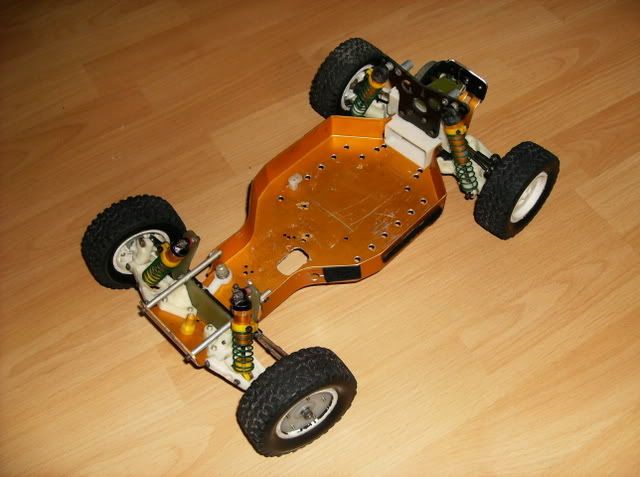
Ignore the mess on the workbench, I'll tidy if up eventually lol

(I'll resize the pictures tomorrow, I can't seem to do it with the Photobucket app.

User avatar
JK Racing
Super Member
Posts: 4603
Joined: Thu Jul 19, 2007 2:32 pm
Location: Placentia, CA
Has thanked: 103 times
Been thanked: 200 times

Re: SteveK's Classic build.

Post by JK Racing »

My workbench always looks like that.

Love that body on there...been thinking about doing a Pro 2 - Lite lately myself, you beat me to it.
--Joey --
Vintage A&L and Factory Works
Old School Racer & Vintage RC Car nut
JKRacingRC.com

SteveK
Approved Member
Posts: 748
Joined: Wed Aug 26, 2009 3:43 pm
Location: Syracuse, NY
Has thanked: 1 time
Been thanked: 2 times

Re: SteveK's Classic build.

Post by SteveK »

I'm trying to find a picture of the real truck that body is based on, I know I have one at home in iPhoto. It is an old Class 1 desert truck from the mid 1980's.

TheSpeedway
Approved Member
Posts: 188
Joined: Sat Feb 23, 2013 10:50 am
Location: Colorado Springs, Colorado

Re: SteveK's Classic build.

Post by TheSpeedway »

Are you sure about it being Class 1. Typically that was a Buggy class until Ivan Stewart smoked everyone in the Toyota Truck and they moved him to Class 1 out of the Truck class that he had been in.

Interested in what you find out.

SteveK
Approved Member
Posts: 748
Joined: Wed Aug 26, 2009 3:43 pm
Location: Syracuse, NY
Has thanked: 1 time
Been thanked: 2 times

Re: SteveK's Classic build.

Post by SteveK »

Image

Image

Image

From what I can tell, that is the famous Class 1 truck, just very early on in it's life. You can see it in this 1989 race with the big flared fenders, though they trimmed those down pretty quickly to the more streamlined look that everyone knows later on that year (probably for aerodynamics; as speeds increased, desert guys were experiencing the 'parachuting' that RC short course trucks have now). The Ford body is called the '88 California Ford, so 1988-89 sounds about right for this too.

I have seen a catalog picture of the Ford mounted on a car with buggy wheels and tires, but only the Toyota mounted on a truck conversion. I know Team Blue Groove bodies are a little smaller than the originals, but these looks like it will fit everything OK.

TheSpeedway
Approved Member
Posts: 188
Joined: Sat Feb 23, 2013 10:50 am
Location: Colorado Springs, Colorado

Re: SteveK's Classic build.

Post by TheSpeedway »

I like it!

SnoopMaxx
Approved Member
Posts: 699
Joined: Sat Mar 06, 2010 3:38 pm
Location: Vraa Denmark
Been thanked: 1 time

Re: SteveK's Classic build.

Post by SnoopMaxx »

That is soo cool Steve :shock:

I actually used these 1,9" Tamiya wheels & tyres on my CE a few years ago, and the tyres look exactly like the ones on Ivan Stewards Class 1
Image

Image
Morten Max

SteveK
Approved Member
Posts: 748
Joined: Wed Aug 26, 2009 3:43 pm
Location: Syracuse, NY
Has thanked: 1 time
Been thanked: 2 times

Re: SteveK's Classic build.

Post by SteveK »

How did you mount the fronts? The rears are easy with the HPI hub adapters, but I can't figure out a way to get the fronts on without drilling out a set of 12mm wheels, which I am too OCD to do on my own.

I am planning to use a set of Tamiya Brat tires in the future, with Tamiya wheels on CRP adapters or just mounting them on stock wheels.

SteveK
Approved Member
Posts: 748
Joined: Wed Aug 26, 2009 3:43 pm
Location: Syracuse, NY
Has thanked: 1 time
Been thanked: 2 times

Re: SteveK's Classic build.

Post by SteveK »

Regarding the rear suspension:

Here is the rear suspension at full droop, hanging under it's own weight:
Image

You can see where the dogbone rubs on the rear suspension arm:
Image
You can see a dark spot where the dogbone touches the arm.

The screw is in the hole recommended in the manual, and these shocks are built with the two .031" spacers as called for:
Image

These shocks are from an RC10 CE and were built with three .125" spacers inside them:
Image
It looks like they should be fine for the outer hole in the rear arm, but for the second hole the shocks will need another .062" limiter at least.

The manual is clearly wrong when it comes to the number of spacers required inside the rear shocks, which trickled down to the packaging department because only those two thin spacers were included in the kit. If this was intentional, as some Associated reps have apparently said, then I would love to hear their reasoning behind it.

If you don't have many spacers in your spare parts boxes, this RJ Speed spacer set is probably the best option:
http://www3.towerhobbies.com/cgi-bin/wti0001p?&I=LXWBR5&P=7

SnoopMaxx
Approved Member
Posts: 699
Joined: Sat Mar 06, 2010 3:38 pm
Location: Vraa Denmark
Been thanked: 1 time

Re: SteveK's Classic build.

Post by SnoopMaxx »

SteveK wrote:How did you mount the fronts? The rears are easy with the HPI hub adapters, but I can't figure out a way to get the fronts on without drilling out a set of 12mm wheels, which I am too OCD to do on my own.

I am planning to use a set of Tamiya Brat tires in the future, with Tamiya wheels on CRP adapters or just mounting them on stock wheels.
Front
I used a set of OZ wheels and just made a new center section with a 8mm hole for the flanged bearings
(Photo for reference only)
Image

And I used a 12mm hex head Toyota bolt for the rear hub :lol:
Morten Max

SteveK
Approved Member
Posts: 748
Joined: Wed Aug 26, 2009 3:43 pm
Location: Syracuse, NY
Has thanked: 1 time
Been thanked: 2 times

Re: SteveK's Classic build.

Post by SteveK »

I can't seem to get the stock body to fit quite right. It looks like the chassis is wider than the inside of the body, and it has to be pressed down over it to sit flat. Made a bit of a hack job cutting up the front end to try and sit right, so I won't be putting any effort or using the kit decals on this one, I'll save them for the JComcepts body, or another stock body now that I have some idea of how it is supposed to go.

SnoopMaxx
Approved Member
Posts: 699
Joined: Sat Mar 06, 2010 3:38 pm
Location: Vraa Denmark
Been thanked: 1 time

Re: SteveK's Classic build.

Post by SnoopMaxx »

SteveK wrote:I can't seem to get the stock body to fit quite right. It looks like the chassis is wider than the inside of the body, and it has to be pressed down over it to sit flat. Made a bit of a hack job cutting up the front end to try and sit right, so I won't be putting any effort or using the kit decals on this one, I'll save them for the JComcepts body, or another stock body now that I have some idea of how it is supposed to go.
I noticed the exact same thing today :cry:
I ever tried an extra body an it's the same issue :evil:
Morten Max

SteveK
Approved Member
Posts: 748
Joined: Wed Aug 26, 2009 3:43 pm
Location: Syracuse, NY
Has thanked: 1 time
Been thanked: 2 times

Re: SteveK's Classic build.

Post by SteveK »

I've never had a Protech body before, so I don't know how it is supposed to fit.

User avatar
JK Racing
Super Member
Posts: 4603
Joined: Thu Jul 19, 2007 2:32 pm
Location: Placentia, CA
Has thanked: 103 times
Been thanked: 200 times

Re: SteveK's Classic build.

Post by JK Racing »

my body seems to fit just fine.

Image
--Joey --
Vintage A&L and Factory Works
Old School Racer & Vintage RC Car nut
JKRacingRC.com

SteveK
Approved Member
Posts: 748
Joined: Wed Aug 26, 2009 3:43 pm
Location: Syracuse, NY
Has thanked: 1 time
Been thanked: 2 times

Re: SteveK's Classic build.

Post by SteveK »

I picked up a new Protech body on eBay ($12 w/free shipping), so I'll give that one a try. This time I'll get it cut and centered on the chassis first, then drill for the body posts and wing tubes. Mounting bodies is by far my least favorite part of this hobby.

I have a set of Team CRP truck body mounts coming tomorrow, so I'll use the kit body for an inner body to keep the chassis clean. I need to chop off the front and rear portions of the body to clear the mounts, so I'll just use Velcro or something to keep it in place.

Post Reply

Create an account or sign in to join the discussion

You need to be a member in order to post a reply

Create an account

Not a member? register to join our community
Members can start their own topics & subscribe to topics
It’s free and only takes a minute

Register

Sign in

  • Similar Topics
    Replies
    Views
    Last post

Return to “RC10 Buggy Re-Release Forum”

Who is online

Users browsing this forum: No registered users and 1 guest