The new wheels arrived tonight and they are...horrible! Seriously, they're so hard I can break the back end loose at any time. I did a couple of laps around the parking garage and the only positive things I can say about them - the motor finally warmed up and they were really cheap. The concrete is a little gritty, but the OEM Prolines were much better. It's still a BLAST as a drift car, but that's not really the idea of the build. I'll be ordering something else very soon...
I like the idea of a foam bumper filler. Right now, the bumper sits about 3/4" behind the front lip of the body and I've always wondered if there was a better way to close that gap. Once I decide on a new body, I may fill that gap with something - regardless of the fit.
RC10DS Rebuild
-
LoboNYC

- Approved Member
- Posts: 786
- Joined: Tue Apr 09, 2013 12:26 pm
- Location: Staten Island, NYC
- Has thanked: 870 times
- Been thanked: 356 times
Re: Replacement tires / tires&wheels for RC10DS
Maybe try these tiresjwinker wrote:The new wheels arrived tonight and they are...horrible! Seriously, they're so hard I can break the back end loose at any time. I did a couple of laps around the parking garage and the only positive things I can say about them - the motor finally warmed up and they were really cheap. The concrete is a little gritty, but the OEM Prolines were much better. It's still a BLAST as a drift car, but that's not really the idea of the build. I'll be ordering something else very soon...
I like the idea of a foam bumper filler. Right now, the bumper sits about 3/4" behind the front lip of the body and I've always wondered if there was a better way to close that gap. Once I decide on a new body, I may fill that gap with something - regardless of the fit.

I have them on my red mustang DS and they do well on the parking lot.
I use the vintage tires on my yellow mustang and those handle pretty good as well.

-
LoboNYC
- Approved Member
- Posts: 786
- Joined: Tue Apr 09, 2013 12:26 pm
- Location: Staten Island, NYC
- Has thanked: 870 times
- Been thanked: 356 times
Re: Replacement tires / tires&wheels for RC10DS
Sorry about that, apparently linking to tower hobbies pic did not work...so here are two pic samples of the HPI rally tires


Here are two samples of the HPI vintage tires


I used to run these on my NTC3 but i havent tried them on the DS yet...only mounted them on the lamborghini

Here are two samples of the HPI vintage tires
I used to run these on my NTC3 but i havent tried them on the DS yet...only mounted them on the lamborghini
Re: RC10DS Rebuild
I like those HPI Rally tires. That might be a winner.
Ordered a new body on Friday. I've gone back & forth on this a couple of times. It seemed like everything I picked previously was either a truck body, a pan car body, or really complicated. I finally decided to go back to simple & chose a Abarth 1000tc. Since the Fiat 500 was originally such a small car, it's like having a 1/4 scale car on a 1/10 chassis!!!

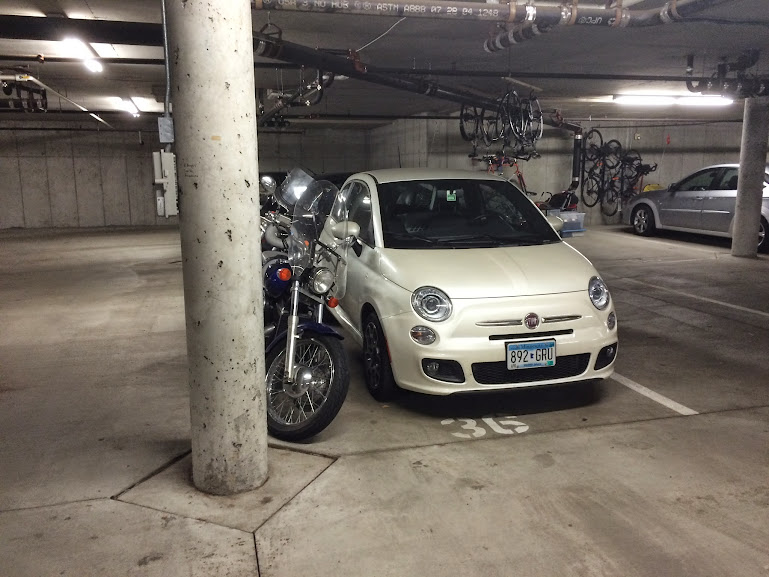
Here's my "other" Fiat 500.
And here are some pics of *real* Abarth 1000tc race cars in action. Fun fact - the engine hatch (rear) was intentionally propped open to keep the engine from overheating.

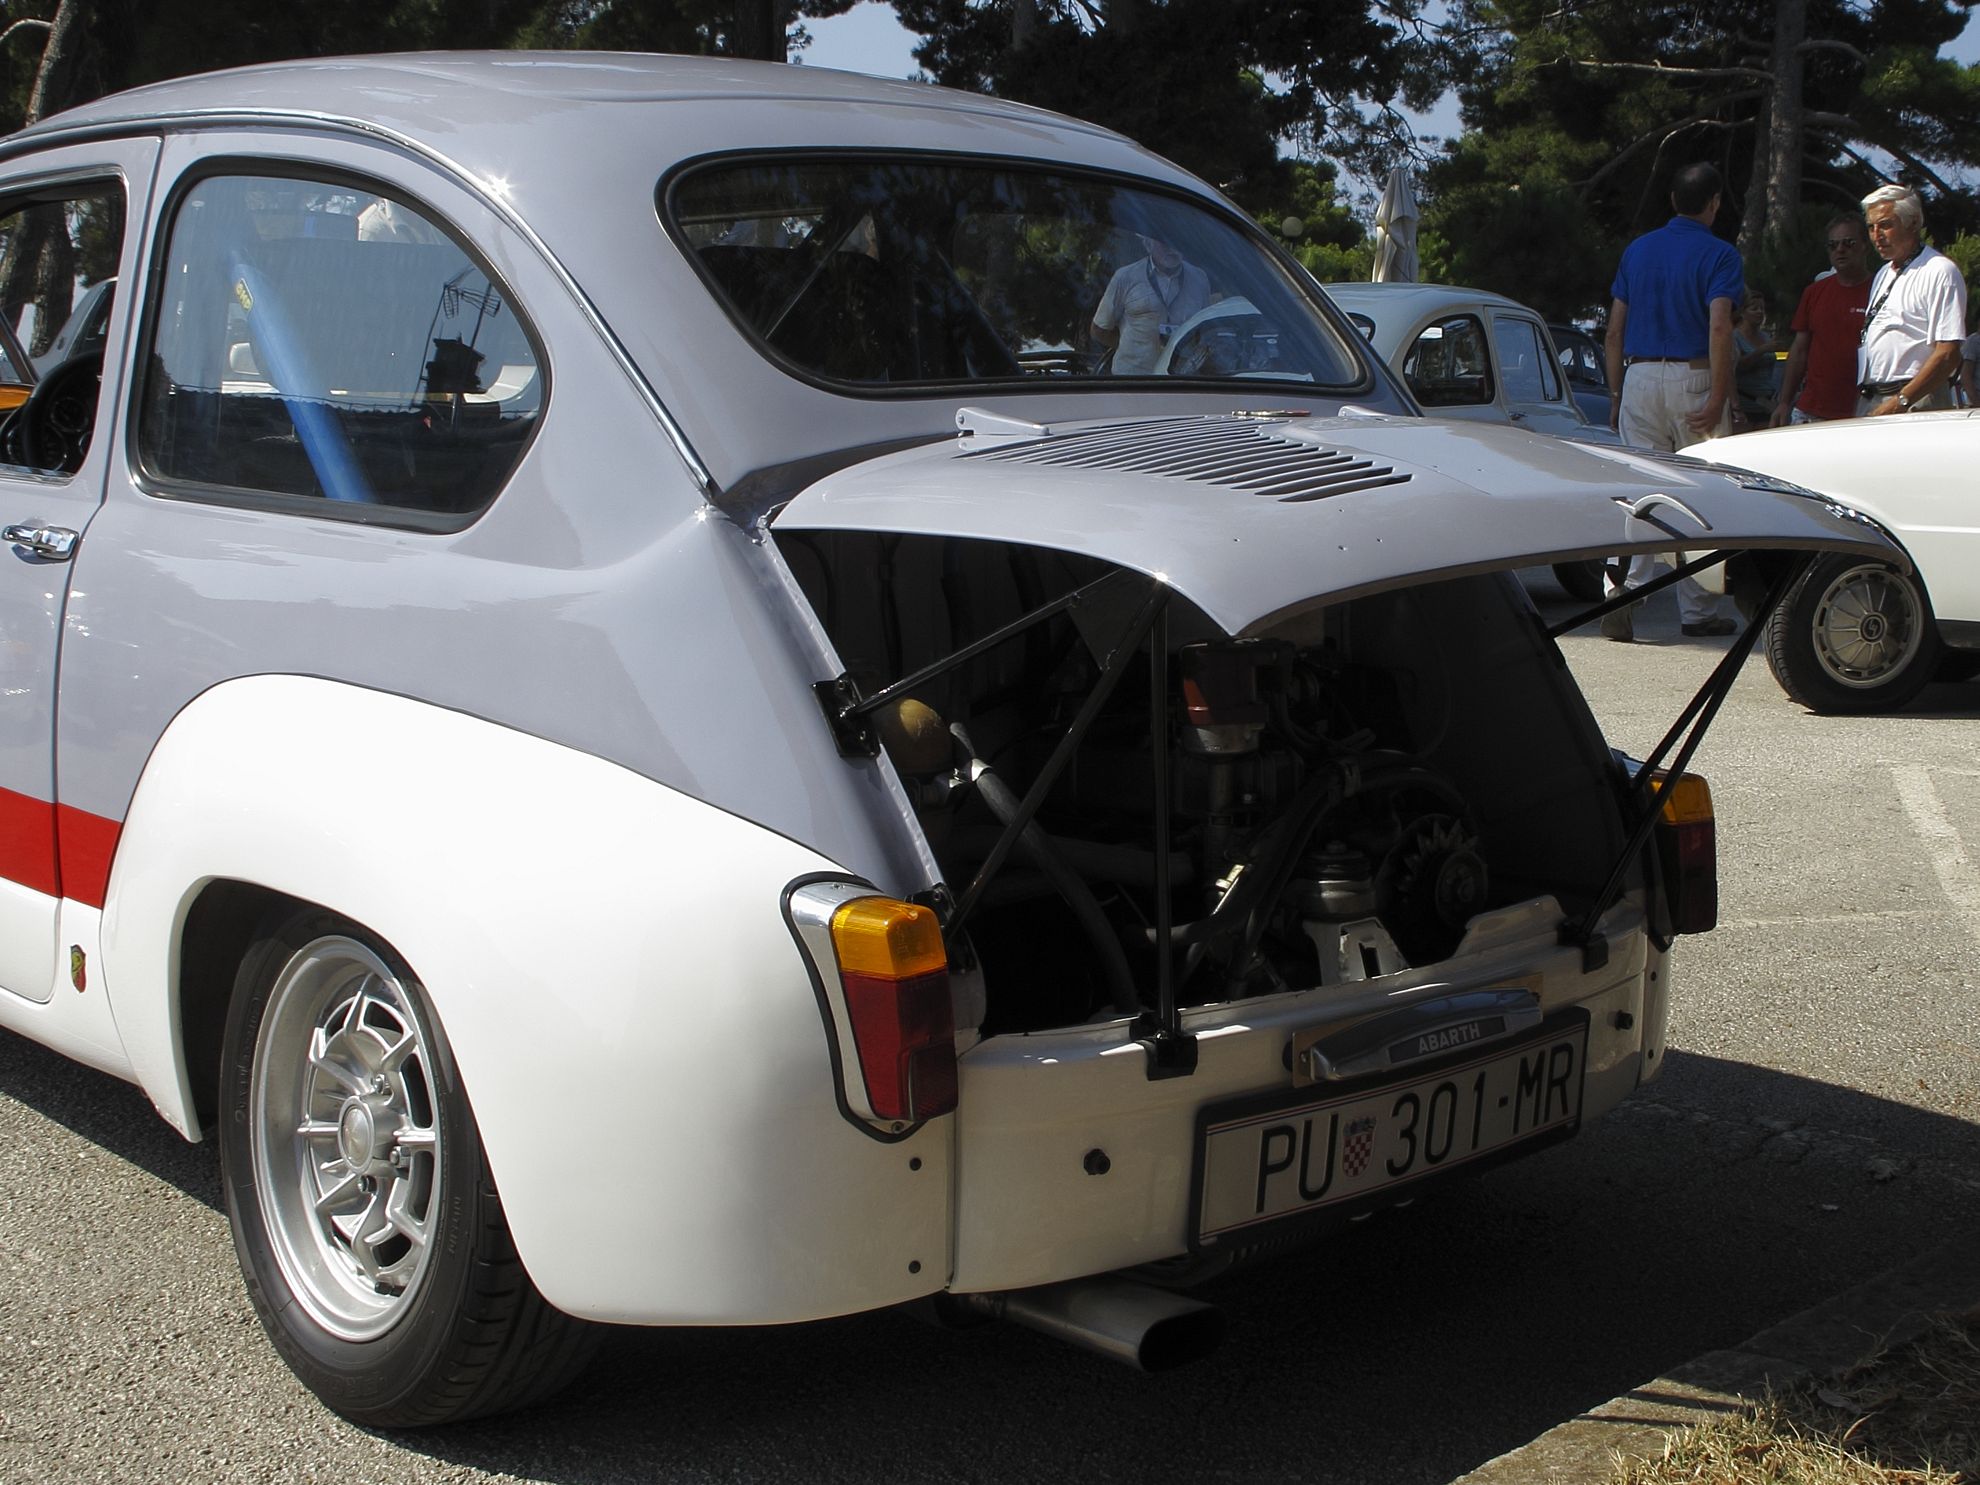

I have always loved the bright colors and wild schemes on the Fiat/Abarth cars. I don't think I'll get as crazy as #442 there, but I am going to do a checkered roof & three-tone like the middle car.
Ordered a new body on Friday. I've gone back & forth on this a couple of times. It seemed like everything I picked previously was either a truck body, a pan car body, or really complicated. I finally decided to go back to simple & chose a Abarth 1000tc. Since the Fiat 500 was originally such a small car, it's like having a 1/4 scale car on a 1/10 chassis!!!
Here's my "other" Fiat 500.
And here are some pics of *real* Abarth 1000tc race cars in action. Fun fact - the engine hatch (rear) was intentionally propped open to keep the engine from overheating.
I have always loved the bright colors and wild schemes on the Fiat/Abarth cars. I don't think I'll get as crazy as #442 there, but I am going to do a checkered roof & three-tone like the middle car.
Re: RC10DS Rebuild
Ok, this gets better...
Notice in the 4th picture the hood is braced open? This was an Abarth trademark. The larger engine would overheat if the lid were closed, so they just...left it open! Turns out, this also made the little car slightly faster in the bends!
Well....I kinda have the same problem with clearance. So, naturally, I have to implement the same solution! My trunk deck hits the top of the motor, so I'm just going to cut around it and brace it open!
I haven't started painting yet, but I have been planning. I think I'm going to set aside some time this weekend to do some of the fine detail work like the chrome trim, lights, rubber gaskets around the windows, and the vents in the rear deck. I'm still considering waiting for next pay period & buying an airbrush kit for the main body.
No new pictures yet, but I just ordered a new SD card for my DSLR so I should have something this weekend.
-
romulus22

- Approved Member
- Posts: 2549
- Joined: Wed May 19, 2010 7:30 pm
- Location: KY
- Has thanked: 900 times
- Been thanked: 789 times
Re: RC10DS Rebuild
If you take your time trimming it out it should look pretty realistic. Look forward to seeing how it turns out. I've always liked the look of those old Abarths race cars. I like a lot of the European race cars of that period.
Re: RC10DS Rebuild
I am surprised there aren't more of them available! Actually, I should re-prhrase!
I am surprised there aren't more *ACCURATE* models available. I found a lot of mid-60's "Mustang" "Camaro" or "Muscle Car" bodies, but very little specifics for 200mm Touring Cars. I know it would be a limited market to a niche clients, but where is the 1/10 Jag XKE body with wire wheels? Or an old Porsche Speedster? Or a '50's Stock Car?
I was a little discouraged by what I found. I'm currently riding the bridge between buying a Traxxas Stampede (which seems to have 10000 bodies available) and starting a hyper-accurate polycarbonate 1/10 plastic molding company.
Re: RC10DS Rebuild
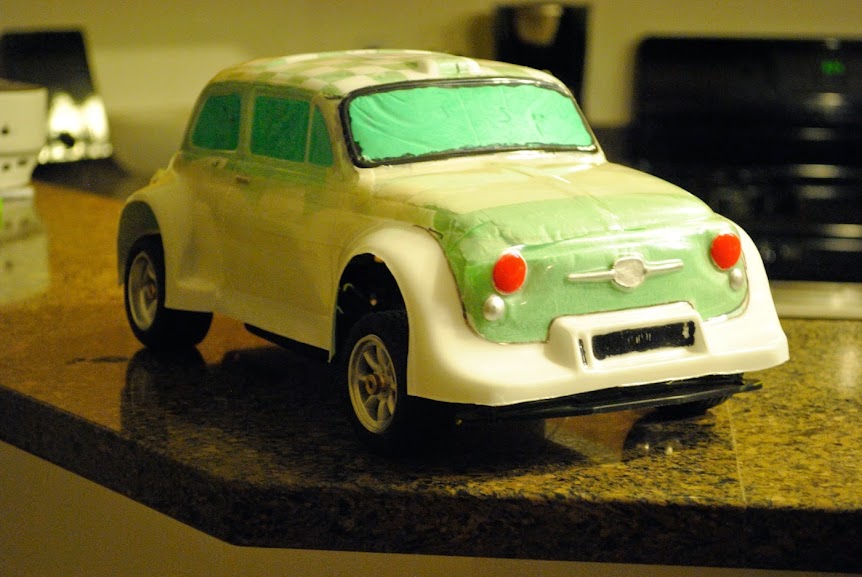
So, not much has happened with the holidays interrupting. I have started painting the Fiat body, but I'm focused on the trim while deciding what to do with the body. I have collected some additional parts, though! I have a set of HPI 8-spoke rims & vintage racing tires AND a set of foam 26mm racing wheels. Pictures pending...
Re: RC10DS Rebuild
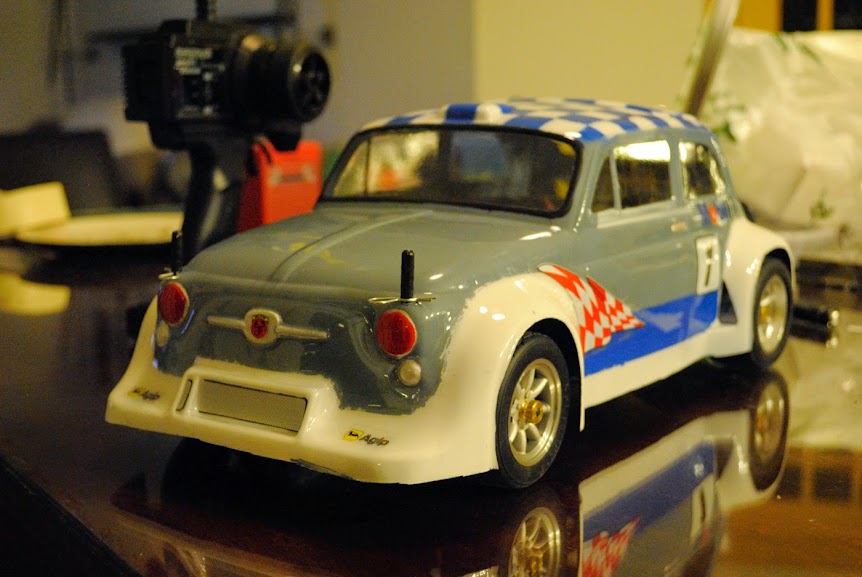
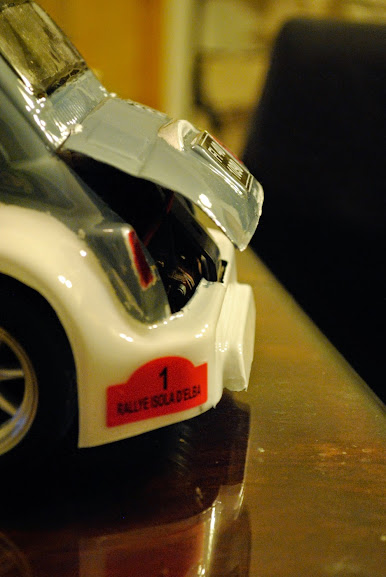
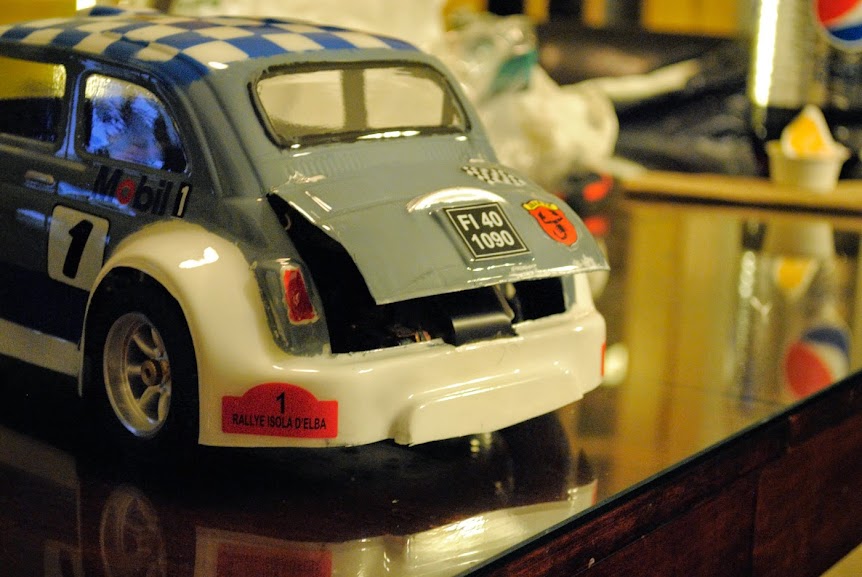
Well...after hours and hours taping and prepping the body - then botching the checkerboard roof very badly almost immediately - I decided to go back to the purpose of this car. I'm building a parking garage toy, not a shelf queen. So, I peeled back the excessive tape, painted it with Rust-Oleum grey and slapped on some stickers to cover up the bigger painting mistakes. I might do another Fiat 500 with more detail sometime later, but this car has work to do. I still have to do something with the rear body mounts, but I haven't decided what I'm going to do yet.
I'm 80% satisfied with the finished product. I realize I need an airbrush kit to do what I really want to do, but I just don't have the motivation to drop $250 on a new kit. I'm watching CL for something to come up, but so far it's pretty empty. Hopefully after the holidays...
Onto the pictures!!! Here it is prepped for paint, body isn't drilled so it sits up very high.
I found these nice brass knurled nuts for the wheels. Probably the BEST $2 I spent on this entire project. Don't worry about the tire bead...I hadn't glued them when I took this picture.

And here's the finished body.
Here's the left-open rear deck.
I'm 80% satisfied with the finished product. I realize I need an airbrush kit to do what I really want to do, but I just don't have the motivation to drop $250 on a new kit. I'm watching CL for something to come up, but so far it's pretty empty. Hopefully after the holidays...
Onto the pictures!!! Here it is prepped for paint, body isn't drilled so it sits up very high.
I found these nice brass knurled nuts for the wheels. Probably the BEST $2 I spent on this entire project. Don't worry about the tire bead...I hadn't glued them when I took this picture.
And here's the finished body.
Here's the left-open rear deck.
-
PlastiZapCA+

- Approved Member
- Posts: 746
- Joined: Mon Jun 11, 2012 1:41 am
- Location: Watauga,TX
Re: RC10DS Rebuild
Car looks good to me! You can get a Badger 150 for under $99.00 that will do most any job including fine scale work. The 150 is a very well rounded airbrush. If you plan on doing super fine scale work or lots of freehand then you want to step up to an Iwata HP-CS or beyond.
-
Coelacanth

- Approved Member
- Posts: 7421
- Joined: Thu Jul 29, 2010 6:20 pm
- Location: Alberta, Canada
- Has thanked: 16 times
- Been thanked: 325 times
Re: RC10DS Rebuild
I think most of your painting problems could've been avoided by using liquid mask instead of tape. Paint is much less likely to bleed under liquid mask than tape of any kind. If you absolutely have to mask with tape, the best I've used thus far is the yellow Tamiya masking tape. Liquid mask is also easier to use for complex paint schemes involving lots of curves, because you only have to very lightly score the mask with a fresh X-Acto knife blade.
Completed projects: CYANide Onroad Optima | Zebra Gold Optima | Barney Optima | OptiMutt RWD Mid
Gallery - Coel's Stalls: Marui Galaxy & Shogun Resto-Mods | FrankenBuff AYK Buffalo | 1987 Buick GNX RC12L3
Gallery - Coel's Stalls: Marui Galaxy & Shogun Resto-Mods | FrankenBuff AYK Buffalo | 1987 Buick GNX RC12L3
-
LoboNYC
- Approved Member
- Posts: 786
- Joined: Tue Apr 09, 2013 12:26 pm
- Location: Staten Island, NYC
- Has thanked: 870 times
- Been thanked: 356 times
Re: RC10DS Rebuild
I normally use Scotch's blue painter tape for my lines. and my lines tend to be spot on with no bleed.
The secret to no paint bleed is in the application of the first few layers of paint.
Spray a light thin coat (almost non visible) and let dry.
Repeat several times with the all important drying time so the layer of paint builds up and creates a barrier preventing paint bleed.
Yes its tedious but the end result is worth it.
check out the sharp lines


The bronco has painted side lines...sharp just like a decal

Be patient and build up those all important first layers.
Adeendum:
I forgot to mention...im old school so i use rattle cans and painters tape.
The secret to no paint bleed is in the application of the first few layers of paint.
Spray a light thin coat (almost non visible) and let dry.
Repeat several times with the all important drying time so the layer of paint builds up and creates a barrier preventing paint bleed.
Yes its tedious but the end result is worth it.
check out the sharp lines
The bronco has painted side lines...sharp just like a decal
Be patient and build up those all important first layers.
Adeendum:
I forgot to mention...im old school so i use rattle cans and painters tape.
Re: RC10DS Rebuild
I was using painter's tape & spray, Lobo. I was using green instead of blue for most of it, but same idea. Old school is the new school, or something like that!
What I forgot to use was a spudger on the edges of the checkerboard roof. I didn't press down the edges after peeling off the tape from the white spaces. I realized it about 2 seconds into the first coat of white when I saw a little flutter of tape from one of the corners. Too late... I tried to clean it off with some model paint thinner, but that just made things worse. At that point, I admitted defeat and just sprayed to get it complete.
I like the concept I had in mind and it's the first paint I've done in nearly 15 years. I learned a couple of important factors while putting it together and I might do another body just to see what I can do.
I think he most important lesson I learned is that Rust-Oleum 2x paint sprays on just as nice as the Tamiya paints at ~1/2 the price and 1000 different colors, including a really nice chrome & gold paint I'm really curious to try.
I also have to figure out something with the rear body posts. The standard DS posts are just inside the rear window. Even if they were longer, I don't like where they land. Still working on that problem & I'll get that figured out before I buy a 3rd body.
-
SFC K

- Approved Member
- Posts: 1336
- Joined: Tue Nov 30, 2010 9:24 pm
- Location: Oakdale, MN
- Has thanked: 47 times
- Been thanked: 9 times
Re: RC10DS Rebuild
That paint you used is not designed for Lexan polycarbonate bodies. Your first crash into something will start to cause the paint to flake off. You might get a second chance at painting that body...
Jeff
Create an account or sign in to join the discussion
You need to be a member in order to post a reply
Create an account
Not a member? register to join our community
Members can start their own topics & subscribe to topics
It’s free and only takes a minute
Sign in
-
- Similar Topics
- Replies
- Views
- Last post
-
- 17 Replies
- 2616 Views
-
Last post by Frankentruck
-
- 4 Replies
- 1130 Views
-
Last post by rctenracer
-
- 13 Replies
- 2841 Views
-
Last post by Maxell27
-
- 2 Replies
- 1312 Views
-
Last post by ZED32
-
- 12 Replies
- 2628 Views
-
Last post by LoboNYC
-
- 3 Replies
- 1594 Views
-
Last post by rc10DS fan
-
- 13 Replies
- 1942 Views
-
Last post by markt311
-
- 1 Replies
- 1166 Views
-
Last post by morrisey0
Who is online
Users browsing this forum: No registered users and 2 guests